Pages

Showing posts with label tools. Show all posts

Sunday, December 29, 2013

Calipers Continued

On an earlier post (Bronze Sand Casting) I started construction of a set of calipers.  It has since been an on-again-off-again project.  It stays in my bag in the event I have a project night to go to and I don't know what project to bring.  

In this stage of the projects evolution I simply cleaned up the cast pieces, smoothed out some edges and began the joinery.  

I drilled a hole in each piece slightly smaller than the brass rod I intended to use as a rivet.  I like to drill small and file to size.  I was afraid of drilling to the needed size only to find that the drill drifted and the piece would be off balance.

I kept filing and fitting until the two piece aligned correctly and would move easily on the intended rivet.


I cut the rod to length to use as a rivet and filed both ends smooth. 


To work as a washer between the moving pieces I used a piece of deer skin parchment.  I cut a small piece and cut the hole to snugly fit on the rivet.  This washer will allow for better mobility of the pieces once peened together.


I really hate peening rivets.  It always makes me nervous.  I slowly worked around the edge of the rivet trying not to make the joint too snug, but at the same time I wanted it snug enough that it would hold it's position when in use as a measuring device.


That's it for now.  You can see that I have left the finish a little rough.  This piece was not intended to be a piece of artwork.  It is intended to be a tool with practical uses in the hands of a craftsman.  Like many period pieces it will remain unfinished and unpolished.  I do intend to mount steel points to the end rather than simply sharpening the bronze ends.  That will come later...


I eventually took a small bit of tool steel and fashioned a tip which would be more durable than the bronze divider.  I created a lap joint and riveted the steel tips on.


Converted Modern Axes

When it comes to wood working the ax is my all time favorite tool.  With a good sharp ax you can carve away wood in a constructive and creative manner faster than any other tool.  So when I decided to put together a period looking wood working kit I needed to make an ax that would pass muster.  I haven't gotten around to blacksmithing and ax yet, so in the mean time I decided to take a modern $5 ax and convert it into a medieval looking ax for day to day use.

Here's how.

I started with this modern axe.  I probably should have looked for one with a slightly larger head that WASN'T painted black.  Next time...


I removed the handle.


I took the head to the wire wheel on my bench grinder and removed most of the paint.
I then used the angle grinder you see here with a cut-off wheel.  I ended up using about 50% of the wheel so that should factor into the cost of the ax.  I get my angle grinder wheels from Harbor Frieght rather cheaply so the $5 ax may have cost about $6 when you account for the raw materials used.


I used the cutting wheel to get close to the shape you see above.  I then spent about 30 minutes on the bench grinder rounding out and cleaning up the face.

I took the previously ugly and modern looking handle and shortened it a bit.  I also removed some of the shape to it and made it a bit more comfortable for my needs.


I use this axe for cutting, carving and shaping so a short handle works very well.


Very happy with the finished ax.  I keep it ground to a very sharp bevel.  I wouldn't ever use it to cut a tree down or do serious hewing, but it is great for smoothing and carving.  It is light enough and balanced enough that I can carve very nicely with it as you see here.  I might polish it up more later, but I was eager to get it to use.


At the local Kane County Flea Market I found a couple really nice looking "vintage" axes.  These were each $5 as well.  One came with a handle and one did not.  Well, it actually did have a piece of wood on it that the seller called a handle but I pulled it off and threw it away before I left.  I was basically buying two ax heads for $10.


Both axe heads were vintage hewing axes.  Both had a heavy poll which had bee slightly rounded from use.  The poll allows you to strike the axe with another tool to help drive it through the log.  I planned on grinding down the rough edge.  I don't mind the rusted and aged patina on the axes, but I want to grind down any sharp edges or dings in the blade.


I chose a couple chunks of oak from the firewood pile that I would use for the handles.  I planned on making one axe left handed and one right handed.  A hewing axe has an edge ground on only one side so that it will cut the surface of the wood smoothly without biting in too deep.  Since I am right handed I took the better of the two heads and planned on making that into my right handed axe.


Here is the small handle roughed out.  I used my carving ax at the beginning of the blog for most of the roughing out work.  I finished up the handles with some draw knives and scrapers.


The picture you see here is my "right handed" axe.  If you are astute you will notice that I have mounted the head backwards.  Doh!  I was able to easily remove the head, cut a new wedge and remount it correctly.  I didn't take another picture, but the finished ax is reversed.  The flat side should be on the left side of the face as you look down the axe from the rear (poll) side.  That way when the axe swung with the right hand it will smooth the material


Same procedure for the left handed axe.  I made this handle a little longer as I am not left handed I probably won't use it much anyway.  I have sharpened both axes up quite a bit since these photos were taken.  I have used the right handed axe already, and it works like a dream.  I can't quite get the hang of hewing with my left hand so I suppose I'll bring that for demos in case a visitor who is left handed want to try it.  I is likely to collect a little dust in my shop.


Carpenter's Rule

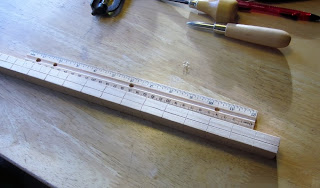
I am in the progress of building out a medieval woodworking tool box.  I thought that one of the first tools a woodworker would need would be a ruler.  I cut a piece of Aspen and began to mark out the "inches" on it.  Before marking it I did some research to find out the standard measure.  I found that most wood workers would use the width of their thumb as the unit standard.  As long as the measure was consistently used it really didn't matter if I called it 10 thumbs and you called it 14.  I took a set of calipers to measure the width of my thumb and darn it if my thumb isn't exactly one inch wide.  

While it looks like my rule is marked with modern inches, it is in fact marked with increments the width of my own thumb.... which just so happen to be one inch wide.


I was happy with the progress so far, and then I failed.  I tried using some of my old black walnut stain and it didn't take very well to the wood I was using.  The rule became a dirty looking piece of wood which was now hard to read.

I will have to try and make another one at some point in the future because I don't like the look of this one.  Way too dark for my liking.  I have tried to use it on other projects and found the markings very tough to read.  It will have to serve for demos, until I make another one.


Woodworking Mallet

This project began back when I rummaged through the firewood pile at Pennsic earlier this year.   See post (Goldenrod, Black Walnut & Pennsic) for the early steps.

I thought I took pictures along the way, but I must have misplaced one of my memory stick where I collected my photos.  All I can find is the finished product.

The head is made from a chunk of oak from the Pennsic firewood pile.  The handle was cut and shaped from a branch from a tree cut down a couple years ago.  I believe the tree was ash, but as it was dry, without bark and no leaves I can't tell for sure.  The wood is very light, but very dense.

I split the log and used a hewing ax to cut the handle along the grain.  I then used some hand chisels to cut the whole for the handle.  In hind sight (and on my next version) I will likely drill the hole first, or get some better mortising chisels.  My flat chisels were slow going getting the hole cut.

One other lesson learned.  I cut the wedge too long.  When I was pounding it into place I was a bit over zealous and started a split along the handle.  It is still functional, but the small crack is a weak point that will fail some day.  Before that happens it just annoys me every time I look at the new tool.


I applied a light coat of oil and wax once complete.  I read on one site that it is recommended to soak a mallet to add weight keep the wood from cracking.  I haven't done that to this mallet.  I had already applied a coat of oil and wax before I read that.  I may add a few more coats of oil, but it has a good amount of heft to it already so I'm not sure it needs more weight anyway.

Here is my new mallet with his new best friend, the carving ax.  I'll post another blog entry on how I made that.  The combination of these two are my favorite tools in my garage now.


Pear Tree Stool

So, i'ts been a long time since I've posted to my blog.  That isn't to say that I haven't been busy.  In fact I have been VERY busy.  My total obsession with finishing my greenwork shirt accompanied by a computer with a bad USB port connection... well I've only just been able to download all my pictures from my camera.

This project was first started back in September and finished at the end of October.  See blog entry (Goldenrod, Black Walnut & Pennsic Projects) for pictures of the beginning stages of the top of this stool.

To finish the project I wanted to complete it without the use of power tools and so I needed acquire a hand auger to drill the holes for the legs.  The following picture is one of two augers I purchased at the Kane County Flea Market.  Each auger cost $5 and needed a bit of work.


I started by removing the handle which required me to do some cutting to get the rusted nut off.  Looks like the nut rusted on and the previous owner decided to just paint over it.


After removing the bit from the handle I proceeded to remove the rust and the paint using a wire wheel attachment on my angle grinder.  I then took some small metal pin files and cleaned up all the cutting surfaces.  I honed the cutting tip with a small Arkansas wet stone.


All cleaned up and ready to go!


I took a cabinet scraper to the handle and tried to get off the grunge and the white painted initials.  I planned on using this tool and also bringing it along for demo purposes in the future.  White paint on the handle had to go.

After the handle was reattached it cut like a dream.


A little blow out on the bottom of the stool, but that didn't matter to me much.  I placed a board underneath to help prevent the blowout.  Unlike modern drills which cut with a high speed bit, these hand augers rely on the small screw tip.  That screw tip helps guide the cutting edge and also pull the drill through the material.  Without a backer board the small screw would pierce through and stop pulling the rest of the bit.

This was my first attempt using an auger of this size.  It was stiff to turn, but didn't take long to get used to.  The hardest part was keeping the angle correct and I tried to press down and twist. I loved the sound of the cutting and the look of the big chips that were removed.


As I don't yet have a lathe to use I simply used a draw knife to round out few of the branches from the pear tree.  The branches were removed at the same time the tree was felled.  They had been in my garage almost a year drying out.  I cut the legs on a slight angle so that they would slide in easily and yet firm up in place once driven in with a mallet.


Once the legs were all inserted and then cut to length I trimmed the excess off the top using a standard hand saw.  It scratched the surface of the bench a little, but I didn't feel quite right using my Japanese flush cut saw on a Circa 1200 project.


As you can see there are some rough edges on the bottom of the stool.  It is good and solid.  I thought that the rough finish offered character to the stool while making it look period.  Even as a wood worker from the year 1200 I don't know if I would spend a lot of time cleaning up and making my stool pretty.  It is functional and VERY sturdy.  That is really all I needed.


The angles of the auger holes were not drilled entirely correctly.  Honestly I was in a bit of a rush to try out my new tool.  The resulting stool is functional, it just looks a little off kilter as the legs aren't directly pointing to the center of the stool.  Some day I'll make another and take more time, but for now this serves my purpose for local events and demos.