Pages

Thursday, May 30, 2013

Leather Canteen

Yet another project that stemmed from my need to create a full and complete kit for a medieval friar.  I expect to be walking around all day, every day in wool robes on days in direct sun when it has a great chance of being over 90 degrees each day.... What will I need?  Water!

I did a little digging around to see what sort of devices one might use to carry water and I found two options.  
1) Leather Canteen.
2) Leather Costrel.

After discussing the matter with one of my judges at the recent A&S competition he directed me towards the easier of the two options... the canteen.  He indicated that even with his many many years of experience he had issues creating a costrel which didn't leak.  I understand the concept and the approach but I am constrained by time and don't want to risk spending weeks on a project only to find that it leaks.  I decided that I would make a leather canteen with no embellishments.  

I understand that there are two theories for creating a canteen.   
Option 1:  Stitch two pieces of leather together and jam them full of sand or some other medium while the leather is wet.  
Option 2:  Create a form which to stretch the leather over and then stitch the two pieces together.

Both have their arguments, pros and cons.  I opted for the easier of the two.  Actually I wanted to cut and sew leather and didn't have an interest in carving a form at this point.  I will, some day create a version using the forms and even a 3 part costrel, but not this year and not for Pennsic.


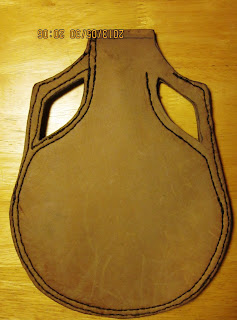
After sketching out a roundish option, I cut the 7/8 ounce vegetable tanned leather and began marking it for stitching.


Not much in the way of interesting things happening here.  Just a few hours of sewing.  I was able to get all of this cutting and sewing done in one day.  Well, one long evening.  This page probably represents about five hours of work or so.  Based on that rate I imagine I'll be looking at about 10 or so hours total sewing time for the entire canteen.


When I finished for the night I put the leather work in progress project in a bucket of water.  I plan on extracting it the tonight or tomorrow to finish up the sewing.

I night soaking in the bucket...I was a bit worried that the leather had been in the bucket of water for a long time, but stitched up just fine.


Finished the sewing and getting ready to stuff.  Color looks a bit different, but that is the camera.  I had to switch cameras as my kids took the other one on a trip.


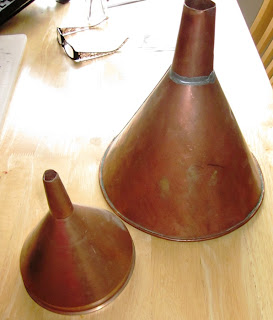
I found these cool copper funnels at Salvation Army a while back.  I was never really sure what I would do with them, but when I see cheap copper items, I snatch them up. I planned on cutting it up and reusing the metal, but it turns out that I'm glad I didn't.  The smaller version worked great for this project.


The smaller funnel fit perfectly in the top of the canteen.  I purchased some "washed play sand" from Home Depot.  After placing the funnel in the opening I simply jammed it into the canteen a little at a time.


At this point I was wondering how full I could get it.  I kept using the wooden spoon to jam as much sand in as I could.  My hand started hurting from pressing the spoon over and over.  When it felt like I was packing it onto concrete I figured I was done.  Now I just have to wait a week for it to dry out.  I hope I didn't pack it too hard that the sand won't come back out.  We shall see.  So far it looks pretty cool though.


Book Binding

OK, this a completely new type of project for me.  Yup, I seem to do that a lot.  I have this vision of what a medieval friar would look like and what he might carry.   Well as I go through the list of things that I think the friar might have I keep adding projects to my list.  The one big thing that I think is lacking from my complete kit is a copy of the scriptures.  I need to have a copy of at least some biblical texts.  While I don't read Latin and I'm quite certain that I never will I decided to make a "period looking" book that I could carry.  I do some scribal stuff but there is really no chance that I'll copy the bible and bind it up to carry along.  I had to make some compromises.  This project is basically my first attempt at book binding.  Once I work through the process I may or may not decide to bind an actual vellum book some day.  For now the goal of this project is to create a period looking book which I can also use as a journal to read and write in while at the week long event.

In the image below you will see all the supplies I have at this point to do the initial binding.
I printed out two sets of text to be bound.  One volume contains the first four books of the new testemant and the other volume contains only the Book of Matthew and the Psalms.  
Supplies:
 - Jute cord
 - Bag of needles
 - Linen thread
 - Awl
 - Printed texts
 - scrap leather
 - pliers
 - Hobby saw
 - Planks of wood
 - Clamps

I brought jute cord and scrap leather to bind the book.  I decided against the strips of leather and went with two types of jute instead.  One book has a single thick strand of jute and the other has two smaller srtips.  I used a heavy linen thread to do the sewing.  


I started out by clamping the folios together. One volume had 4 page folios, the other one had 10 pages.  This entire project is a practice/proof of concept so I wanted to do subtle difference to see what worked better.  

I clamped the folios together and marked the places where the binding would go.  I then used a small hobby saw to score the backs of the folio to make small slits to sew through.


After sawing you can see the small slits inside each folio where I will sew through.


I have seen rigs set up to sew a book together.  I didn't go into anything elaborate like that.  I simply held the folios in my hand and stitched them one at a time to the cords.  As I added each folio to the stack I stitched it not only to the cord but to the last folio as well.  This makes sort of a zig-zag stitching pattern over the cordage.


First book bound.  This volume is the the book of Matthew.  I intentionally made two volumes of different sizes to see how thickness and page size affected the binding process.  The stitching process took about 1.5 hours I believe, which I don't think is bad for a first attempt.


I put the book in between two planks and tightened some clamps down on it.  As I was doing so I rounded out the back of the book to make sure it aligned properly with an slight arch to the back of the book.  I then set it aside for some future day and moved on to the thicker volume.


This smaller book was printed in four page folios.  Each finished page is 1/4th a sheet of standard printer paper.  Since this was a test case I didn't want to use any sort of expensive paper in case it didn't work well.


I clamped the book together, marked the edge and sawed the binding just like last time.


Here is the thinner jute cord used for the thicker book.


More than 1/2 way done and the book is really starting to look like a real manuscript.


When the sewing was complete I bound the book up using the clamps.  I only had two planks with me at the time and I was doing this at a friends house so I'll have to clamp it up better later.


I am really surprised how easily this went together.  I finished all the work you see on this page in one evening at a friends house at "guild night"  It was probably about 3.5 hours of work total to get to this point.  So far I am really liking book binding and I think I may have to try transcribing a real book so that I can bind a "real" medieval book some day.

Leather Cup Holder

I found this nice little 2.5 ounce hand made glass at a local shop.  The store indicated that it was hand blown and made from recycled glass.  Very cool.  I had to get it for my friar persona.  I figured I could use it to drink wine from and also to use as a painting cup when doing scribal stuff.  Problem with the friar persona is the carrying of the item.  Hmmmmm.... If I'm going to carry around a small glass cup, I'm going to need a cup holder case to put it in to ensure that it doesn't get broken while on my pilgrimage.  OK, another leather working project is born!


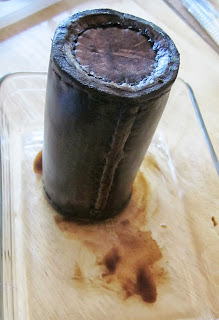
Basically the same exact process as the penner, so I'm not going to go into a ton of detail.  The only difference really is that I used the cup as a model to shape the case around rather than simply using a wooden dowel rod.  The cup has a very small taper to it as well so that it cannot fit into the cup when inserted upside down.  Kind of cool though.  Having to cut the case at a small angle to custom fit the package made this a bit more interesting.


inside layer completed.  This time around you'll note that i used the smooth side of the leather on the outside rather than on the inside.  Wanted to try it out more than anything to see how well it works or even if there is any noticeable difference.


Cup was placed back inside and the outer layer was built around it.

Here are views of the top and bottom of the outer layer compmleted.  Yup, I think my hand sewing is getting a little better with each project.


I tried something new on this project.  I used a black walnut concoction that I made in the past.  It stains my fingers just fine, so I thought it would work on the leather as well.


I brushed on the stain and let it sit overnight.


FAIL!
Rinsed right off and only mildly colored the leather.  Oh, crap!
I went back to my good old pall, vinegaroon.  Used the same black dye I've been using for everything else I've made lately.  Time to learn how to make a new dye.


Finished piece!
I am VERY happy with this one.  The hand sewing is looking cleaner with each project I do and the fit of this case to the glass package inside is PERFECT.  I couldn't be happier with this.  I even cringed and dropped the piece with the glass inside from about 3 feet off the ground.  No broken glass.  Very cool!

 
Bottom (left) and top (right) of the finished piece.


Leather Needle Case

And the leather kick continues.  

I've been having some fun playing leather lately.  I've been working on a handful of projects all at the same time.  This was inspired from a penner I made recently.  When it was completed I thought to myself, "heay, that would make a great needle case if it were smaller!"  Thus this project was born.  I took the same basic shape, style and construction from the recent penner project and simpy did it smaller.  I used a 1/2 inch copper pipe as the template for the shape of the case.  All in all I'm only mildly happy with the result.  I really think I should have done the rough side in on the case so that the lid would open/close easier.  Also, I think on my next one I'll make a much larger overlap so that the lid stays on more easily.  I may just use this as an example of what not to do.  The lid is not very study.  I may carry it to Pennsic the way it is though.  I don't have a lot of time to redo it now.  :-(


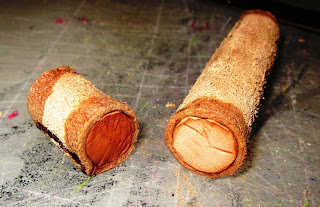
Soaked in water and dried to harden it.  I then cut the piece into two pieces.


I cut the caps to fit snuggly on before stitching them in place.


I soaked the inside layer in water and let dry overnight and then added the outer layer.  I used a small piece of brass wire to hold the slits opened which I would use for the hanging strap.


After completed and dried,  I used the same vinegaroon as I've been using a lot lately.  Love the stuff.  The vinegar smell fades after only a few days.


Dyed and ready to chop.  Small knife was used to gently slice into the piece and remove the cap.


for the carrying case I used a small piece of braided leather which I had previously made.  I don't even know why I made this strip, but it has been hanging around in my project box for over a year.  Now it has a home.  At least about 1/3rd of it has a home.  I only cut off a small portion to use as the hanger.  Had I liked the resulting case more I might make a better strip.  Not bad for a first attempt, but I will definitely have to make another one of these later.