Signed up for another blacksmithing class this week. Now that I have a forge and some hammers, what's next? Well, tongs and other tools, that's what's next. I am actually quite excited. I've been watching a lot of tutorials on YouTube, but seeing it in person and then making them should be fun. Hope the weather holds out.
Here's a link to the place where I take the lessons: http://www.fineline.org/classes/mgblacksmith.html
BLACKSMITH TOOL MAKING AND FORGING
Instructor: Daniel L Caldwell
One of the tests for an up and coming Blacksmith would be to make his own tools like hammers, tongs chisels and punches. The ability to take basic steel and work it into the tools of your trade was and still is a badge of honor. Learn to make and forge some of your own tools, as well as heat-treating processes and tool steels. In this 2-day workshop we will explore different types of forging processes used to produce functional tools. Some possible projects will include, hammers, tongs chisels and punches. ... This class will be fun for the intermediate as well as the advanced metalworker. Anyone from previous blacksmithing or knife forging classes is welcome. Students who have had blacksmithing classes or workshops from other instructors are welcome as well. If in doubt, please call the instructor.

Friday, April 30, 2010
Monday, April 26, 2010
Ruff - 14 of 14 parts assembled
Well, after a rather sleepless night, while watching Elizabeth R again, I finished joining all fourteen sections of the ruff. The cartridge pleating will begin this week. I’m glad that the 63 feet of ruff is fully assembled, but now as I look at the details of the stitching I’m not all together pleased with the quality of the butted seems. It appears that it should pass the 3 foot rule without any problems, but upon close inspection I don’t feel that the piece will be A&S competition ready. As it turns out the piece is based on an extant garment which falls outside of the time period anyway. Since A&S judging criteria require the piece to be prior to 1600 this will just end up in my wardrobe and not on the judging table. Maybe I’ll make another ruff of an earlier period some day. I really like the look of this style. Too bad, so sad…
Friday, April 23, 2010
The end is in sight
After a productive sewing guild last night I am near done assembling the sections of the ruff. There are 14 sections and so far 13 have been assembled (that’s about 58 feet!). If all goes well I will begin the process of cartridge pleating the ruff sometime next week.
Saturday, April 17, 2010
First Jewelry item made
Well, today was a day of days. I went to an SCA A&S fair. I've never entered a piece and wanted to see what the judging criteria were like. I was planning on shadow judiging at the faire. While looking for a posting related to the judges meeting I came across a class that I had not previously noticed. Silversmithing. I was giddy and upset. I was upset beacuse had I known in advance of the class, I'd have planned on showing up on time. I ran to the building where the class was to be held. I was about 30 minutes too late, but found that the instructor was a merchant willing to teach all day. He had an outstanding arrangement. You make a piece, if you like it, you pay for the materials. If you don't like it, well you had a free class and he's melt down the silver and you paid nothing. About three years ago I bout a set of rings which were based on period style. I loved his work and his prices and his stories. He knew the history of each type of stone and which ones were period and where they might be found. I was giddy to find out the man teaching the class was now willing to teach me to make a pendant which would match the style of a ring I bought from him 3 years prior.
Here is a photo of the instructor (Jerald Day) and his setup.

I selected a red jasper stone which resembled a ring and the color of the outfit I wore. I began by chosing the type of band which would wrap around the stone. You can see the stone and the band below. I began by cutting the band just large enough to go around the stone. I then created a 1/8 inch lap joint and soldered the band closed.

 After successfully soldered I had to place the band on a mandral and use a brass hammer to pound out the joint. After soldering and pounding the joint was unnoticable.
 You may have realized, I cut the band to match the size of the stone. I then lap joined the band closed. Wouldn't the band be too small? Yup. I had to continue pounding the joint until the space was regained. At this point the band was shaped to the stone again and a flat piece of silver was chosen as the backing.
I had to solder the shaped band to the back. I did this by placing 7 smal 1/8 inch pieces of silver solder around the endg of the band. I used a solution of borax and water as a flux. The solder is drawn to the heat, so heading the center of the back drew the solder underneath.


Here is the "cleaned" piece succesfully soldered.


 Here is the piece all cleaned up and ready for a loop to hang it from. Nothing went to waste. After I trimmed the extra silver off, the instructor picked up all the scrap and placed it onto a wood block. He heated it until it all fused together into a small silver ball to be used later for another project.


Here is a photo of the instructor (Jerald Day) and his setup.


 After successfully soldered I had to place the band on a mandral and use a brass hammer to pound out the joint. After soldering and pounding the joint was unnoticable.
 You may have realized, I cut the band to match the size of the stone. I then lap joined the band closed. Wouldn't the band be too small? Yup. I had to continue pounding the joint until the space was regained. At this point the band was shaped to the stone again and a flat piece of silver was chosen as the backing.
I had to solder the shaped band to the back. I did this by placing 7 smal 1/8 inch pieces of silver solder around the endg of the band. I used a solution of borax and water as a flux. The solder is drawn to the heat, so heading the center of the back drew the solder underneath.

To cool and clean the piece, it was dropped into a mild acid and then rinsed with water.

Here is the "cleaned" piece succesfully soldered.

I was hoping the pendant would match a ring I had purchased. I selected a thin twisted silver wire to accent the edge. Again the piece had to be cut, shaped and soldered on. This took some doing. I placed the solder on top of the twist brade. As it turns out, the solder should be on the bottom as the piece is heated from below and the solder runs faster that way. This portion took about 20 minutes to work out as I was a slow learner and had to do it four times. Ick!

Should be done with the edge now. Another acid bath and rinse.

 Here is the piece all cleaned up and ready for a loop to hang it from.

I selected some 1/2 round double wire for the loop portion. I wanted the loop to match the style of the ring. I cut the wire and shaped it as desired. The pieces were rested on a fire brick and soldered together.

Now all the joinery was done, the instructor tested all my soldering and it held. Time to clean up the mess.

Here is the instructor holding a handful of stainless steel shot which is placed inside a rock tumbler. After about 30~40 minutes of tumbling, all the dirties were gone!

Now all the shiny bits are shiny and it is time to mount the stone.

Here is the finished pendant sitting next to the ring which inspired the piece. This class was definitely one of my favorite SCA moments.

Thursday, April 15, 2010
Blacksmithing photos
Finally getting round to posting the blacksmithing projects done last Saturday.
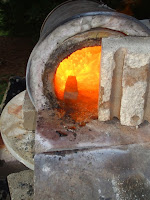
The following photo shows the gas forge we were using. It has a hookup for forced air. Oh, come on. I know it's not period, but my arm can't swing the hammer and pump the bellows and get this all done.

While I waited for the forge to get up to welding temp I played with some 1/4 inch square stock.
Other students were making these, so I made one too. This is a shepards hook. I plan on using it to hang my pots from a cooking chain, when I get around to making that too.

Here is the finished hook. It was warmed up, brushed off and then place in a bath of crisco and wax to coat it from the elements.


 First heating. I needed to draw the bar out from 1X1 inch to 1X 1/2 inch with the plan of folding the bar over on itself and wedging some high carbon steel in the middle.


 Now that I had a nice square little bar, I had to start fishtailing one end while keeping the hammer end of the adze square. This photo shows the pice beginning to fish tail.


Now that I had the basic shape I polished it up a bit with a wire wheel and grinder. After it was nice and shine I had to temper the piece. The goal was to get the tip very hard, but the the striking end had to be very soft. I didn't want the piece to shatter from a firm hammer blow. To temper it I heated it until it was no longer magnetic and then I quick quenced the entire piece in the wax bath. Once cool I reheated the striking end of the piece and let the color change gradually. Once the color change moved to the tip I was ready to quench it again. The goal is to get a purplish blue about 1.5 inches from the end and a dark straw color all the way up to the tip. Once close to the tip I quenced just the last 1/4 inch and kept doing so until the piece was cooled. Here is a photo of the tempered piece. You can really see the color change which shows the proper temper. Also I file tested it. If you can draw a file over the soft end it should grab and file easily. When you get the file closer to the tip, it should only slide over the metal and no longer take purchase. The file test and colors showed a proper temper. I used the piece about 3 hours later and it worked like a charm!

 In the final piece you can really see the benefit of distressing the bar. The tip of the piece widens out to a point which is wider than the rest of the bar. That was a result of the distressing. I could have simply drawn out the rest of the bar and left the head wider, but then that would have shrunken the final shaft I had to work with and it would have taken a LOT more work.


The following photo shows the gas forge we were using. It has a hookup for forced air. Oh, come on. I know it's not period, but my arm can't swing the hammer and pump the bellows and get this all done.

While I waited for the forge to get up to welding temp I played with some 1/4 inch square stock.
Other students were making these, so I made one too. This is a shepards hook. I plan on using it to hang my pots from a cooking chain, when I get around to making that too.

Here is the finished hook. It was warmed up, brushed off and then place in a bath of crisco and wax to coat it from the elements.

Here is my next project. The plan was to make an adze. I started it with this 1 inch square iron bar. The bar is believed to be between 100 and 200 year old recycled iron. The following couple photos show the bar next to the scal image of the adze head I planned to make.

On this cross section you can really see the "grain" of the iron. I love the way iron looks so much like wood.


In this photo you can see the bar drawn out. This was tough as I had to keep the wide and only draw the length out while thinning.

Once the bar was drawn out, I forge welded a small piece of high carbon (non-period) steel in the middle to make the piece practical. Once the bar was forge welded nice and tight I cut it off with a cutting wheel. I didn't want to risk a hot cut in case the weld was weak. Once it was cut I kept working the weld to make sure it was solid. Here is a photo of the bar once welded and cut to size.


Banging and forging continue...


Now it's beginning to look a bit like the adze head I'm looking for. At this point I took a break and made the hot punch which you'll see later. Once the hot punch was done I punced the head and you see the finished product. Well, not finished, but as finished as I got it for the day. I tossed the piece into vermiculite to let it cool nice and slow.

Here are some photos of the punch I made. This isn't necessarily a period punch, but there were some like this used. I made this one from high carbon tool steel so as to get long use from it. I began with a hex rod and distressed a spot about 1.5 inches from the end. I then started forging the tip. I was looking for a smal oval end about 1/2 wide by 3/16 thick.

Now that I had the basic shape I polished it up a bit with a wire wheel and grinder. After it was nice and shine I had to temper the piece. The goal was to get the tip very hard, but the the striking end had to be very soft. I didn't want the piece to shatter from a firm hammer blow. To temper it I heated it until it was no longer magnetic and then I quick quenced the entire piece in the wax bath. Once cool I reheated the striking end of the piece and let the color change gradually. Once the color change moved to the tip I was ready to quench it again. The goal is to get a purplish blue about 1.5 inches from the end and a dark straw color all the way up to the tip. Once close to the tip I quenced just the last 1/4 inch and kept doing so until the piece was cooled. Here is a photo of the tempered piece. You can really see the color change which shows the proper temper. Also I file tested it. If you can draw a file over the soft end it should grab and file easily. When you get the file closer to the tip, it should only slide over the metal and no longer take purchase. The file test and colors showed a proper temper. I used the piece about 3 hours later and it worked like a charm!


Here is my final photo of the adze head after cooling in the vermiculite. Ugly, but protected and ready to continue work another day. You can see that there is still work to widen the hole. As I widen the hole I have to draw the iron down to the side of the neck. That will be challenging. Another reason to stop where I was after a long 7 hours of forging. There is still plenty of iron to work with and I think the piece should end up being a fair looking replica of the original 1,000 year old item.


Saturday, April 10, 2010
Blacksmithing begins
Well, winter seems to be over and the day was wonderful. I spent the day blacksmiting. Photos to be added later. I am totally wiped out. I made a shepards hook, a hot punch tool, and began a replica of a period adze. I needed to make the punch to make the adze. Smithing at it's best. I wanted to make the adze. The instructor didn't have a punch but said, why don't you make your own. After 3 hours of forging and tempering I had an awsome tool which I then used to punch the handle hole for the adze.
Fun fun fun!
Fun fun fun!
Friday, April 9, 2010
Willow
Was searching for other stuff and came across a copy of the scroll I received last year when I was given the willow.
http://picasaweb.google.com/lincolnscrolls/May2009#

http://picasaweb.google.com/lincolnscrolls/May2009#

Ruff - 1/2 way done assembling the 63 foot strip
Well, now that I have 14 section done, I started the assembly task. I have 7 section combined for a continuous 32 foot section of linen. So far, it looks ok. Each seam I do I like better. There are a ton of things I would do differently now that I’ve gone through this process once. I’m about 30 hours into it and it looks like about another 15 (or less) to finish it up. That’s a lot better than I expected. I’m a little bummed though. I’ve been researching, or trying to, and I just can’t find any reasonable example of this sort of ruff before 1600. Technically it isn’t period, so I guess this fun project will never see the inside of an A&S faire, unless I’m wearing it as I walk around.
Thursday, April 8, 2010
Ruff - 14 of 14 sections done and now assembly
Well, at about 2:30 in the AM, yup, in the AM, I finished the last of the 14 sections which needed to be hemmed. That’s 21 YARDS of hemming done. The estimate of time was, well, way off. I think my progress speeded up the further I went. The rolled edge actually looks better and better as I went along too. Go figure, the more I made the better I got. I guess that’s the whole point of the depth challenge though, right? I started assembling the pieces. That’s tedious. The selvage edge on my linen is rather rough and fringy looking. I have to trim it straight and then press it nice and flat. I’m trying to but the edges together by only catching about 2 threads of the selvage edge. I’d like the joint to be as clean as possible. This will likely be the most difficult portion of the assembly. Yup, I anticipate that this will be even tougher than the 500+ cartridge pleats required.
Wednesday, April 7, 2010
Ruff - 13 out of 14 and almost done hemming!
Spent another 3.5 hours hemming last night. I think I'm getting better and better at this, go figure! I now only have one section left to hem and then I can begin the long fun process of joing the sections together. I think I currently have something like 25 hours into the project and 19.5 yards of hemmed ruff. I've taken to watching Elizabeth R, for inspiration while I'm sewing. Well, partly for inspiration, and partly because our cable went out during a storm and I had to watch a DVD if I wanted to sew in front of the TV. That is my favorite place to work on hand stitching projects.
Monday, April 5, 2010
Ruff - 11 out of 14 sections and couting...
Well, this past weekend was a somewhat productive holiday weekend. After spending some good quality time with the kids each day I was able to sit and watch movies while hand sewing for about 4 hours a night. Nothing dramatic, but I now have 11 of the 14 sections hemmed. I hope to start connecting the sections by the end of this week and cartridge pleating by within 2 weeks! I've only done a few small samples of the joinery as proof of concept, but butting selvage edges up is rather tough. To get a nice clean, flat lightweight seem on the modern linen I'm using is harder than I thought. The period images obviously have cleaner, tighter selvedge edges than the linen I have.
Friday, April 2, 2010
Ruff - 6 of 14 sections complete
While reading through Janet Arnold’s book I fell upon a small print of a tailor at work. I don’t have the book here, so I apologize for a lack of details. The image portrayed a tailor at work sitting cross legged upon a small stool by the window. Apparently that was the tradition. Tailors were known for sitting cross legged while working. Sitting by the window makes sense as there was better light there. Anyway, I gave it a try last night. Usually I sit on an upright chair. My work is on my lap, the TV remote on one side, a vessel with the day’s beverage of choice on the other. Last night I tried sitting on a small stool on the floor. I placed my work on my knees and stitched that way for a while. Strangely enough I found that I stitched much faster. So much faster that I actually finished TWO sections of the ruff last night. Stitching progress was about double. I believe I have about 27 foot of hemming done thus far. I spent some time cutting out the remaining sections and ironing, but the actual sewing seems to go much faster that way. Fun experiment! It was a little tough on the back, but I believe I’ll give it a go again. Maybe those dudes actually knew what they were doing? Ya think?
Thursday, April 1, 2010
Ruff - 4 of 14 and counting
After spending a couple hours working Easter dresses for my girls I decided to take a break and hand sew. How fun! Finished another 54 in section of the ruff which brings the total to 4 of 14 done. That’s about 18 foot of hemming done.
Subscribe to:
Posts (Atom)