Pages

Showing posts with label Circa 1200. Show all posts

Sunday, December 29, 2013

Portable Woodworking Bench

Further adventure in making a portable medieval wood working kit.  I need some tools.  I'll need some wood.  Oh yeah, and I'll need a work surface to do my business on!

I looked at various images of medieval wood workers as depicted in illuminated manuscripts.  I am aware that I'll probably want a few small benches or what we currently call saw horses.  In the mean time I wanted a portable surface where I could do some wood working at events or demos.  
I had four primary concerns during the planning stages.
1) It must look like a period work bench
2) It must be constructed using only hand tools.  
3) It must be cheap to create.
4) It must be portable to the point of easily fitting in the back of my car.

I have had a stash of hard wood in my garage for over 20 years.  I used to work on the shipping docs of Builders Square.  When I was there I was able to collect the hardwood pallets used to ship very heavy deliveries.  I had at one point planned on making a butcher block table out of it, but like many of my plans they vanished before they completely began.

So, with a stash of what looks to be oak on hand I had my resources.  I measured the back of my car and that became the maximum length of my bench.  My least favorite part of this project is the work surface.  It is recycled lumber from the old gazebo which used to be attached to the pool which existed when I bought my current house 12 years ago.  I destroyed the gazebo, but kept a lot of the lumber.  It is very poor quality treated lumber which will be replaced as soon as I have the chance!

Here is the basic idea I had in my head.  I made the following doodle while at work, during a horribly exciting meeting.


That was all the plans I had.  Other than measuring the length of the boards for the top, the rest of this project just sort of went along without any measured plans.  

Started by selecting some stock, cutting to standard length and then cutting the mortise which would fit into the legs of the bench.  At this point I hoped that the pieces would be all interchangeable, but I gave up on that.  I marked the pieces as i fit them and as long as I put them together in the proper order there was no benefit in having them be interchangeable. 


Next the base of the bench would have a long runner which would have to be jointed into the bottom cross braces.  This piece was another piece of that crappy pine which may get replaced some day.


Each end fitted in a similar manner.


Snugly fit and ready for pins the bottom is just about done.


At this point I employed the use of my new auger.  See blog entry (Pear Tree Stool) for details about the auger.

I chose the size of my mortise and tenon joint based on the fact that I only had this one large auger bit.  Since this was my only auger, that would be the size of the joint!


Here you see all the pieces jointed together.  At this point I hadn't yet cut the holes for the pegs.  I have since finished all the joints and all the pegs.  All the joints fit well and are very sturdy when assembled.  I am still rather disappointed in the work surface.  I may replace it with simple pine which is better than the ugly treated lumber I have now.


The bench is now completed, but I don't yet have pictures of it assembled or unassembled. I'll post more later as time allows.

After I completed the bench I decide to start adding more details.  I need some hold fasts and bench dogs to hold my work pieces in place.  So far I have only made the following three items, but rest assured I will make more.  A flat work surface is important.  A method to hold your work-piece on that surface is more important.

The following piece of wood was taken from an American Ash (I think) which was recently cut down this fall.  I know it isn't fully dried yet, but for what I am making it didn't matter.


I split the log into sections and roughed them out with my little carving axe.  Did I mention how much I love my axe?


I roughly marked the location of the head and then trimmed it up further with a carving knife.  I 


I know that they aren't perfectly square, but I have used them already making a few other projects and they serve the purpose.  I will make more later but this served as a fun little addition and I was itching to make something out of the reddish center of the Ash tree recently felled.  


Here is a chunk of the center of the Ash tree we felled.  Sections had a lovely red tone to it.  As it has rested nicely in the corner of my garage the color has already begun to fade.  The section I used for the bench dogs wasn't quit this red, but originally had a nice bright orange streak through it.


Carpenter's Rule

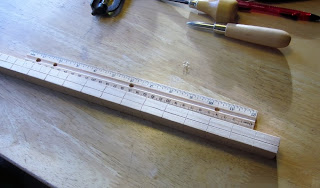
I am in the progress of building out a medieval woodworking tool box.  I thought that one of the first tools a woodworker would need would be a ruler.  I cut a piece of Aspen and began to mark out the "inches" on it.  Before marking it I did some research to find out the standard measure.  I found that most wood workers would use the width of their thumb as the unit standard.  As long as the measure was consistently used it really didn't matter if I called it 10 thumbs and you called it 14.  I took a set of calipers to measure the width of my thumb and darn it if my thumb isn't exactly one inch wide.  

While it looks like my rule is marked with modern inches, it is in fact marked with increments the width of my own thumb.... which just so happen to be one inch wide.


I was happy with the progress so far, and then I failed.  I tried using some of my old black walnut stain and it didn't take very well to the wood I was using.  The rule became a dirty looking piece of wood which was now hard to read.

I will have to try and make another one at some point in the future because I don't like the look of this one.  Way too dark for my liking.  I have tried to use it on other projects and found the markings very tough to read.  It will have to serve for demos, until I make another one.


Woodworking Mallet

This project began back when I rummaged through the firewood pile at Pennsic earlier this year.   See post (Goldenrod, Black Walnut & Pennsic) for the early steps.

I thought I took pictures along the way, but I must have misplaced one of my memory stick where I collected my photos.  All I can find is the finished product.

The head is made from a chunk of oak from the Pennsic firewood pile.  The handle was cut and shaped from a branch from a tree cut down a couple years ago.  I believe the tree was ash, but as it was dry, without bark and no leaves I can't tell for sure.  The wood is very light, but very dense.

I split the log and used a hewing ax to cut the handle along the grain.  I then used some hand chisels to cut the whole for the handle.  In hind sight (and on my next version) I will likely drill the hole first, or get some better mortising chisels.  My flat chisels were slow going getting the hole cut.

One other lesson learned.  I cut the wedge too long.  When I was pounding it into place I was a bit over zealous and started a split along the handle.  It is still functional, but the small crack is a weak point that will fail some day.  Before that happens it just annoys me every time I look at the new tool.


I applied a light coat of oil and wax once complete.  I read on one site that it is recommended to soak a mallet to add weight keep the wood from cracking.  I haven't done that to this mallet.  I had already applied a coat of oil and wax before I read that.  I may add a few more coats of oil, but it has a good amount of heft to it already so I'm not sure it needs more weight anyway.

Here is my new mallet with his new best friend, the carving ax.  I'll post another blog entry on how I made that.  The combination of these two are my favorite tools in my garage now.


Pear Tree Stool

So, i'ts been a long time since I've posted to my blog.  That isn't to say that I haven't been busy.  In fact I have been VERY busy.  My total obsession with finishing my greenwork shirt accompanied by a computer with a bad USB port connection... well I've only just been able to download all my pictures from my camera.

This project was first started back in September and finished at the end of October.  See blog entry (Goldenrod, Black Walnut & Pennsic Projects) for pictures of the beginning stages of the top of this stool.

To finish the project I wanted to complete it without the use of power tools and so I needed acquire a hand auger to drill the holes for the legs.  The following picture is one of two augers I purchased at the Kane County Flea Market.  Each auger cost $5 and needed a bit of work.


I started by removing the handle which required me to do some cutting to get the rusted nut off.  Looks like the nut rusted on and the previous owner decided to just paint over it.


After removing the bit from the handle I proceeded to remove the rust and the paint using a wire wheel attachment on my angle grinder.  I then took some small metal pin files and cleaned up all the cutting surfaces.  I honed the cutting tip with a small Arkansas wet stone.


All cleaned up and ready to go!


I took a cabinet scraper to the handle and tried to get off the grunge and the white painted initials.  I planned on using this tool and also bringing it along for demo purposes in the future.  White paint on the handle had to go.

After the handle was reattached it cut like a dream.


A little blow out on the bottom of the stool, but that didn't matter to me much.  I placed a board underneath to help prevent the blowout.  Unlike modern drills which cut with a high speed bit, these hand augers rely on the small screw tip.  That screw tip helps guide the cutting edge and also pull the drill through the material.  Without a backer board the small screw would pierce through and stop pulling the rest of the bit.


This was my first attempt using an auger of this size.  It was stiff to turn, but didn't take long to get used to.  The hardest part was keeping the angle correct and I tried to press down and twist. I loved the sound of the cutting and the look of the big chips that were removed.


As I don't yet have a lathe to use I simply used a draw knife to round out few of the branches from the pear tree.  The branches were removed at the same time the tree was felled.  They had been in my garage almost a year drying out.  I cut the legs on a slight angle so that they would slide in easily and yet firm up in place once driven in with a mallet.


Once the legs were all inserted and then cut to length I trimmed the excess off the top using a standard hand saw.  It scratched the surface of the bench a little, but I didn't feel quite right using my Japanese flush cut saw on a Circa 1200 project.


As you can see there are some rough edges on the bottom of the stool.  It is good and solid.  I thought that the rough finish offered character to the stool while making it look period.  Even as a wood worker from the year 1200 I don't know if I would spend a lot of time cleaning up and making my stool pretty.  It is functional and VERY sturdy.  That is really all I needed.


The angles of the auger holes were not drilled entirely correctly.  Honestly I was in a bit of a rush to try out my new tool.  The resulting stool is functional, it just looks a little off kilter as the legs aren't directly pointing to the center of the stool.  Some day I'll make another and take more time, but for now this serves my purpose for local events and demos.

Monday, November 5, 2012

Kingdom Craftspersons Faire

Got to display my Landsknecht outfit in progress as well as my Circa 1200 outfit and a couple other items hand stitched items I made.  This was the first time I got to see the outfit as it will be seen by others.  Kind of shocking.  So far I've seen pieces of it on myself, but only in the mirror.  I was able to borrow a mannequin to display the outfit on and it looked pretty cool.  I am very happy with the way it is turning out.  The outfit is almost wearable.  After the event I'll continue to tweak it and finish it for the competition, but getting close to wearing it in public for the first time!


PhototakenbyPhilippe de Lyon 


Monday, April 16, 2012

Blue and Green fashion show is done

Well all the components I wanted to get completed for the fashion show were completed.  The shoes, although completed, I'm not really happy with. I'll make another pair some time in the future I'm sure.  I'd like to submit this entire outfit into the 2013 A&S competition and if I do that I will no doubt have to remake the shoes.

I don't have any pictures of the outfit other than this one, as I was the guy wearing it and I'm also usually the guy taking the pictures.  At some point in the future I may get pics that others have taken and drop them here.

Now off onto my next set of projects.
Coming soon?
1) Landsknecht outfit begins construction...
2) Period folding pocket knife begins construction...

Friday, March 16, 2012

Wool Hood finished


This is yet another garment to be worn as part of the Stone Dog Baronial Green and Blue Fashion Show.
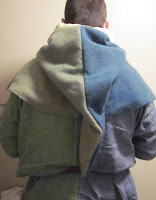
It is a hand stitched wool hood lined with linen. Entirely hand stitched using linen thread waxed with bees wax. The outer portion of the garment was constructed half blue and half green using dyed wool. The lining was constructed of yellowish linen which was also "dyed" by boiling the material in some stale juice and wine.  For further details on the dying see prior posts.  I found some old (very old in fact) wine in the refrigerator.  I tasted it and it was horrible.  I took that wine and some very old juice and thought I'd do a little experiment.  I boiled a bit of linen in a pot for about 45 minutes and what I ended up with is a very nice orange/yellow tint.