
Well this project was yet another first for me. I had a bunch of fun sewing the leather quiver I made recently that I wanted my next project to dive right back into the leather arena. I was hoping to make a leather quill case also referred to as a "penner". I found a number of images online and some in books which I used as reference and inspiration. I found images of a variety of styles but the following two images best resemble the two styles of penners I was attempting to make. I want a plain black simple penner to wear in my Friar persona. It was to be simple and purely functional. I need to carry my quills around with me at the week long camping trip and I don't want them damaged or wet by the weather.


As I said I had two styles in mind and I actually began both at about the same time. They were sort of a working proof-of-concept. whichever worked out better would be the one I would use. Turns out that they are both coming along nicely, but one was finished recently.
This rectangular one is going to be constructed of two layers of very thick vegitable tanned leather. I soaked the leather and wrapped it around a pine 1X4 board to help shape it. I wasn't sure if this was needed, but I let it dry for a few days before cutting and stitching it. In hind sight I don't think the piece should be left to fully dry before cutting and stitching. The rounded penner you will see further down was constructed by stitching the wet leather and letting the piece dry only after it was fully stitched.

Not sure exactly how to cap the ends I tried two methods. On one end I simply folded over the flap from one side of the penner which required stitching around the other three side. This seemed like a good idea because it would require one less side to stitch, but I won't do that again. I found that the other end worked out much better. Cutting a rectangle to fit and stitching all the way around got a much cleaner flattened end.

You can see here I left a gap in the stitching. As I read up on ancient penners it appears that they were constructed in various layers with the smooth side of the leather facing inwards. Another layer (or two) would be added to the outside with the smooth side facing out. They would be constructed as a full case and then cut afterwards. This is known because there have been penners found with cut marks still showing on the inside layer which leads one to believe that they were cut after assembly. I planned to cut at the break in the stitching but wanted to harden the case first.

I soaked the piece in hot water for about 20 seconds and then gently straightened it as best I could by hand and placed it in a small oven at about 180 degress for about 30 minutes.

I let the piece cool and dry further over night and it ended up as hard as a piece of wood. Very cool experience.

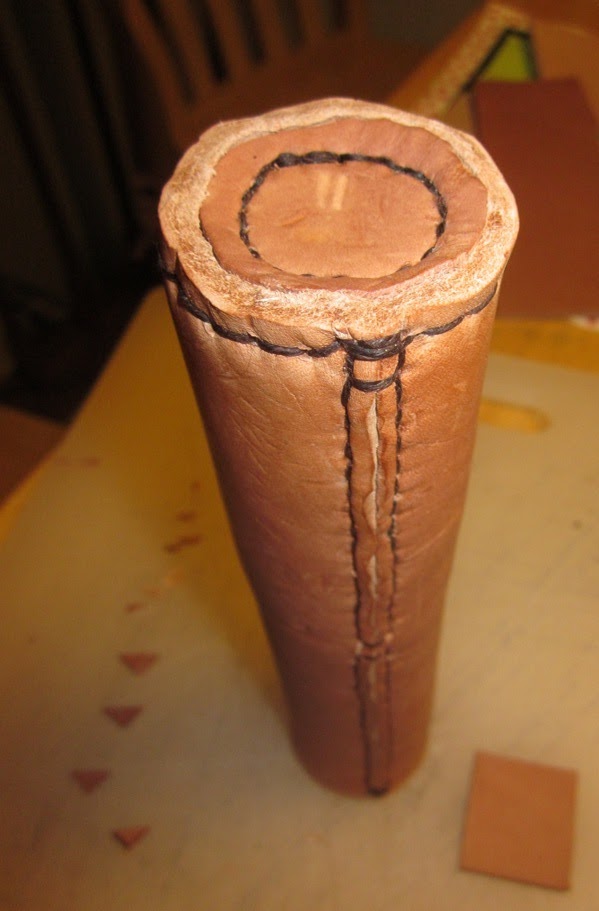
So at this point I liked the rectangle look but wanted to start the round one as well. For the round piece I cut to approximate size, soaked it and then stitched it while wet. I stitched it over a wooden dowel rod at first, but then found that it was sticking as I tightened up the stitching. I was afraid the piece would shrink onto the dowel so I removed it and stitched without a mold.

I found that the cut shape wasn't quite as nice and straight when i cut the piece wet and stitched free hand without a mold. Not too concerned about that though since only the top 2~3 cm will show anyway.

I used a small saw to open the penners after they were hardened. They were easy to cut and didn't lose any shape in the process.

Here you can see the raw cut edge on top and the smoothed edge on bottom. I trimmed the edge and then used a smoothing tool I made from a piece of antler to round the edges out. I did this while the edge was dampened with... my spit. Yup. I sucked on the edge and then smoothed it. Works great but makes the kids a bit sick. :-)

Same technique used for the round penner. To ensure that I made a nice straight line I applied a piece of painters tape as my guide line and then simply cut around the edge of the tape.


Raw edges above and smoothed edges below.

Here you can see the capped ends. I simply ran the stitching up the side and then over onto the cap. None of this stitching will show so I wasn't too fussy about the finishing. I wanted a nice tight seal and that was all.

Here you can get an idea of the size. I know that this penner is slightly larger than period style penners, but I wanted this to not only hold my period quills, but some modern quill pens as well. Modern pens are about the size of the pencil you see in the picture below.

Time for the outer layer. I was really liking the way the round penner was coming along so I put the rectangle one aside. I placed a dampened piece of leather of the same thickness on the outside. I wet the leather in warm water for about 30 seconds. I let the leather sit for about 5 minutes then cut to size and began stitching it on. You can see the gap I left on the outside stitching does not align with the other gap. That is so that the outside layer overlaps by about 2~3 cm forming a nice lip to hold the cap on.

At this point to finish the ends I cut the edge to the approximate size, cut a disk of leather to use as an end cap and then trimmed to the right shape.


Here you can see the homemade knife I use and the trimmed up ends


I cut a circle to fit snuggly in place. I wet this leather and let it sit about 5 minutes before cutting it. When I pressed it into place I stitched the cap on.

Here you can see the end stitched into place. On my next one I may do the stitching a bit differant. It looks neat enough, but as I pulled the string tight I formed sort of a dish to the surface of the leather. perhaps I can try a small needle and stitching closer to the edge. For a Friar though, I think this will work out nicely.
I dampened the side of the cap and cut it free. I then added a few slits in the side for the hanger. I kept wetting the leather as I eased a nail through the hole. In hind sight I should have used a bone or wooden awl for this. You will see why later.


After I let the leather dry over night you can see what the nail did to the leather. This wasn't a great tragedy on this piece as I intended to dye it black anyway. For future project though, I will be sure not to use a nail, or at least not to let the piece dry with the nail in place.

Same story for the other end. Now that the cap was finished I did the same thing on the bottom of the penner.


I used the nail again as I knew the piece would be dyed and I wanted to make sure the size of the hangers matched.

All done! Stitching complete and hangers pierced. Now time to dye and oil this thing!

 I thought I took pictures along the way, but turns out that I didn't have any. Oops. I used a black dye that I made by soaking a piece of steel wool in vinegar for a few months. When it is applied it simply looks like you are wetting the leather, but then turns to black in about 10 seconds or so. Was really fun to use. I had made the dye for a past project. I didn't like the way it looked for that piece and so never used it. I wasn't as concerned about the decorations on this piece and simply wanted a solid black so I went with it this time.
After the dye dried over night I applied about 5 coats of oil to the piece. I took a small cube of bees wax and rubbed that on the end grains as well. I brought the piece to a local event to show some friends and I as I was helping clean up I found this broken lace out on the heavy list field. I simply stuffed the "garbage" in my pocket. Later when i got home I found it and decided what to do with it. I will probably replace it with another piece of darker leather later, but for now it gives you the look of the finished piece.

