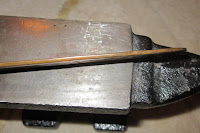
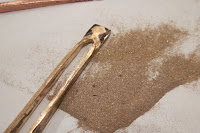
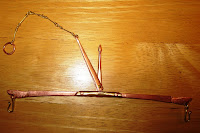
I cold forged the arms of the balance until I got to this point. I spent many hours on the next steps. I filed the joints little by little until I ended up with a good fitting joint. These pics are the roughly shaped arms.
The middle section of the balance was made from a brass rod. This isn't because I saw that on any extant example, it was simply because I like the look of the shiny brass and copper together. Brass was much more solid to work with and I imagine would make a sturdier piece if entirely constructed of one or the other. As this is a very small coin balance which will not hold much weight, I'm not too concerned with the sturdiness.
I drilled the brass rod and used a hand saw to start the joint portion of the brass. I then worked with small metal files to clear out the slit and get it to the point where it fit will with the copper arms.
Here is the top (left) and bottom (right) views of the rough piece. As you can see I hammered the piece a slight amount to draw in the center and flatten the bottom. Mostly for aesthetic reasons. I kept working the pieces together and tweaking the shapes to make it look more appealing than a simply round bar.
Turns out that the pointer I previously made was lost. I brought it to a friends house to work on during a guild night and seemed to have misplaced it. In the mean time I made a new one. I like the revised one much better anyway. Turns out the original piece was located after the balance was done, but I really like the revised version better. I hammered the copper wire to a rough shape. I wanted this revised piece to be a bit slimmer. After purchasing an extant balance from the 1800s and examining it closely I determined that the slimmer pointer looked a little better.
Once the pointer was shaped to fit the opening in the brass center I cut it and flattened it so that it protruded only about 1/8th inch past the bottom. I then hammered the brass piece tightly closed over the pointer and then peened the copper end down to keep the piece from coming out. At first I thought I might have to solder or braze the pieces together but they are very solidly joined with just hammering.
Here is the bottom of the finished piece.
And now on to my next fail. Started out as a good idea and ended up to be about a three hour waste of time. I purchased the following copper mug from Salvation Army. I often buy stuff like this that I don't intend to use and simply keep for raw materials. From this piece I wanted the handle. It was a nice thick piece of solid 3/16th inch thick copper. I cut the handle off and hammered it flat to begin.
After hammering and flattening the edge the piece was ready for shaping.
I took a chisel to cut the piece to length using only about 1/2 the handle and then I proceeded to make a cut along the length of the piece. I cleaned up the edges of the cut with a file and then used a couple pairs of pliers to help me twist the piece to the shape you see on the right.
So far, so good. Now begins the few hours of shaping with files. The following picture was after about an hour of work or so. My idea was to make a decorative hanger out of the handle. I planned on twisting the descending arms and hanging the balance from it.
I got to this point happily and then started some shaping of the top portion. In the following images you can see some black marker on the piece indicating the area I planned to file away. I planned on punching the center to hang the balance from.
Almost finished piece looking good and fitting nicely. Once I got to this point I wanted to make one or two more twists in the descending arms, but I happened to be working at a friends house. I spent the day working at an A&S gathering and didn't have access to my torch.to soften the metal. I happily placed this off to the side to finish later.
Riveting the final piece came next. I drilled the holes in the brass center piece next and enlarged them with a file. You might ask why I didn't just use a larger drill bit? Well, I was concerned that if I used a bit of the proper size and it drifted even a bit off center I couldn't fix it. If I used a bit of about 1/2 the size as it drifted off center I could easily fix it as I enlarged the holes with a file I was also able to properly place the hole where I wanted it. The image below might better demonstrate my concern when preparing to drill the holes.
After drilling and shaping th holes I placed a smaller rod in place to test the joint.
When the joint was shaped to my satisfaction I took a rod slightly larger than the hole and filed it down. It should be noted that the hole I made in the copper arm was slightly larger than the one in the brass. I wanted the rivet to fit very snug in the brass piece but allow the copper arm to move freely. Once the rod was shaped so that it snugly fit the hole I tapped it in place with a hammer and then cut it to length with a small hand saw so that about 1/8th inch protruded.
I peened the end of the rod piece so hold it in place. This step was very nerve wracking. I wanted the peen to look finished without having to file or polish it and yet I didn't want to damage the brass center piece. I also was concerned about hitting too hard and causing the joint to seize up. Took longer than it should have because I was so nervous, but worked well on the first try.
Same process.... other side.
Here is a little trick I used when I had to file the various rod pieces. I was able to fit the small pieces in the holes in the bottom of my 2 lb anvil. Works nicely for holding a small piece while filing or shaping.
Both joint finished and looking good!
So far so good, so now onto another fail! Two fails actually. You recall the twisted hanger I made while at a friends house? Yup, I broke it. I heated it up and tried to twist it a bit more. First side twisted nicely. Second side cooled too fast and snapped. No pictures of it (yet) as I was so mad I tossed the piece aside and started over again.
The following picture is what happens when you cold work brass too long. A nice little fracture right up the end of the piece. Brass works a lot like string cheese. Once the piece looks like a string is coming apart at the end of your cheese stick. Stop, cut it off, throw it away and start over.
My revised hanger was made of a copper rod this time... shaping heating bending shaping and then... snapping. Dang, no luck this week!
Third time was a charm. Worked this piece slower this time. Annealed it three times to finish this, just in case!
I took a cold chisel which I had previous rounded off (for a previous project) and used that as the basis for my shaping. Placing the chisel in the center allowed me to fish tail the ends while keeping them in line with one aother.
Roughly finished piece ready to cut to length. I cut it to length and then drilled holes similar to the manner in which I did the arms. This time the hanger had smaller holes and the arrow pointer had the larger hole so that it could swing freely while weighing my coins.
Rivet time. Before I could finish the rivet though, I took a small file to bring the center of the rivet to a triangle edge. I wouldn't have thought of this based on examination of extant photos. I have never been able to see the details close enough. Based on evaluation of the scale from the 1800s which I purchased I could see that the cross beam was pointed like the fulcrum of a teeter-totter. Makes sense. Glad I bought that other scale!
Placed in the center and peened away like the other portions were done.
Here you can see that the hanger swings freely and when the arms are fully extended they are well shaped, even and in a symmetrical layout.
Now, how to hang the chains. I debated over this part for a while. I mocked up the piece and hung the pans using paper clips just to see what it would look like. While putting the scale down I found that a folding scale permanently attached to those small chains is a real pain in the butt. I wanted to make some hooks to hang the pans from, but do it in a way so that I could remove them and store them separately. I started working on a few brass eye-pins to work into hangers.
I shaped the hooks and permanently formed them onto the arms. The hooks stay attached to the balance but the pans and chains can be removed for storage.
Here is a close-up of the hook.
The final piece was a small brass chain to hang the balance from. I attached the chain from a small copper hoop fashioned from copper wire. I used a style of the chain which I liked when doing my proof of concept testing early on. Glad I got to use that style chain somewhere in the process. Very pretty and sturdy style of linkage.
The finished piece! Fully extended and packed for storage.


