I do love thrift store shopping and there is one store that is at the top of my list for finds. I found this little beauty at that Salvation Army and immediately saw plans for it's future. This appears to be some sort of salt/spice shaker. There was a hole at the bottom, but the plug was missing. That's OK, that's not what I needed it for anyway.
For this little gem to become the product I envisioned I would first need to chop off the handle. Lovely handle. Don't worry, I kept it. I will be melting it down later to use again as something else.
Roughed up handle removal. had some trouble with the remove and accidentally cut into the body of the spice shaker. Will have a bit of pewter repair to the side. That's OK. Another opportunity to practice a new skill.
Here is what used to be the bottom. I sliced the hole on the bottom much larger. I plan on using this at the new top. Need to come up with a way to fabricate a screen to place on the top here.
This is what used to be the top and will eventually be the bottom. I will either take another piece of pewter- ware I have and cut it to shape or else I will melt the handle down, pour it out and hammer it to shape. Not sure which option works best yet. I like the idea of melting the top and the handle. That way I can say the entire piece was re-purposed without any additional pewter needed to complete it. We'll see.
I hope to convert this specimen into something like the one shown in the following Holbein portrait.
I am not certain of the approach I will use for the top of the pot, but I decided to make a piece out of brass to see how it looked. I cut a circle out of some cardboard and kept tweaking it until the fit seemed about right. Now that I had a template I cut that same shape out of a brass plate I had been using for a coin balance I'm working on.
Happy with the basic fit of the piece I then removed it and dished it slightly with about 6~8 hits from my dishing hammer on a wood stump.
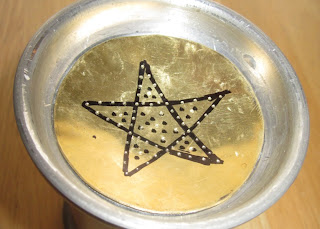
So far so good. I like the overall look so I moved forward by cleaning up the basic shape with a more refined hammer. Satisfied with the basic shape of the dished brass I then sketched a star on the top of the piece to use as a guide for my punched holes. So far this has only been about 20 minutes work or so and I'm still considering it a proof of concept. If the top turns out nice I may use it, but I also may decide to remake it using copper or pewter.
Following the basic guide of the marker I drew on the piece I used a punch and small hammer to mark the spots where I would drill. I used a modern drill to make the holes in the piece.
On the flip side you can see the basic look of the star. Even if I go with the brass on the final piece I'm not sure I like the start. I want to first clean it up a bit and then try and use it. I'm concerned with spending too much time before actually using it. I want to make sure the holes are big enough, but not too big. I also want to make sure there aren't too many holes.
I've seen some period examples of pots and some later examples as well. Based on those examples I think I have about the right sized holes and about the right number. I'm going to tape some cardboard on the bottom and give it a try before going any further with this project though.


