
Continuing work on my "Weights and Measures" project. Hoping that these efforts will make their way into the A&S Pentathlon competition this year. We shall see if I can finish enough projects for that though.
Where I left off was some mostly finished chains and a mockup of the pans they will connect to. Much progress has been made. I decided to make two sets of scales. The larger one will have slightly dished copper pans and the smaller coin balance will have triangular brass pans. I've found extant examples of both styles. Most of the examples of the triangular ones were flat pans. I did see one with angled corners, which is the style I adopted. Since I didn't plan on much embellishment on the surface I liked the character that the angles provided.
Where do I get my metal you ask.... "Well I love shopping at Salvation Army!" The two plates pictured here are made of about the same thickness. The copper is slightly thicker, but I have no gauge to measure the exact thickness. They both sold for 75 cents and are solid metal. The one on the left is brass and the one on the right is copper. Two of my favorite metals.

II decided to make the copper pans round, to go with the brass set of chains. I chose to make the brass pans triangular to go with the copper chains. I started by using a marker to draw the shape onto the metal and then I used sheet metal cutters to slice out the rough shape. Tough cutting through the edge of the plate which has a rolled rim. The sheet metal cutter did the job though. Not period, I know, but this project is more about the finished look and less about the period construction techniques. After the pieces were roughed out I used the sheers again to clean up and get closer to the draw lines.


After I had the relatively clean cut pieces I took a metal file to the edges to knock off any potentially dangerous sharp edges. I then rotated the pieces against each other to make sure that they were both the same shape and symmetrical.


AAs I mentioned earlier I decided to make the triangular pan a littler more than flat. I drew some lines on my two pound anvil to mark the spot where the brass would sit. I then used a few quick sharp blows to knock the corner down a bit. Once I determined the pieces matched and the angle was clean and sharp I added the next set of bends.


What is this picture for you ask? Looks like a poorly centered image of my itty bitty anvil. Nope, that pic was my reminder to myself to show the manner in which I cushion the blow and the noise of my banging. The padded mat you see beneath my anvil is the type they sell to go beneath throw rugs to keep them from slipping. Serves two very nice purposes: 1) It deadens the noise of the anvil crashing on the table. 2) It saves the surface of the table (which also means it saves ones relationship with his significant other.)


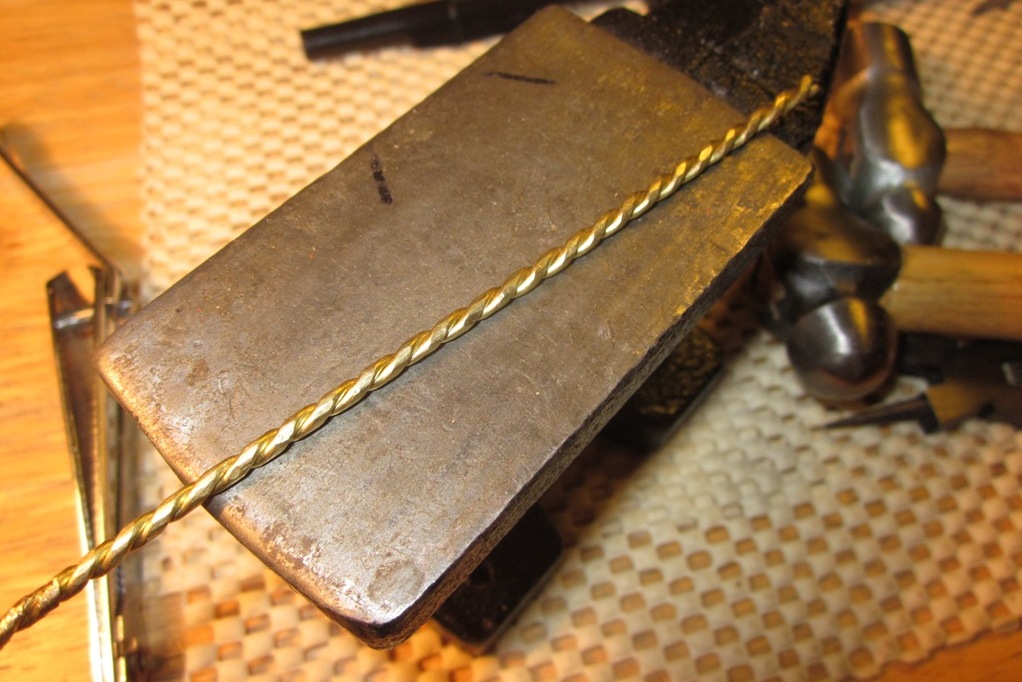
Next step in the process was to fabricate some sort of ring from which the chains would hang. Most of the extant examples I saw either didn't have any ring left or had what looked like a simple jump ring. I chose to make a functioning jump ring, but a little more decorative. I started by twisting a length of brass and then hammered it a bit. I really like the look but I'm not entirely sure if I will be able to braise/solder the rings closed while the other bits are hanging from it. Oh well, I made the rings first and I'll figure out how to close them later.
I made these first by twisting the wire. I placed the two ends in a pair of good strong pliers. I then place the loop end around a piece of rod held tightly by a vise. I then proceeded to simply twist the pliers around and around. When complete I hammered it a bit and then used jewelry pliers to form a rough spring. I then shaped the "spring" over a jump ring mandrel to hammer and tighten up the wire a bit before cutting it. Once happy with the shape I used a small saw to cut the jump rings off the coil. Small amount of filing was needed to clean up the ends. I hope that they solder easily.


I wasn't entirely sure what size I wanted so I created two sets of rings. You can see them here next to a ruler.


Next step, figure out how to join the chains to the rings. The rings were made a bit thicker than the material used for the chain. The brass wire used for the ring started out as 16 guage brass, but ended up thinner when doubled up, twisted and hammered. Here you see the chains hanging from the mockup ring. I wanted to hang them all evenly to best match up two sets of three chains as close in length as possible. Even though I tried my best to make every link the same, there was no way to ensure exactness. I simply group the chains in two groups of three that best matched.


The prototype become the final product. I started out this section as a prototype, but I really like the look and so I decided to keep those style links as my hangers. I made three more to complete the other set of chains and I'm done with that step.


To hang the pans obviously I need to make some sort of holes in the pan. I started by using the awl you see here. I struck the brass from the top, then reversed it and struck from the bottom. After two iterations of this, the holes were made. I used a small pin-vise drill to clean up the hole and make them uniform. Not sure if they used those in period or not. I wanted a nice clean look and my punched holes were not entirely uniformly created.

Well, I couldn't go any further now that I had a set of chains and a punched pan. I quickly fashioned some rough copper hooks to connect the pan to the chains just to get a feel if I like the length/size/look. So far this project is exceeding my expectations. Very happy with the look.


I ended up with the option you see below. Looks like a simple pin head on one end and an eye hook on the other. Very practical. Allows for full mobility. Offered none of the problems that the hook or link method had. The hooks and eyes didn't want to hang nicely when first picked up. The hooks were more likely to snag, twist or cause a problem when I set the scale down flat and then picked it up. This pin approach allows for rotation of the chain and prevents any issue of twisting or kinking.


Now that I finalized the approach I would use to hang the pans I went back and softened up the edge of each point on the triangle.


At this point the work on the coin balances had come to a stall. I have both pans and chains fully built and operational. The next step is to fabricate the arms of the balance. Before that I figured I'd take what I just learned to make a set of hangers, rings and pan hooks for the larger balance. I took the same ideas and construction techniques and applied them to slightly larger stock for the brass chains.


Jump rings and hangers done!

Now this is the part I have been kind of looking forward to, making the copper pans. These pans needed to be dished slightly. I started by simply using my dishing stump and my modified sledge hammer. These rough dished shapes were constructed in about 10 minutes. Very rough and not nearly symmetrical They were simply the starting point to ensure that the shape and size was what I wanted. Held up to the chains I decided that I was happing with the depth of the dish and now I could go back over for a more detailed cleaning of the pans.


My other took which I needed was a planishing form. I used this heavy ball hitch. I purchased this ball hitch from Harbor Freight on clearance. Only a couple bucks but worth it. I took a grinder and sander to this as well to knock off the sharp edge it came with. Works great as a surface to planish against. I will have to hit this again with my buffer to clean it up before I do the final run of polishing my pans with a hammer.

Here are my slightly better looking dishes. Smoothed them out more and matched them up so that the depth and shape of the two pans was consistent.


I decided to get done quicker so I hit them each with a sander to smooth them out and find any imperfections. Here they are after about 5 minutes sanding.


While working on the copper pans I started thinking about something. These pans will see a lot of use by placing small metal items on them to be weighed. The weights I plan on making are made of metal as well. Making the pans with a high polished shine is probably not the best idea. With a mirror finish any tiny scratch or imperfection will show quickly. The more I thought about it the more I decided to hit the pans with a soft scouring pad to give it a more frosty sheen. The frosted look would mask any scratches the pans would get from use.

Before scouring pad...

After scouring pad...

Kind of a pain to go through the trouble of polishing them, but I think in the long run they will look better like this.I haven't yet done the same thing on the copper pans. I'm still debating on scouring the inside of the pan and leaving the outside with its raw planished look. I like the look of planished metal where you can see the very small hammer strikes. My arm hurt here though and I had to call it a day.

Lastly, here are a few more types of chains I experimented with. Not sure what I'll do with them. I like each of them for a different reason. Maybe I'll use the ideas from each for something in the future.


