Pages

Monday, September 16, 2013

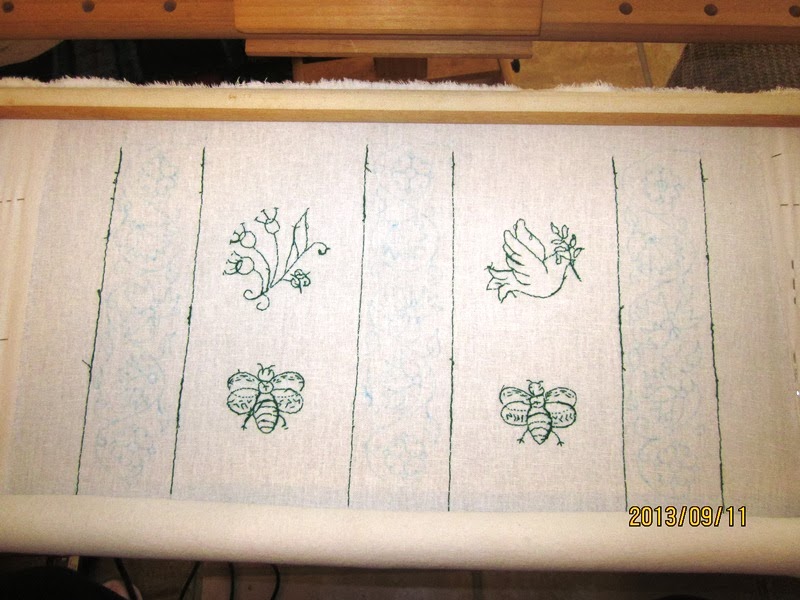
Greenwork Shirt Sleeve 2 Section 1 Completed

Same style work, slow progress being made.
I find this sort of progress tracking rather interesting.  Three full spools and a small amount of a third required to complete one sleeve, two cuffs and one collar.


Since these photos were taken I have fininished the first section of the second sleeve.  The quality of work seems to have improved, although the rate of progress has seemed to slow down a bit.  I was hoping that it would go faster.  Not sure, maybe I was simply having a few off days.


 Front and back closeups


Here are some pictures of the first section front and back.  I think my quality of stitching has improved greatly with the last 100 hours or so of work on the first sections.


Here is the update to date chart of work so far. Still looking like a 350 hour or so project.

Description
Initial frame setup1
Overall design and layout2
Research, drawing & layout planning1.5
Wash and stretch fabric0.42
Collar9.67
Cuff 14.17
Cuff 25
Sleeve 1 Section 1 - Flowers/Bees5
Sleeve 1 Section 1 - Vines12.33
Sleeve 1 Section 2 - Flowers/Bees4.28
Sleeve 1 Section 2 - Vines11.25
Sleeve 1 Section 3 - Flowers/Bees3.33
Sleeve 1 Section 3 - Vines9.83
Sleeve 1 Section 4 - Flowers/Bees4
Sleeve 1 Section 4 - Vines11.5
Sleeve 1 Section 5 - Vines2.08
Sleeve 2 Section 1 - Flowers/Bees5.33
Sleeve 2 Section 1 - Vines13.92
Sleeve 2 Section 2 - Flowers/Bees1.25

Tuesday, September 10, 2013

Bronze Sand Casting

I recently was able to take my first attempt at sand casting bronze. I've done some pewter work with soap stone, but I have never successfully cast anything in bronze. I attended an event called For Hands and took a class taught there by an awesome teacher.  He goes by the name of "HL Guillaume del la Sudeterre" in the SCA.  The following images were photos taken at the event, some by me and some by my daughter.  I roped her into my adventure and she serves as my photographer a lot lately.

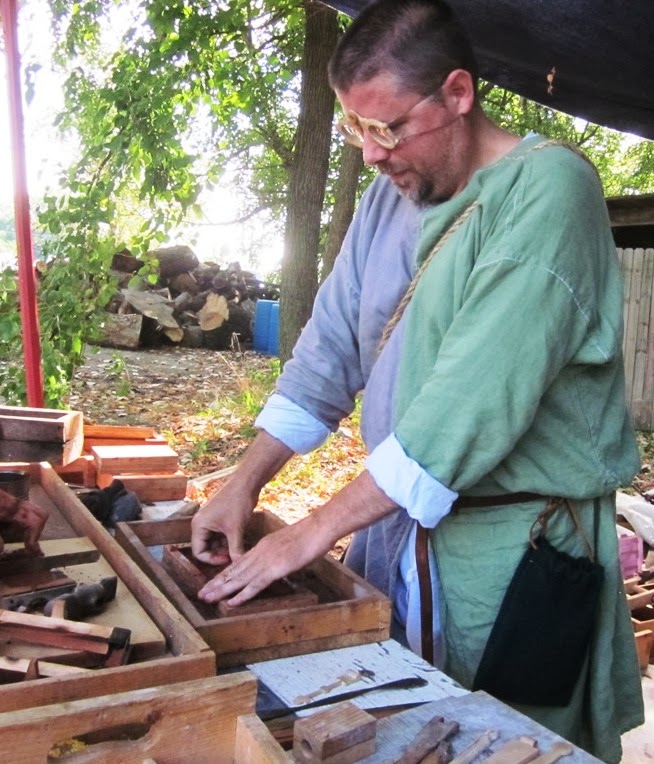
The gentleman on the far right is HL Guillaume del la Sudeterre who was instructing the class.


This first piece was for another student but the instructor did most of the work to show us how it would be done.  We had a selection of wooden shapes to choose from which he had created previously.  This particular object is a small flint knapping hammer.  The piece is placed face down on the work surface and then surrounded with the frame.  I light coat of talc was then tapped onto the piece.


The mixture of sand and some other agents (I wasn't taking good notes) was pressed into the mold.  When the frame was sufficiently packed a hammer head was used to pack the sand firmly into place. After sufficiently packed the frame was flipped over.


 A second half of the frame was added and the piece was coated with talc again.  The second frame was packed with the same sand in the same manner.  You can see here that when the frames are tapped on the side you can separate them into two distinct frames again allowing you access to remove the model.


At this point I started the process with my own piece.  I chose a two part model which would become a small compass.  As you can see I angled the pieces so that the smaller ends were closer together as I planned on cutting the sprue on that end.


I placed the two pieces in place, applied the talc and held them in place with one hand as I packed in some sand.  Once sufficiently covered I began packing the sand in with my thumbs and then the hammer head.


Back to the instructor.  He began to show us that we would remove the piece and then cut a sprue slot where the molten metal would be poured in.  He indicated that the opening should be sufficiently large enough to allow a pool of molten metal to sit.  As the metal in the mold would cool it would shrink.  As it began to shrink the still molten metal in the sprue would trickle down and fill in the gaps.  


Here I have finished packing my first frame and was ready to flip it and apply the second side.


So far so good.


At this point I was doing close up work and had to remove my glasses.  The purpose of the next step is not always needed.  If the model being used is square this process may not be needed.  When the model is a rounded shape some of the sand must be removed to allow for the piece to be removed cleanly.  The following images will demonstrate what I am talking about.

Assume you have a round piece.  If you covered the piece with sand, flipped it and then covered the other side with sand when the mold was opened it would look like this.  The piece would be buried and unable to be removed.


Instead, after the first mold is flipped the piece must be dug out slightly up to the half way point of the rounded piece.  In the image below you can see that I would dig out along the dotted line to allow easy extraction of the piece.  


After digging out the piece and then flipping the top frame would be filled with sand to provide the following cross section.


At this point I was doing close up work and had to remove my glasses.  I began carving out the piece with a few small metal tools that the instructor had.


Pieces carved out and ready for the next step.


I covered the newly carved sand with another layer of talc so that the next layer of sand would not stick to it.  I placed the second half of the frame on top and then packed away.


When the halves were opened up you can see that the top half has a protruded layer of sand similar to that of the cross section image above.


It is now time to cut out the section for the sprue.  The opening was cut on both sides of the mold and formatted so that the flow of molten metal would go into both halves of the mold evenly.


 After the sprue was completed it was time to cover the mold with two pieces of plane lumber and clamp it shut for later filling.


As evening progressed the bronze was melted in a propane forge.  Here you can see the instructor checking on the warming metal.  It was heating for about an hour or so before it was ready to pour.


The process was rather amazing to witness.  The instructor held a long armed instrument which would carry the crucible.  A second gentleman (Master Gerald Goodwine) lifted the crucible from the heat source and placed it into the carrying device.  He then helped guide the pouring into each of the molds.  My job was pretty easy.  I simply held a pair of tongs to make sure that the clamped molds didn't move as he was pouring.


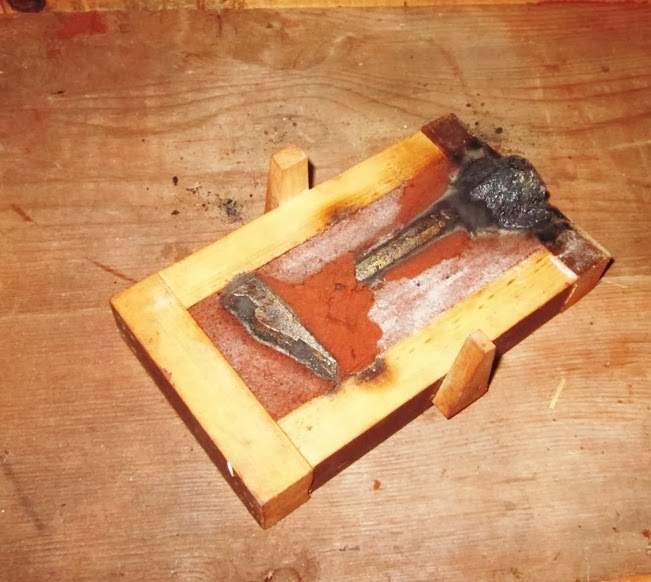
You can see that some of the molten metal did spill onto the wooden frames.  As it did the wood ignited and began to burn.  This is a normal occurrence I was told and nothing to worry about.  Eventually I tried blowing some of the flames out and the molten metal would ignite them immediately anyway.  After about 8~10 minutes the flames would go out on their own.  The instructor took a small hand full of dirt and dropped it onto each mold to suffocate the fire sooner.


Here you can see the burning molds and the instructor holding the device with the crucible.  Master Gerald would then take the crucible out of the device and place it back into the heat for a second pour of another project.


After letting the molds sit for about 30 minutes or so they were broken open.  here you see the first hammer that was made.


 After seeing how the process was done I opened up my mold to find the piece nicely formed.


At this point the piece was still rather hot.  Using small tongs the piece was placed into some water to cool it down quicker.  You can see that there is a bit of extra material around the seam of the piece but I think that will all clean up easily with a metal file.  The sprue was cut off and the pieces fit together perfectly.


Greenwork Shirt - One Sleeve Done

Well there have been many hours spent thus far and I can now say that I have one collar, two cuffs and one sleeve fully embroidered.  Not much in the way of details to add here.  The process is simply more and more of the same.

Here are the images that I'll be using in various locations on the shirt.


Here is the completed sleeve.  I hand washed the material in cold water and then stretched it out by hand to flatten the design.  Here is a pretty bad picture of it hanging in my bathroom drying.


I have been keeping a rather detailed log of the work I have put in on this project and below you can see that I have over 90 hours in on this project so far.  Based on the previous estimates and the current progress I still anticipate that the blackwork will take over 300 hours and then I'll have to assemble all the parts.  I am still guessing that this will be about a 330-350 hour project.

Hours By Section


Description

Initial frame setup1
Overall design and layout2
Research, drawing & layout planning1.5
Wash and stretch fabric0.42
Collar9.67
Cuff 14.17
Cuff 25
Sleeve 1 Section 1 - Flowers/Bees5
Sleeve 1 Section 1 - Vines12.33
Sleeve 1 Section 2 - Flowers/Bees4.28
Sleeve 1 Section 2 - Vines11.25
Sleeve 1 Section 3 - Flowers/Bees3.33
Sleeve 1 Section 3 - Vines9.83
Sleeve 1 Section 4 - Flowers/Bees4
Sleeve 1 Section 4 - Vines11.5
Sleeve 1 Section 5 - Vines2.08
Sleeve 2 Section 1 - Flowers/Bees3.08
Sleeve 2 Section 1 - Vines2.67
Grand Total93.12
3:42pmHL Guillaume del la Sudeterre His real name is Hayward Hall.

Tuesday, September 3, 2013

Changing the Game

After returning home from my Pennsic Wandering Friar experiment I had various communications with a number of folks where I acknowledged my frustration with some aspects of the SCA.  While considering both my journal and those communications some thoughts were sparked in my head.  I would like to share those thoughts here.  I would like to compile a running list of ideas on ways to "change the game".  Feel free to send me your own practical, constructive and concise ideas.  Try and remember what it was like for you when you started.  Is the magic still there for you?  I'm curious to see what other people think are easy ways to improve our hobby. 
At every event/function you go to:

  • No snarking... ever.  Not in public and not in private. 

  • All forms of snarking degrade the experience of others and inhibits growth of our group. 

    Example of snarking without compliments – “You know linen is very easy to find these days.  There is really no reason to make a shirt out of faux linen which is really a non-period fabric.”

    Example of snarking wrapped compliments - I love that dress you made.  You know that the shirt isn't really from the same time period as your dress though?  It would look so much nicer if you tried to make a shirt which would match.  I love your work and look forward to seeing your future attempts.


  • Find at least one person who you have never talked to, smile, wave say hi.

  • I'm an introvert and talking to people I don't know is very stressful.  You don't have to talk to make a person feel noticed and welcome.  Smile, wave and nod your head.  That is often enough.


  • Find five people who you have either never or infrequently talk to.  Find the thing you like best about their "look" and tell them.  No constructive criticism, simply say "What you did there... love it!"

  • Don't: That dress is lovely.  Next time you should try adding some period trim.  That would really make look even nicer.

    Do:  That hat... love it.  Looks wonderful!

    While walking around at Pennsic as a mute I went up to people and tapped them on the shoulder.  Without talking it was tough, but when I pointed to an aspect of their garb and then gave them the OK and thumbs up, they knew what I meant.  A silent compliment always brought out a smile.


  • Compliment and thank your servers.  A small token of thanks means a lot to a volunteer.

  • We never think twice about tipping a waiter or waitress at a restaurant.  Even bad service warrants some sort of tip.  Why not offer a simple thank you to your server?  Even if you didn't like the food, a thank you to the server will be appreciated.


  • Compliment and thank your cooks in public.  Never publicly criticize the cooking staff.

  • I've attended great feasts and poorly managed feasts.  Nothing good can come from publicly criticizing the cooking staff.  Remember they are volunteers and usually doing the best they can.  Critiques and complaints are not often well received at the end of a day when the staff has been in the kitchen all day long working to make your meal.  Constructive criticism should be done in private and a few days after the event.


  • Thank a parent who brings small children to an event.  They are the lifeblood of the future, make sure you acknowledge it.

  • Seeing children at events has always been one of my favorite aspects of the SCA.  Managing at an event with children can be very challenging.  Let a parent know that you appreciate their effort since their children are the next generation keeping our hobby alive.


  • Even if you don't have children, participate in an occasional activity with minors.  Foster our future.

  • Children raised in the SCA will have even more insight and opportunity to make our community better in the long run.  To best foster the dream, foster their dreams.


  • Thank the water bearers

  • When you are in the heat of battle and caught up in the day's activities don't forget to say a simple thank you to those who support you.  While water bearing at Pennsic I encountered many who were gracious and thankful and for every jug of water offered.  There were others who never offered a word of thanks.  Playing the game of battle requires a lot of support staff.  Simply nodding and saying thank you at least lets your supporters feel that they are appreciated.


  • Thank the event staff who volunteered to set the stage for you fun.

  • Running an event takes a lot of work before the day begins and constantly throughout the day.  Make sure you acknowledge that effort if you want to enjoy events in the future.  Again, any constructive criticism is probably best packaged and received a few days after the event rather than the day of when everyone is worn down and tired.


  • Pay someone's gate fee if you can.  Drop the cost of a site fee at troll and secretly tell them to apply it to the next person who comes in with a minor or comes in without an SCA membership.  Leave a note "You've been a victim of a random act of kindness.  Enjoy the day"

  • If you do this don't make an effort to find out who benefited from your gift.  That may make the recipient feel awkward and beholden.  Simply enjoy knowing you made somebody's day and they may do the same to someone else someday.


  • Even if you are not an A&S type person, go look at the displays anyway.  Lack of foot traffic is very demoralizing.

  • There are many aspects of the SCA.  The more you support and foster other's areas of interest, the more they will be willing to support yours.  Walk through, smile and say nice job.  Every artist will be thankful for such a visit.


  • When a performance art is offered, attend, watch, listen and applaud.

  • It takes courage to put oneself on a stage and perform for the public.  Make sure when you see folks performing you let them know you appreciate their effort by being courteous and respectful.


  • Create your own personal token.  Leave it at displays/performances you enjoy. 

  • One of the easiest things you can probably do to make a new person's day.  A person new to the SCA who receives such a token will be more likely to be proud of what they have done and come back and try again.


  • Give tokens of thanks to those who demonstrate all that is good in the SCA.  Tell them you appreciate what you witnessed.

  • I once did something simply because it had to be done.  Somebody came up to me and paid me a nice complement and gave me a small token of their thanks.  They didn't have to do that, but I was walking on clouds for the rest of the day knowing my work was appreciated.


  • Even if you are not a fighter, pick out a newer fighter and cheer for them loudly at the day's tournament.

  • There are many things that go on at events.  Branch out and see more than your little bubble.  Even if you are not a fighter, cheering and playing along will help grow the bond between the 'factions' in our hobby.


  • When you receive an award thank the signet and thank the scribes who made it possible.  Don't critique artwork even if you don't care for the period, style or design.

  • Many hours go into the production, collection and distribution of awards.  Be thankful for what you have received.  Don't critique the artwork publicly even if you hate it.  Remember that all the efforts are volunteer and many artists see their creations as they see their own children.  You would never walk up to someone and say "Wow your child is really ugly!"  so hopefully you won't demoralize an artist by complaining about a scroll in public.     


  • Don't leave early.  Go to court and cheer for awards, even when given to those you don't know.

  • Try and remember what it was like for you when you started.  Try and remember the dream.  Foster the dream in others.  Be respectful during court because you may be sitting next so somebody who is a friend of the recipient.  When you cheer for even those you don't know you are building a future for our hobby.


  • Don't sideline an instructor's class.  This is especially important when you can see that the instructor is inexperienced.

  • Becoming a new instructor is very stressful for some, myself included.  I have attended a number of classes which got sidelined by a well-meaning experienced teacher.  Even though you mean well and are only offering what you think is helpful, you may be scaring away future teachers in the room.


  • Don't critique an instructor during class.  Do so afterwards and only in a positive manner and only if you wrap it between two compliments.

  • Try and remember what it was like for you when the dream was fresh and real and you taught your first class.  Not everyone is an extrovert, so do not get hung up on critiquing somebody so much to show them that you know more.  A new instructor may be so overwhelmed that they simply decide never to do it again.  Without teachers for the future our community will not grow.


    The following entries were added after the initial post as feedback from other SCAdians.

  • When a herald cries Oye, immediately cease your conversation and attend. .

  • The sooner everyone is quiet, the sooner the herald can deliver their announcement and everyone can get on with their activities..

  • If someone asks you a question, take time to listen to the question and answer thoughtfully and fully.

  • Compliment and thank your teachers.

  • A small gift or token for a teacher lets the instructor know that you are aware that it takes a lot of time to put a class together and that you appreciate their time.