Pages

Showing posts with label archery. Show all posts

Sunday, February 2, 2014

Medieval Bag Quiver

On a snowy day after the driveway has been cleared off twice and the wife and kids are out at a friends birthday party what does Daddy do?  Well, gotta be a "project" of some sort.  After finishing a half dozen projects lately I was at a loss of what to work on next.  I muddled some ideas around and then I finally decided rather than starting another project I might finish an old one.  I decided to finish the Bag Quiver that I started working on in the summer of 2012.  See post (Bag Quiver) for further details.

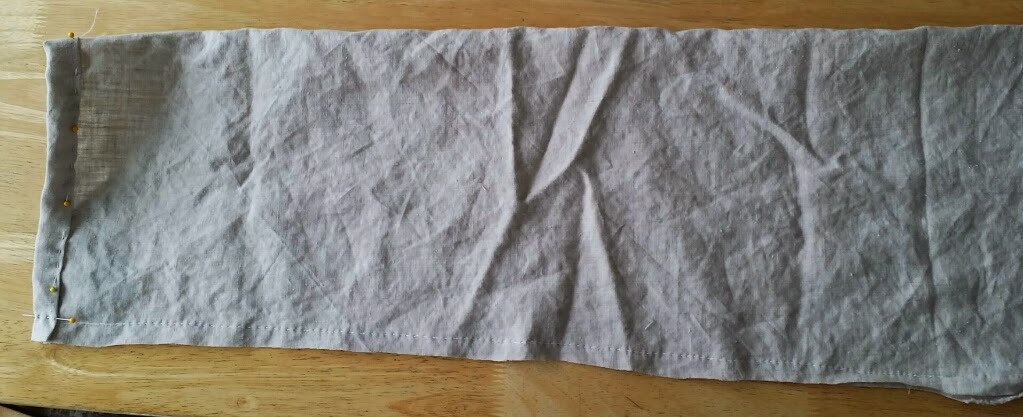
Started with a heavy weight piece of linen.  This has been in my stash a while so I'm not sure where it came from, but I think it was a Hancock Fabrics purchase.


On the image above you can see that on the left the opening is about 1.5 inches narrower than the opening on the right.  The left side will be the bottom of the bag.  I ran a seam down the side using a running stitch.  I know that this seam will not be under tension and doesn't need to be pretty so this was just a quick and dirty seam.  I then trimmed the edges leaving .5 inches on one side and .25 inches on the other so that I could fold over the seams and flat fell them.


Pinned and ready I whip stitched the flat felled seam closed.

xxx


I had to allow for a closure both at the top and the bottom.  I planned on either using a leather thong or a small rope to close the bag.  I also rolled the edges which were exposed at the top of the bag opening.  I find it easiest when doing a whip stitched seam to simply fold over and whip stitch loosely.  When you open up the fold you have a neatly flattened seam.

For example:
 

If you whip stitch loosely when you open up the fold you hemmed edge is hidden nicely and from the right side you see very even, small, straight stitches.


This was the plan.  As you will see later I left the opening at the top too large and had to close this opening a bit for fear that my arrows might fall out even when the bag was closed.


Here is a technique I used ALL the time when hand sewing.  I sit at the table and pinch a section of the fabric between my stomach and the table.  I simply lean onto the fabric to provide tension.  I then pull the seam with my left hand and stitch with my right.  This allows me to hold the seam flat, straight and provide consistent tension when I tighten my stitches.


This was not part of the original plan and I have no historical basis for it.  I imagine that most bag quivers were used to simply transport large amount of arrows to the front line.  I don't really believe that they were used, over and over and over again to carry a couple dozen arrows to the archery range.  In any event I was worried that the linen would weaken and begin to develop holes at the bottom of the bag from use.  As arrows are dropped into the bag over and over they might start to pierce the bottom of the bag.  I decided to take a scrap of wool which was literally on the top of the garbage pile from last weekend's project.  I cut the wool to a roundish sort of shape in hopes tht when the bag was closed it would provide enough cushion to ease the points in without damaging the linen bag.  Only time will tell.


From the outside after the wool was stitched into place.


Here is the leather spacer I finished about a year or so ago.  I added a heavy weight linen stitch around the edge.  Again, no period example of this.  To my knowledge only the extant leather portions exist today so the manner in which they were attached to the bag is purely speculation.  I decided to add this running row of linen to allow me to then more easily stitch the bag to that edge-work.  If I were making hundreds of these for carrying arrows to battle surely I would not have done this.  I would have probably stitched the leather to the bag with as few steps as possible.  I want my bag to last from use though so long term durability was a concern.


After pinning into place to ensure proper spacing I then ran a simple whip stitch from the linen bag through the loops of linen thread.


Completed attachment.


I then pulled the bag top over the leather and smoothed out the folded edge just stitched.  The result is only a series of small stitches from the outside but the leather spacer is very securely in place.


After trying a few versions I ended up mixing.  I know that in period the bottom of the bag opened so that the arrow bag might allow the archer to simply pull arrows from the bottom for use.  I don't really envision me opening and closing the bottom of the bag often so I wanted a very tight and secure closure.  I found that the leather thong provided a better closure and a more appealing look.  Frankly I just liked it better.  I went with about 1/4 inch hemp rope for the top of the bag.  I wrapped the end of the rope with linen thread to keep it from fraying.


Here you can see the space where I left a large opening.  I ended up stitching the opening about 80% of the way up.  Next time I should probably measure and do a mock up.  This project was sort of a snip and rip guesswork sort of thing.


You can see that I left the rope for the top closure a little long.  I did that on purpose so that I could take one end of the rope and use it to tie to the bottom.  This would allow me to make it into a shoulder bag in the event that the archery range (at Pennsic) is a long freaking walk!


Here you can see what the bag might look like loaded.  At the moment I have only carbon and aluminum arrows.  My next project is to make some proper wooden arrows to fill the bag with.


Tied for use as a shoulder bag and ready to head to the range.

Sunday, January 27, 2013

Largesse Project has been mailed


I joined an A&S Gift swap "event" called the Midlands Largesse.
http://www.facebook.com/groups/282763965120014/
The description provided is as follows:  "A&S based 'secret-gift' exchange for the Midlands Region. The swap sign up is going on now and will go through September 8. Participants will receive their recipient assignments by September 15. You will also receive information on the recipient at that time. You do not know who got *your* name until you get your gift!
This is the SECOND ROUND The object of the game is to create, for less than $25, a product that can be used by the recipient in the SCA. Items will be due by January 31, and there will be a face-to-face exchange at the Festival of Maidens. Anyone in the Midlands, or who considers themselves a Midlander, is invited to play."
After joining I received information regarding my recipient:

SCA Name: Eadric the Smith
Modern Name: Max isenholt
Persona: 10th Century Anglo-Saxon West England
Preferences: Colors are medium gray and forest green (white and black work, too); prefer to not have foodstuff; I do archery, thrown weapons, and learning blacksmithing. 
Heraldry: Gyronny argent and vert, two ravens volant and an anvil reversed sable.

Well, I did some digging around on the internet.  I felt a bit like a stalker I must say.  I wasn't able to find much in the way of useful information.  I found only one picture of the gentleman and a sample heraldry which was submitted when he registered it.

http://wurmwald.pbworks.com/w/page/1949004/Eadric%20the%20Smith


After much time spent on Google and much pondering I settled on making an Archery bracer.  Eadric went to the trouble to register his device which I was able to find on the SCA website and therefore I settled on creating something with a version of that device on it.  I decided to make a leather bracer to be used in archery.  Eadric had indicated that he did archery so I supposed that's as good an idea as any.  I had been in the mood to start doing some leather working anyway, and have never really done any tooling (since I was in Boy Scouts some 30 years ago).  I've recently been making my own leather working tools with the intent on making a bracer and quiver for myself.  Good first attempt.

This post will be the steps taken to make the bracer from start to finish.


I planned on tooling the item with his device on it, but in a more Anglo-Saxon design.  I did some digging for design ideas, but my leather tooling is still beginner so I went with some plain knot-work style border surrounding his device.

Here is the initial sketch.  Well, there were a few versions of varying sizes, this is the one I ended up using though.  I sketched it on notebook paper and then kept tweaking it to see if it would fit my arm.  I mocked up some straps, which changed 3 or 4 times along the way, as you'll see.


After mocking up on paper I cut up an old cereal box to mock up a stiffer version.  At any given time I have about 10~12 of these type boxes just for this purpose.


Here is the vegetable tanned leather I purchased from Tandy.  Honestly I don't remember the weight.  It is rather thick though.  I purchased three thicknesses and ended up using the thickest one.  The thin ones I planned on using for strapping, but threw those out and revised that plan.  This leather about 8~9 ounce leather I think.


Freshly cut out I dampened the surface and then traced the image from my design.  I used a simple ball point pen pressing hard enough to mark the surface of the leather along the way.


Once the image was marked well enough into the surface I used a home-made carving knife to cut along all the lines before tooling it up a bit.  This part was new to me.  I've only done a few mock-ups of this type of stuff.  This was my first actual project using this approach.


Thought I had more pictures along the way, but I guess not.  Knotwork was a bit tricky.  Trying to press the varying degrees of depth to make the knotwork flow nicely.  I finished this and then took it up again about 5 times adding more detail and trying to fix the shading over and over.  I might do some of this differently next time, but I guess it came out well enough.  I need to make some more tools though.  I didn't have a shader with a sharp enough edge on it.  I was pressed for time and had to use the tools I had.  Wanted to make this entirely using my own home-made tools.  I ran out of time for making new ones.  I have about 6 more styles of punches I plan on making before my next project though.


I debated about dying the surface all black, oiling it and leaving it brown or simply painting it.  I really don't like the look of painted leather.  It may be period, but I just don't like it.  I was debating between the dye and simply oiling.  I made my own vinegaroon and planned on using that.  After some issues with it I decided against it.  I applied some of the dye to a few sample pieces of leather and it looked great.  Below you can see the jar of vinegaroon I made and a few of the sample pieces.  Took only one coat and very quickly covered in a rich black.  I then tried it on another piece of leather that I tooled a bit.  Wanted to see how long it would stink and if it impacted the detail.  Stink faded after only about two days.  Detail wasn't impacted at all.  Issue I found was that there was some oil stains on the leather.  I feared that my tools would rust after non-use so I coat them with a light coat of oil.  I thought I cleaned them all off, and yet the dye had trouble coating nicely.  Must have been dirt from the leather store or oil from my tools.  Either way I had a problem.  I posted on some leather working boards for ideas.  Got some ideas.  None really worked well enough.  Went to Tandy and spoke with an instructor.  He recommended an oil based dye.  We tried that and it didn't cover well either.  He also recommended a deglazer and oil.  I used the deglazer to clean the surface and then coated it with neatsfoot oil and let sit for a day.  He indicated that the oil would open the pores and allow the dye to soak in well.  It did.  I coated better, but not enough for me.  I was really worried about getting 1/2 way across the surface and finding a blemish which would not coat.  Next time, when I have more time I'll do it on my own piece.  Time was a factor and I ended up simply treating the leather with the oil alone.


Since I wasn't going to add color to the surface I used a heraldic blazoning technique to demarcate the green areas.  The color green (vert) is indicated by a diagonal line from top left to bottom right.  I scored the surface of the leather with a knife lightly before applying the oil in hopes that it would show enough.


Here is the oil I invested in from Tandy leather.  As you see, the straps I have here are not the ones I had above.  Those were not thick enough.  I made a new set.  Those sucked too.  I tried making a buckle, but it didn't have the movement I wanted and so I broke down and bought a brass buckle from Tandy.  Bummer.  Next time... more time... I'll make the buckle.


Here is a close up of the leather used for the straps.  It is a much softer already dyed leather that I bought from a vendor at an SCA event.  I purchased a bundle of "scrap pieces".  Lots of odds and ends and small pieces for small project stuff.  I wasn't crazy about the color, but once I dyed the other stuff I was OK with the two tone look.  I hope the recipient likes it as well.  I used a brass riven to hold the buckle on.


The FINAL piece.  These are the last pics before I stuck it in the package to send out.  The strap was quite a bit longer that I would need, but I'm not sure how big the recipients arm is.  Hope he can cut it to size easy enough.