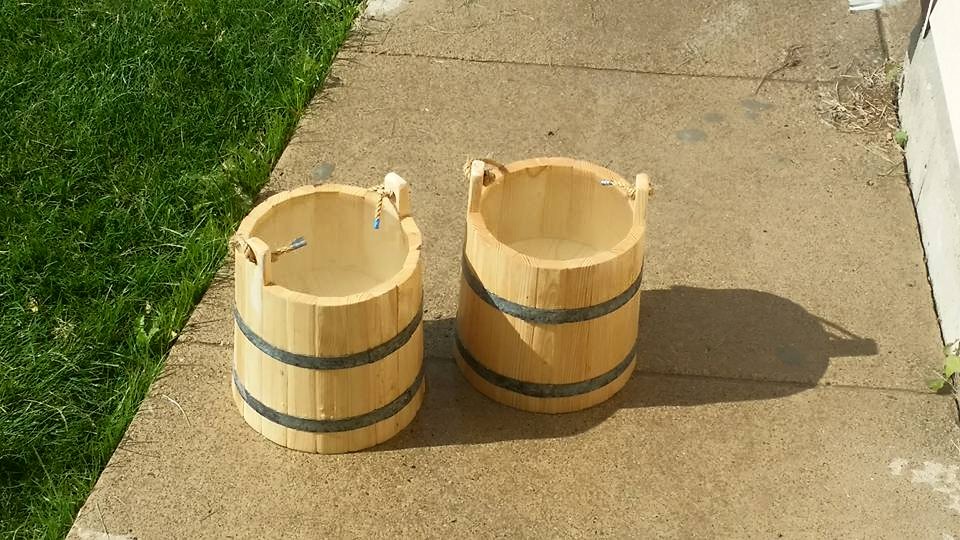
Well "wash and rinse" are done. That is the name I have given my newest project. Each bucket stands about 12 inches high and is about 39 inches around at the base.
I'm not ready to change my last name to Cooper but they will have to do for this year's Pennsic. I have a small metal pot I plan to heat water in over the fire. I then can use my wash bucket and my rinse bucket to do laundry, dishes, etc. No glue or nails used I the making of these new items. Some day I may try to make another using traditional methods but this was a LOT of fun for a first bucket.
Started out as 1X10 with some knot holes. Marked the sections with the least holes I could use.
Ripped into 12 staves 1/4th of the board width.
Created a jig to cut the angle on each stave. Since I was using a jig all staves would be the same width. I planned on 20 staves which meant a 9 degree angle on each cut.
First angle cut.
All cut an layed out. You can see by the slight curve that the angle of each stave was very shallow. Next time I might make a jig with slightly bigger angle.
Had an idea to get them together. I taped them all side by side so that when I picked them up the bucket would form itself.
Tape idea worked oK on the first bucket but not the second. Too much saw dust and dirt. The tape wouldn't stick well. Once I had one hoop made putting them together was easier.
Initial setup seemed ok. angles all lined up with only slight gaps.
Based on the measure from the top and bottom you can see that there is only a very slight angle. Bit of a mistake actually. Next time I'd make that angle more acute. Made a tough problem when adding the hoops later. It would have been easier if the bottom hoop were large enough easily slip over the top hoop.
Used a modified ball peen hammer. I ground the hammer down to make a straight peen face. I then used that straight peen to knock notches into only one side of the metal strips. I found this metal by the side of the road when I was on a walk with my kids. I imagine it was some sort of strapping left over from construction. There was recently completed road construction but they didn't do a good job cleaning it up. By striking only one side it stretches that side which makes a slight arc. When made into a hoop the top of the hoop will be slightly smaller than the bottom. Fits the bucket better.
Cut about 2.5 inches longer than the circumference. Held up to bucket and marked for riveting.
Drilled and riveted. Notice on the right that I had to strike the top layer slightly to bring the strap in line with the bottom layer. That would ensure that the strap would make contact with the surface of the wood.
Drilled and riveted. Notice on the right that I had to strike the top layer slightly to bring the strap in line with the bottom layer. That would ensure that the strap would make contact with the surface of the wood.
Made a second ring. Note that the ring was a bit too big. Oops. Had to toss it and make another. Good practice. I used it here to hold the staves in place so that I could remove the tape.
First bucket prototype (right) worked well. Started a second bucket. This time I actually rounded the edges of the staves slightly to soften the curve on the outside. I did that before making the hoops.
Once cut and fitted I used a router to cut a groove in each stave. The cut was very rough. I used a small knife to clean up the edges of each cut.
Once cut and fitted I used a router to cut a groove in each stave. The cut was very rough. I used a small knife to clean up the edges of each cut.a
Cut, cleaned and lined up.
Saw this method on a YouTube video. Worked well. I clamped one stave in and then added 2~4 more. Added another clamp. Once all the stave were in place the clamps would be removed and the ring, even when very loose, will hold them all together.
Took the first bucket apart and rounded all the edges of each stave and cut the groove for the bottom as well. End of day one work.
Took the first bucket apart and rounded all the edges of each stave and cut the groove for the bottom as well. End of day one work.
Cut a bottom. I beveled the edges of the bottom towards the edges. The idea was to make the edge just barely fit into the groove. Once the staves are driven together they would snug up and hold the bottom in.
Took about 4 fittings. Trim, fit, take apart, trim.... This was the first fit. I knew it would be big but wanted to make it big and slowly bring it down to size rather than make it too small and start over...
Marked the width of the groove on the edge of the bottom plates. Then used a sander and chisel to bring the sides down to that line.
Right side was after 2nd fitting. Left side was on the way to the 3rd fitting.
Initial fit with bottom looks much better this time.
Eventually figured an easier way to put the bottom in. I placed a board on the inside so that the bottom would rest on it. As I collected the staves around it the bottom fit into the groove more easily.
This process got easier and easier. This was about the 12th time I had to assemble...
I made a tool to help drive the rings down. I took a railroad spike and ground the tip to a flat 1/8th inch face. I then used a hammer to strike the railroad spike to drive the hoops down. I also had a modified ball peen hammer with a flattened face which I used to initially drive the hoops down. Once very snug though I switched to the spike to reduce the chance of striking the wood with the hammer.
Done and ready for water test. I know there are bits of tape on the ropes. I'll fix that later. Wanted to get to the water test.
Had some issues. And, by some issues I mean about 2 hours of rework. The first bucket leaked... a lot. I soaked it for 2 hours but still leaked a lot. I then took it apart. I placed the staves in the sun to dry and started making a new bottom. The first bottom didn't have a very snug fit. It leaked the entire contents in about 3 minutes.
After the new bottoms they both leak a little. I will soak them a bit and hopefully the staves will grow as they absorb the water. Eventually I filled them and the level of the water dropped by about 2 inches in 20 minutes. Yes, it leaks a little but for now that will have to do. It holds water long enough to do laundry and wash my body with. Will soak them overnight and see if they hold water better. When I hold them up to the sun and look at from the inside I see no light at all. There must be a slow leak somewhere on the bottom.