
This particular project (set of projects) has been on my wish list for a while. I finally got the kick in the pants I needed and I have begun active work on it. This set of items I will refer to as "Healthy Bones" is going to be a period hygiene kit. The kit will include items made from bone or other "skeletal" materials. The kit will consist of: Comb, Ear Scoop, Cuticle Pusher, Tooth Pick, Tweezers, Nail Cleaner.
The following bone is a piece of cow leg bone which I boiled and dried out in my basement for about two years. I have been experimenting with various methods of chopping up my bones. I have tried various hand saws to no avail. While I whole heartily agree with using period methods when possible, chopping up bones with a hand saw is just a huge waste of my time. I tried my band saw, metal saws, coping saws and even my table saw. The table saw works, but takes off a LOT of material, is hard to control and burns the piece as it is cut.
I started thinking of what sort of modern cutting instrument will work best. I was thinking about man made composite counter tops. They seem to have a consistency and density of bone. I looked at blades used for cutting tiles, stones and counters. As it turns out the diamond bit cutting wheel mounted on my 4 1/2 inch angle grinder cuts like BUTTER! I love it. The wheel costs $24, but is well worth it. Made roughing out the bone cuts so very easy!
Here is the first bone selected for the project. I found period examples of ear scoops, cuticle pushers, etc. and they seemed to be between eight and 14 centimeters. This bone is about 12 cm.

As I experimented with chopping up my bones, I had some smaller pieces. Another project long on my list has been period dice made from bones. These aren't proper cubes yet. As I chopped up bones and had small pieces which would work for a die, I roughed it into shape and tossed it into the pile to deal with later. I also found a few ham bones which were not good for much else I could think of other than thimbles. I chopped the ends off a few and will perhaps make a few more bone thimbles. I've made two and given one away. That's not top of my list of projects right now though. (Bone Thimble)


This is the first bone pictured sliced lengthwise to provide pieces which may be usable in my hygiene kit.
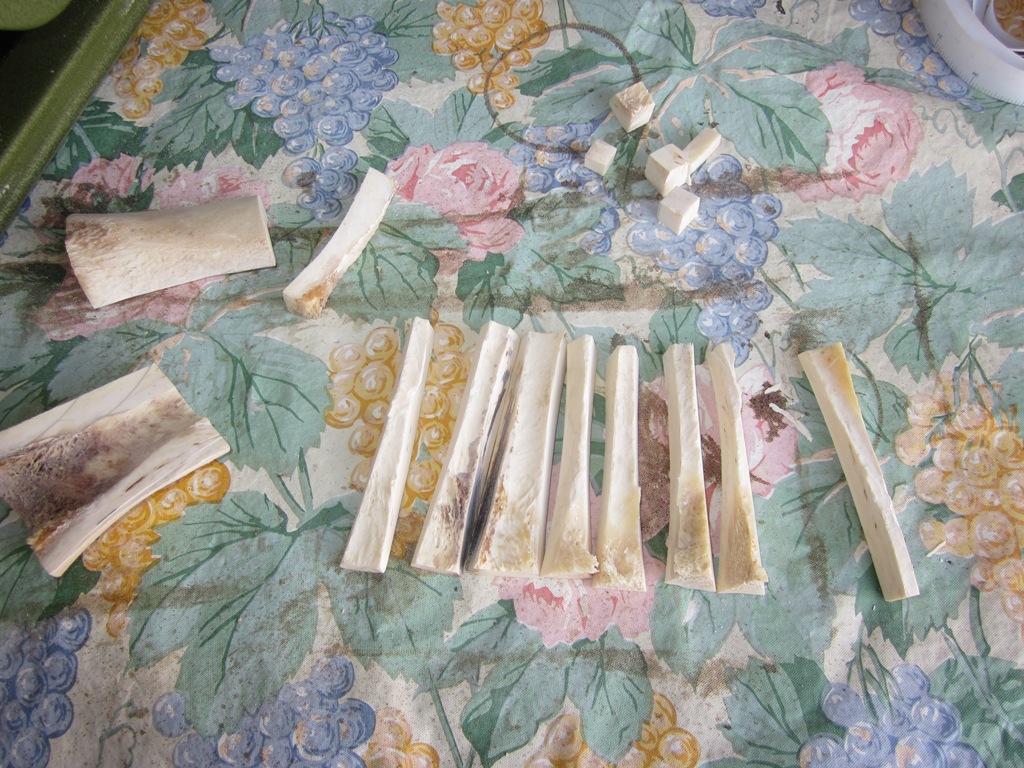
Here is an interesting picture for those who have never sliced a bone up. I figured the end knob of the bone would not be usable. I sliced the end off, more out of curiosity than anything. You can see that there is quite a bit of marrow and very little usable surface once you get to the end of the joint. Something for me to keep in mind in the future when I'm selecting bones to keep.


As I was chopping things up I kept adding more and more items from my list. The process is very smelly and very loud. It was about 20 degrees outside and I was freezing. Since the wife and kids were gone I just kept plugging on and on though. I figured I could always hand finish the next steps in doors. The smelly act of chopping things up had to be done outside though. By the way WEAR A MASK if you do this. Dust is EVERYWHERE and is dangerous to breath!
Here is a slightly larger ear scoop. Not sure if this will be part of the "kit" or not yet. This ear scoop is longer and is loosely based on a period example which had a figure head carved at the end. I will rough it out with the grinder and see how tough it is to carve. I'd like to carve a friars head at the end of his bigger one.


One last piece to work on. I've had a braided line which serves as a period measuring tape. A tailor would use a line to hold up to the client to take the measure. Pinching the line he would then go over to his El Stick to determine the measure. The line was not marked. The stick was marked. I've made a couple measuring sticks for my Tailor's Kit and have had this idea in my head for a while of a bone spool.
Here is a prototype design that I came up with a couple years ago.

Many of the aspects of the piece are geared towards ease of use in measuring. The notch at the bottom of the spool is the marking for a "normal" seam allowance. The spool pictured on the right in the design is based on period spools for holding thread. I thought it only rational that they would also use it to hold the measuring string. The small tongue on the left will be attached to the other end of the line. It can be used as a plum-bob when marking the back seams, it also has proportions to aide in measure. The bottom will actually be 1/2 inch and the top an even one inch. This small piece will also serve as the mechanism to hold the string on the spool. The line is wrapped around the spool and the tongue will be tucked under the line holding the end in place so as to not unravel in the sewing box when not in use. The idea is loosely based on a period spool, but the rest of the idea is completely mine based on personal experience and random thoughts. :-)


Here are the pieces cut out and roughly shaped. The rest of the work will be done by hand later.

I took the best five sections of the smaller bone I had to work with and outlined them on my notebook.

I placed the bones on the layout and gardened at the extant example found on the Mary Rose. I was trying to envision the best use of the bone I had and a way to make a usable collection similar to the Mary Rose version.


After pondering and moving the pieces around a bit, I came up with the design. I sketched a rough shape for each piece on my notebook and on the bone pieces Next step will be to take the grinder to each piece to rough it into shape. At that point I'll re-evaluate the design to make sure it all still fits good together. The goal is to bind these five items together with some sort of loop or link like the one on the Mary Rose. That part of the design has failed to reveal itself to me as of yet though.


Oh, this was sort of a proof of concept. I had seen pictures of an ear scoop, but never actually used one. I had a small chunk of ham bone lying around and decided to make a small version to see how small was too small. As it turns out this particular ear scoop works very well. My wife doesn't care for it. She said it is much too large. The length of the spoon is small, but she feels the size of the scoop is too big for one's ear. Something to keep in mind when I make the finished item. Below you see the cut out for the next version I make. On the right you can see a red ear scoop made in Japan. This is a modern ear scoop or ear pick that is currently used by my wife and her family. I tried this smaller pick as well, and it seems to work OK. Personally I prefer the slightly larger spoon shape, but now I'll have both.

Here is the prototype scoop. The spiral around the handle was just an after thought. I made it with a knife, V-gauge and a triangular file. The scoop isn't straight, but I worked with the scrap bone I had. I like the slight curve to it, not that I've used it though. The spiral effect is nice as a grip, but I am not at all happy with the appearance. I shall try harder on the finished version next time. Either no embellishment or if there is any, it has to look more refined that this.


