Pages

Saturday, July 14, 2012

Pennsic 41: Sebastian Archer Award Scroll


At Pennsic this year there will be a St. Sebastian archery shoot. There will be a total of 8 winners in their classes. The theme is creatures from the Book of Kells. Scroll size will be 1/2 sheet of Pergamenta. The scrolls needed will be for the best shooter in: Archer.
---------------------------------------------------
“Born of ash and yew, strength in the hand and aim that is true,
A bow across the sky, another in the river,
Whence swallows upward fly, like arrows from a quiver”

Let all know that you have received the Accolade of Archer at the second annual Saint Sebastian Archery Competition at Pennsic 41 XLI.
---------------------------------------------------

Paper Stock: Pergamenata Heavyweight, 5X7 inches, from John Neal Bookseller
Paint: Gouache
Technique: Free hand sketched with a mechanical pencil.
Inked in with India ink applied with a metal-nibbed dip pen.
Applied color using brushed on gouache paint.
Inspiration: Various images from the Book of the Kells

This was my first scroll using Pergamenata.  I love the stuff now.  Even with the additional cost of the material I found it worth while for two major reasons.  One:  It looks a lot more like vellum than Bristol board.  Two: Corrections are 20x easier on the stuff.  I spelled Whence wrong on the scroll and was planning on starting over again as I would have done on Bristol board.  I know you can "fix" Bristol, but it always look crummy when it is done.  I figured I'd practice fixing it on this new stuff and found that scratching away the error was rather easy.  Love the stuff.


After the all but he first letter of "Wence" was removed.

After the correction.  I think in the future I'll have to wait a little longer and probably not scratch so hard.  It pulled some fibers up from the paper and that lead to bleeding a bit, but all in all I like corrections on this more than other materials.

Crappy camera, but here are some close ups.  This dragon is something I just made up to look like it came from the Book of the Kells, but fit the space left at the bottom.  Also, adding a dragon to any scroll in the Midrealm is not a bad idea.


The above image was taken from my camera and the below image was my scanner.  The scanner takes much brighter images, but I find that it also doesn't look as much like the original.  The colors are almost artificially bright on the scanned copy.  Nothing beats seeing artwork in person I guess.


Tuesday, July 10, 2012

Landsknecht shirt neck smocking complete

I didn't think I would get as much done in the last two days as I have, but I can chalk it all up to Tolkien. I started smocking when I began the first of the three Lord of the Rings movies and finished the neck (to the point it is now) about 1/2 through the sixth of six DVDs.  That's about 11 hours of work to make this neck hole.  All in all that isn't too bad.  The result is as good as I hoped for given that this is my first attempt.


Monday, July 9, 2012

Finished Bone Thimble

Not much of a write up on this one.  Just some pictures of the finished thimble.  I sketched some lines on the thimble with the hopes of using that to guide the location of the dimples, but then after reading a little more about thimbles in a book I have, I found that the random location of the dimples was more likely the process used.


I cheated here... I know,  yuck!
I used a Dremel at this point.  Up until this point I had only used hand tools, but I gave up and decided to wrap this project up quickly.  A decision I'm sure I'll regret.  I have more bones in the basement so perhaps I'll make another some day all by hand.


Landsknecht shirt started

This is my first ever attempt at what is currently modernly referred to as smocking.  I've read that in period they simply called it pleatwork.  To start off I did some samples to get an idea of how much gathering would reduce the overall size of the material.  I found that the pleatwork reduced the length of the material to one third its original size.  For the "real" shirt I started by folding over a 2 inch edge and finishing it with linen thread.  I then drew a grid along the entire 100 plus inches which will be the neck opening of the shirt.

These rectangles are 2 centimeters wide by 1/4 inch high.  (Mixing measuring units, I know.)


I then ran a stitch in and out every centimeter, along every line to be used as gathering and reinforcement during construction.


Took a few hours to run all of these stitches in and out and I haven't even started the pleatwork yet.  Ugh.  What have I gotten myself into!?


I pulled on each of the strings to get an idea of the size of the neck hole.  I'm really starting to like the look of the shirt though.  Best part about this project is that it is obvious that it was hand done.  I don't know of a sewing machine which would allow you to create such a look.

After all the gathering stitches were collected, I started the smocking.  This will be a slow and tedious process, so I don't imagine I'll have any more updates on this one until it is about done.


I'm really liking the look of this, but during the testing phase of the neck I found that I'll likely have to add some material to the sleeves to get the fullness that I'm looking for.  I used general guidelines and measurements from another blog I came across.  I think I like the size of the neck, but I am sure that the sleeves will not be full enough for my liking.  So far not bad for a first smocking attempt though.

Quiver pattern finalized

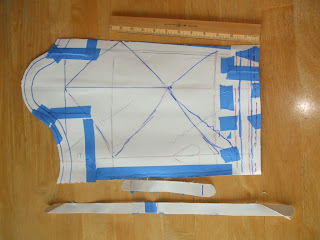
I reworked the previous pattern I was planning to go with.  After loading the cardboard mockup with some arrows, it just didn't look right.  A bit too big for my liking.  I reworked it a bit to make it a little taller and narrower.  I've also added some mockup straps to see how it will hang.


After assembly and satisfaction with the general layout, I took the pieces apart to arrive at my pattern for the leather.  This will also give me a better idea of the space I have to work with for the tooled Celtic design I have to come up with.  I have an image in my head of what I want it to look like, but I have yet to put pen to paper for the design.

Wednesday, July 4, 2012

Bone Thimble

Here is s quick little project that has been in the back of my mind for a while and was recently stirred into the front of my mind by my spouse.  When she is out for the evening and has taken the kids with her, that often leads to a particular favorite type of dinner.  I generally like a large portion of good steak with a small side dish of lamb chops.  All cooked very rare on the verge of raw.  OK, I know.  I'm a carnivore, what can I say.  Well last week my wife had such an adventure and I had such a dinner.  Here is the result.  I decided to boil the lamb bone for about an hour, scrape it clean and let it dry in the sun for a week.  I picked it up from the side table while I was watching a movie and thought "what the heck.... here goes!"

I started using some hand files to shape this very well fitted bone thimble.  I still plan on drilling some holes in rows around it, but for now this is what I have.  After I finished it I really wished I had some "before" pictures so that you could see how much fitting it took.  Oh well.  The bone and files were within reach, but alas, the camera was not.


Tuesday, July 3, 2012

Bag Quiver

An archer in the local SCA group I participate in recently challenged me to make a tooled leather quiver.  This sparked a new re-interest in archery.  If I was going to make a quiver, I should probably have plans to use it.  If I was going to have plans to use the quiver, I best get some arrows.  After pricing the wooden arrows which are used in SCA archery, I decided to make my own.  I have all the supplies I need, but with the recent stint of extremely hot weather, I have to wait a while before it cools enough for me to be able to apply the finish to the shafts I bought.  I purchased three dozen arrow shafts.  Even though I have plans to make a tooled leather quiver I'll need a place to store the rest of the arrows.  I really liked a few bag quivers I saw that some folks made.  The gent who challenged me made one as well.  It is based on a period pattern and looks REALLY cool when loaded up with arrows.  I liked the way it looked so much that I started my own bag quiver.

Here is the starting chunk of leather.  It is a circle of 6.5 inches with 1/2 inch openings for the arrows.


I cut a piece of deer antler (from a past hunting trip) and used a metal file to notch a groove in the end.  I also rounded out the end slightly.  I then used this antler as a smoother to press the raw edges of the leather into a nice smooth, pretty edge.


I hate to say it, but I used a commercial overstitch wheel to mark the stitching holes.  I was thinking about making my own, but heck I already owned one and the kids were already in bed.  To late for me to start banging and cutting metal in the garage.


I took a damp sponge and wet the entire surface and then used the smoothing tool I made to round out all the arrow holes neatly.  The finishing touch was my EG3D stamp on the top.  Hard to accidently pick up my bag quiver with my makers mark right on the top.  
This tool was a project I did a few years ago.


Monday, July 2, 2012

CTC - Leather working tools created

I have a rough idea of the type of design I want to tool into the quiver that I"ve been challenged to make.  Before that fun could begin I needed a few things.  First thing was the leather.  A quick trip to the local Tandy leather solved that.  Just so happend that they had some nice looking vegetable tanned leather which will work our perfectly.  Next thing I needed was some tools to do the design work.  Some folks have offered to loan me some tools, but I figure it would be that much more satisfying if I made my own tools at the outset of the project.  Here's what I made.  All of these tools were made from nails purchased from Home Depot.  They are large nails.  I had to use a torch a few times, but usually just cold working the metal and then grinding, filing and sanding did the rest.

One of the first tools I made was a small circle.  I cut the tip of the tail off and then used that tip to aid in the creation of the rest of the tool.

I torched the flat end where I cut the tip off and used the tip to drive a small hole into the shaft.


This is what it looked like after two heatings.  After it was completed I realized it was a bit bigger than I wanted so I made another smaller one.  Never know when I might want this.

Here is the second version.  You can see that I ground this shaft down a little before even heating.


I have a rather large vise that I mounted onto a tree stump.  Very heavy to move around, but it makes a great portable vise in the shop.

To hold all the pieces while I worked on them I took a small piece of oak that I had lying around.  This wood was scavenged from a pallet back when I used to work loading docks many years back.  I have a good pile of it in the garage and use it for everything.

Here you can see the whole collection.  I've tried some out already and I am really happy with the way they work.  The length of the shaft was driven by the size of the nail.  I started with the two on the right (in the picture above).  That was a much larger nail.  After making those two I realized I could use a smaller nail.  This nail was cut in half to make two tools.  The rest of the tools were cut to about the same length.  I practiced some with them and I like the size.

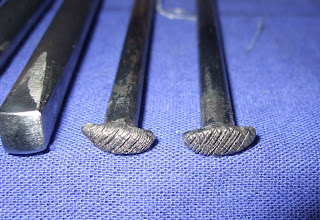
I watched a bunch of YouTube videos on tooling to get the idea of the types of shapes I'd need.  the two on the right, below, are among my favorites.  They are what I've heard called shaders.  They have a very rough criss-cross pattern on them.  When used repeatedly it makes a nice textured background.  So far I didn't take any pictures of the way the leather looks when stamped, so you'll just have to weight.  I made these by hammering to shape and then heated to bright orange and used a heavy kitchen knife to score the lines in it.  I bought an entire set of kitchen knives in a nice wooden display from Salvation Army.  I've used the longer knives around the yard for gardening.  I like them a lot.  Very heavy and very cheap.  Perfect for this job.

The rest of these tools were a combination of things that I had seen on the videos and some things I fashioned in my mind.  I have a design in my head and I tried to come up with all the types of tools I might need to fabricate that design.


Here is a small scrap of leather I was using to test the tools.  I can't wait to start the "real" thing.