Pages

Showing posts with label Scribal. Show all posts

Monday, January 27, 2014

Susana Dorkus - Order of the Willow

I was given a scroll assignment recently and decided to try my hand at "the real stuff".  I purchased some calf skin vellum and proceeded.

The scroll Assignment:

Recipient: Susanna of Ayreton
MKA: Lauren Elder
Home group:  Ayreton
Willow: For her skills in costuming
From the Court of their Majesties Cellach and Vukasin in their Shire of Wurm Wald, January 25, 2014 at Festival of Maidens.

I began searching for inspiration.  I came across a book in the British Library - The Taymouth Hours.  I decided to use this as a basis of inspiration and do the scroll as if it were an open book with opposing pages.

Here are a couple of the many pages which were used to inspire the scroll.
 

To further customize the scroll I searched the recipients FB library for some good photos.  Here are a few images of Lauren.

Left: Susanna of Ayerton (AKA Susanna Dorkus)
Right: Honorable Lady Phillipa Montgomery


I have seen Susana in one other dress not depicted in any of her Facebook photos.  The images on her scroll would be an amalgamation of the styles she has worn.

To begin with I did the basic layout to determine what space I would have to work with for the text.  My original intent was to allow for space for the Royal seal and signatures at the bottom.  Later I would find that the current King does not care for the use of seals.  I altered the scroll slightly the day of the event as you will see later.


The ink I used was created by the Honorable Lord Ian the Green.  Please check out his blog for much more information on inks and ink making:  scribescribbling.wordpress.com.  The ink I used was a 12th century style oak gall ink.  This was my first experience using oak gall ink on velum and I must say I loved it.


As you can see I had to use painters tape to hold the vellum down.  Now I understand why the period scribes always had some sort of item in the non-writing hand.  I had to constantly use a pen knife to hold the velum flat while I was writing. It posed a new challenge not encountered when using modern materials.


Once the calligraphy was done I sketched in the design a little darker to begin the inking of the outlines.  (I am not a calligrapher and don't ever anticipate being accused of being one.  I do think my pen is getting better but has a long way to go!)


Basic outlining done, again using the oak gall ink with a metal tipped dip quill pen.


Basic coloring would be done using three colors:  red, blue and a light ocre.  The paints were a gift from Dame Jocelyn Lutterworth.  She indicated that they were Maimeri brand gouache paints.
The red I planned to use was lighted slightly to make is more of a dark pink.  I was hoping that the overall tone of the image would be slightly more feminine that way.  Not sure if that came out in the finished work or not.  When I stand back and look at it, is simply looked red.  :-(

I began doing solid colors using only the red, the blue and the ocre.


Once done I came back in for a second coat for some minimal shading and then added more detail on the characters.  Overall I was very happy with the result with one exception.  I hated the look of the willow badge.  I painted over it a few times but nothing I did made it better, just more paint.  I really wish I had more time to scrape that off completely and rework it from scratch.

Note:  The image on the bottom left was supposed to be a woman sword fighting with a large sewing needle.   There is also a pair of scissors in front of a stash of material.   Apparently I didn't pull that part off so well as two people had to ask me what it was supposed to be.  Bummer.


Lastly I added the white work using a slightly thicker brush and watered down white gouache.


At the event when I found out that the current King/Queen preferred not to use the Royal seal.  I then added a few decorative lines for their signatures to help fill in the space and balance out the overall look.  I think that had I known that the seal would not be used I might have designed the layout a bit differently but overall I am rather pleased with the look.


The following three photos were taken at the event as the scroll was presented.

  
These images are the property of Diane Peterson-Dover and are displayed here with her permission.

Overall I am rather delighted with my first experience using vellum and oak gall ink.  I really look forward to my next project using the two.  If you are a budding scribe and have not yet tried using the period materials I HIGHLY recommend it.  The ink flows differently but erases very easily.  A simply pen knife removed some mistakes with absolutely no trace.  On artificial velum or Bristol board mistakes are a nightmare to remove.  Dealing with the subtle shapes and textures on the surface of the velum was a challenge but was also a joy.  As a medieval anachronist I felt a lot closer to my craft when using what I knew to be period materials.

Sunday, December 29, 2013

Largess Gift Exchange - Penner

I entered into the Midlands Largess gift exchange where various A&S type folks entered their names into a hat and randomly selected one another.  Gifts were to be created for less than $25 and exchanged at a future event.  After a bit of research I decided to make a penner and pen knife for my recipient.  I was informed (by a little bird) my recipient would like something with her heraldic device on it.

I found the recipient's heraldic device as registered with the SCA.  I sketched it out and then transcribed it onto the leather that I would use for the penner.  I did most of the shallow tooling prior to any stitching.


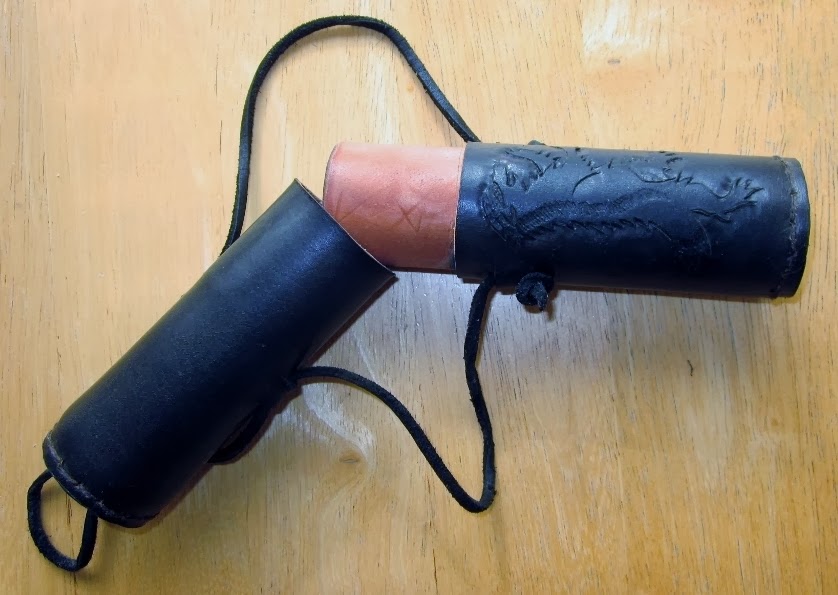
Once satisfied with the tooling I wrapped the piece with paper and then used some painter's tape to hold it in place while it dried.  The penner is made of two layers.  The center layer was already constructed.  See previous blog entry (Penner) for further details on the manner in which it was created.  

 
I wrapped the tooled leather shell around the center and taped it in place with painter's tape.  I find that this works well to hold it in place without leaving any residue which impact the later dyeing step. 
 

Stitching completed.  The gap in the stitching will become the location of the slit which will allow the cover to be removed.


I placed a round piece of leather on each cap and then trimmed to fit.


Once in place I began piercing holes and stitching it on.


After cutting the lid free from the body I made a few slits on the sides where the hanging strap would be slipped through.  I did this while the leather was a little damp.  I used a leather tool to open the hole up a little and then fed the strap through.


Fully assembled and ready for dye.  I used a vinegaroon which I created previously. It makes an outstanding dye.  Simply placing steel wool into a bath of vinegar and water.  The steel will rust and make a very ugly muddy looking solution.  When applied to the leather it soaks in and quickly turns black.  This piece took two coats, but turned a nice rich black easy enough.


The pen knife you see in the following picture was created in exactly the same way as the one that I carried to Pennsic.  See blog entry (Pen Knife and Goos Feather Quills) for further info on how I created the knife.


The penner was finished off with a couple layers of olive oil and beeswax.


Wednesday, July 24, 2013

Pen Knife and Goose Feather Quills

What is a friar or a monk without a scribal kit right?  Well I wanted mostly for a method to write in my journal.  I like the idea of looking like a period scribe at the event, but journaling was the primary reason.  To write one needs a pen.  To make a pen one needs feathers and a knife.  To make a knife one needs a metal file and some bones.

I bought the following metal file from a flea market for about 75 cents.  Rock on!  The guy laughed at me when I asked for a "bulk" rate.  I bought about 20 files, a couple old hatchets and some other stuff.  He said "you must do a lot of wood work?"   I didn't have the heart to point out that these were metal files.  I told him that I was planning on making medieval knives out of them.  He looked at me like either he was drunk or I was.  We were both happy with our end of the bargain and that made for a good day.


Taking the rusty metal file I put it to the grinder for about 5 minutes to take off the rust and smooth our the metal ridges.

Since the edges are the only part that will show I spent more time assuring that those side had no sign of the prior life as a file.

I sketched out the shape of the knife on the blank and proceeded to cut it and grind it to shape.  Note that I could have worked the piece hot, but the benefit of using metal files is that as long as you keep the piece cool, quence often and don't over work you have a VERY hard piece of metal.  I didn't want to lose the heat treatment so I worked the piece bare handed.  Whenever it got warm to the touch I wet it again.  This was key to keeping the temper.

I cut this with a angle grinder with a cutting bit.  I kept spraying with water while cutting to keep cool.

After cutting I used the bench grinder to bring it to shape.

I then moved to a sander to fine toon the shape and help hone the edge.  I also refocused the bod of the blade to make sure it was semetrical.  I marked the pin placement and began drilling the pin holes.  Note this part was the worst.  The metal IS VERY hard as I have stated.  That makes drilling very tough.  I used a metal bit with diamond chips and it still took about 5 minutes of slow drilling to complete each hole.

Metal done-ish for now.  Move on to the bones.  Ox bone plates cut to shape.  This is the first set.  As you will see later, I broke this set.

Bone plates cut to shape, now to go back and work the blade some more.


Blade cleaned up as much as possible without the hinderance of the bone handle getting in the way of the sander.  I cut a small brass 1/8th inch rod into sections about 1/16th of an inch longer on each side of the handle.

I peened the brass pins down to hold the bones in place.

I first filed the brass pin flat to allow for an easy surface to start peening over.

... AND... here is the fail.  Missed the pin and cracked the bone.  I did the same thing earlier on the paternoster too. 


Two fails in the same day.  I used a cut off bit on my dremel to cut off the head of the pin.  I then used the punch you see below to push the pin out of the knife.


Round two.  Same approach, differant bones.


Cut and ground and sanded and peened.  Better this time.  No cracks.  I haven't finished polishing the blade and yet it is still sharp enough to shave with.  Yeah!  I love a sharp blade.

Now to play with some quills.  These are some feathers I collected with my kids around a local pond.


I sorted them out and cut the following to length.  I took only the largest, straightest ones for quills.  I used my new knife to remove the fletching from the shaft.

I heated up a bucket of clean sand in a cast iron pot and then used that hot sand to cure the quills and harden them. 


No detail pics of the cut quills.  I have tried about 1/2 the ones you see below and find that it is much HARDER than I thought.  I plan on taking a class about it during Pennsic.  Not sure if I am doing somethign wrong or if there is an issue with my quills.  They look great when cut, but are way too flexible to write with.   Oh well.... I tried.

Finished penner and quills.