
The purpose of this project was simple. I needed a decent way to display my chained books. The primary reason I made the chained books was so that I could take them to demos and events and display them for public fondling. The requirements of the project were simple:
1) Look appropriate for the books being displayed
2) Be portable - easy to set up, tear down and pack.
I came across this image of a chained library. When I saw this library I was inspired. I needed to make a portable version of that sort of stand.

I did the following basic line drawings as a rough plan.


I purchased some oak from the $5 bin at Rockler. They often have cut-off ends for around $5 a board. With the purchase of the smaller oak board this project cost less than $20.

Here are the pieces glued up.

I cut a mortise in the bottom so that I could insert a brace in the bottom with a wooden pin. The top cross pieces fits onto to the two end triangles and is held in place by pegs inserted below.

I clamped the pieces together and then marked and drilled the face for the dowels. I drilled through the face and into the frame using a bit the same size as my dowel. I then sanded the dowel slightly so that it would be a snug fit, but not permanent. I can tap the pieces apart with a wood mallet for travel.


The finished face.


The face can be easily removed to show the support structure.

Now for the security aspect of the chained library. I wanted something that looked secure and looked like the period chained library although I know that somebody can simply come along and grab the whole case. The concern is not one of real security, rather only the perception of security.
I chose to take a quarter inch rod and bend the ends. I decided to make two eye bolts and mound them to the surface of the stand. Once the cross bar was in place the bent ends would prevent the bar from being extracted.
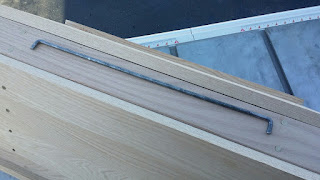
This design also allows me to simply pull the eye bolts out from the top and attache or remove the books.

I was working on this at the same time as the books so here you see the books while still a work in progress.

The loops in the ends of the chains is large enough to fit over the angle bends in the bar. The two free swinging eye bolt construction makes assembly very easy.

I created a stand out of a 1X2 and drilled holes vertically through it. I then inserted the eye bolt portion of the security system in the stand. If need be I can use a pin to permanently attach the eye bolt to the stand but I don't anticipate setting this display up in an area that won't be monitored and I rather trust that nobody will walk off with the entire display without being noticed.


I haven't applied any finish at this point. I may apply mineral oil or some clear finish. I like the look of the wood grain but at this point the finish is lower on my priority list.
Here is what the full display looks like when torn down and ready for shipment.


Once I take the books to an event and get a picture of the full display I'll insert photos here. At this point I haven't yet had the chance to use the display.