
 |


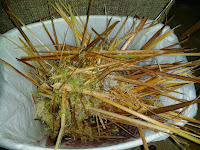
Here is what a rush should look like.

When I collected them many were brown and hard already. I did the best I could to collect a bunch and figured if nothing else it would be a learning experience. My daughter and I trudged through some pretty marshy area to collect these.


I soaked the rushes in a bucket of water to help soften the skins. The basic idea is to soften the skin and scrap all but the last of the skin off. The soft pithy center will serve as a sponge to soak up the tallow for burning. I used the edge of a knife to scrape away the skin at which point the rushes become a bit flexible and fragile.


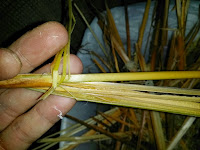

As you can see here, many of the rushes I collected were already drying out and were brown. I fear that may affect the quality of the burning. The skins flaked off on some rather easily.

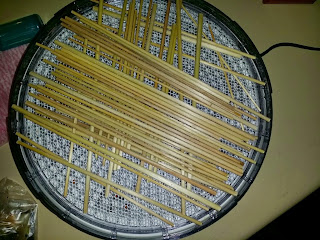
Once scraped off completely the rushes were much thinner. I cut them to a length which would fit into my dehydrator and turned it on low. Normally one would simply cut the rushes and let them dry in the sun. When I collected these it was much too cold and wet outside to expect them to dry so I used an internal modern approach instead.

The dried rushes were ready for the next step so I set them aside for a while as I processed the tallow. I went to a local butcher shop and asked them for beef fat and this is what I got.


Never having done this part I wasn't sure how much I needed so I believe I over bought. I ended up with a LOT of extra tallow which will be used at some future date.
I cut the fat and trimmed off gristle and meat and then placed the chunks into the food processor. The food processor chopped the pieces up further and also identified some long stringy fleshy portions which I also removed before cooking.

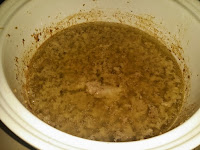
I ended up with this lovely pink paste which I placed into my crock pot and let it simmer.

A few hours into the process you can see the rendering process under way. I've heard complaints about the process of rendering tallow. This was the portion of the process that those people were complaining about. There is an unusual smell that comes from the long slow cooking of a bucket of fat. It is unlike any other smell that one would expect from a kitchen. My wife and children found it to be quite foul. I understood their complaints but it didn't offend me quite as much. It was a rather strong smell though.

I took a photo every few hours.

Every now and then I took a small strainer and caught the bits of cracklin floating at the top. Eventually when the pot was equally clarified I poured the contents though a sieve lined with paper towel to filter out all the nasty bits.
I ended up with 2 pyrex dishes full of clear tallow. Oh happy day. I lined the pans with foil to make the blocks easier to remove once cool. I planned to simply keep them in the foil for storage.


At the home stretch now. I took about two thirds of the rushes and soaked them in the tallow (which I warmed up again some days later). As long as I was experimenting I decided to take about one third of the rushes and coat them with bacon fat instead of tallow.


The tallow covered rushes didn't burn as well as I expected either. They spit and sputter and smoke a lot. I had heard that might be the case but they also seem to smolder and burn out easily unless canted on a good angle. I decided to heat the tallow again and let them soak a good long time in the liquid.


I eventually found that three coats of tallow seemed to make them burn better. They still spit and sputter. I plan to try the process again this summer with hopefully fresher harvested rushes to see if that was perhaps my problem. All in all it may be a cheaper lighting source than beeswax candles, but they don't give off a lot of light and each rush only burns for about 10~12 minutes. A lot of work for only a short lived light.