Pages

Friday, May 29, 2015

Pennsic Circa 1200 Clothing

Well, the push for Pennsic is on.  I don't have a ton of proper 13th century clothing as I don't often do events which are longer than 2 days.  Time to improve the stash.  I made 2 hoods, three pairs of brais, three tunics, three shirts and 2 coifs.  Nothing new about the process so if you are interested please see my prior posts.  My goal was to own at least 4 sets of decent clothing to last me the week.  one set of the clothing should be decent enough to be considered "court" garb.  

I had been on a weaving kick for a while so I had quite a stash of trim I made on my inkle loom.  Time to put some to use.  I found this plain white one I made with no real purpose in mind other than to practice and test weaving this really thick yarn I had.  I decided to whip up a pilgrim's bag like one found in the Morgan Bible.

Here are a couple close ups from the Morgan (Crusader) Bible:
http://www.themorgan.org/node/560/zoomify 
http://www.themorgan.org/node/570/zoomify 


I have created a pilgrim's shoulder bag from a portion of a cotton curtain purchased from Salvation Army.
I purchased three curtains for $8. Each curtain was 6X9 for a total of 162 square foot of canvas fabric. That comes to about five cents per square foot. The strap for the bag was woven from a cotton yarn my mother-in-law gave to me when I started weaving. The tassels were made from threads pulled from the material. Not counting the cost of the thread used to sew this project together it appears it cost about 30~40 cents to make.   The curtains were also lined with light weight cotton slightly thinner than an average bed sheet. I haven't planned on a use for the lining yet.


I didn't really have a pattern to work with.  I compared the size of the bag in the images to the size of the wearers hand.  I used that as my reference and created a paper template.  When I looked at myself in the mirror with my paper bag it looked about right so I used that as my template.  The bag was hand sewn using cotton thread.


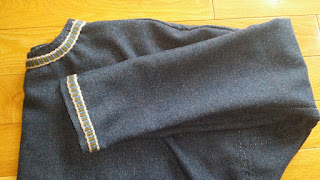
I have created tunics before and there is nothing spectacular about them.  The new ones I created were slightly different in size.  I fitted the sleeves a little tighter and trimmed the cuff and collar of two of them.

Linen tunic, wool trim.


Wool fabric and wool trim.


I found some lovely wool from Salvation Army.  Not many people know that thrift stores sell raw fabric as well as used clothing.  There is a section in my local store which has material on hangers and sometimes still on the bolt.  I purchase 6 yards of this lovely thick wool fabric.  I also purchase four yards of the lovely blue wool you see in the tunic above.


Now comes the real head scratcher that this post was intended to focus on.  I found the following images in the Morgan Bible although I had never seen a pattern for them.  I reached out to some A&S groups I'm in for advice how to construct one.

My issue was regarding surcoats for men.
I came accross images of what appear to be men wearing surcoats with slits in the front so that the wearer can either don the sleeves or let them hang. I don't recall seeing anyone in the SCA do this sort of thing for the time period 1150~1250.
Here are a set of images from the Morgan Bible:
http://www.themorgan.org/node/565/zoomify
http://www.themorgan.org/node/570/zoomify
http://www.themorgan.org/node/571/zoomify
http://www.themorgan.org/node/602/zoomify
http://www.themorgan.org/node/630/zoomify


I couldn't seem to tell exactly how to construct the location of the slit.
I had two theories: 
A) Simply fail to attach the sleeve and leave the front of the sleeve free or 
B) Cut a separate slit slightly to the front of the side seam.

The image above has a few examples along with the basic tunic pattern I have used before. Some seem to have the sleeves only attached at the top, others seem to have only a small slit in the front.

Well without any real pattern to go by I proceeded to make three or four mock-ups from old bed sheets.

After a few mock-ups I decided to head back to the source.  I found these two images on the same page of the Morgan Bible and I believe they are both supposed to represent the same person. It seemed to me that the sleeves are worn on in one image and off in the other but for the same man.  From this image I am leaning towards having them attached as normal in the back and fully open in the front along the seam line.


I won't show the pics of all the mock-ups I did because I'm REALLY not a fan of bathroom selfies.  This was the final mock-up I liked best though.  This mock-up correlates to option A above.

I did mock-ups for both Option A and B above.  I ended up with three mock-ups for option A.

The third version is what you see here.  The shaping of the opening and slightly wider sleeve opening made the finished mock-up fit better and drape the way I wanted over my "non-medieval" shape.


The finished garment doesn't drape quite the same as the bed sheet version obviously.  The wool is thicker than the bed sheet, but also, I lined the coat with linen.  I expect to use this as my coat on cold weather days.  With a linen shirt, wool or linen tunic and this surcoat along with a cape I expect to be warm even in the midst of winter.


Here is a close up of the woven trim I applied.

Turn Shoes and Ankle Boots

Working on my kit I decided that a new pair of shoes are in order.  I have been in the SCA for a bit over 14 years and have converted a couple modern pairs of shoes to late period shoes but other than that I have only created one pair of turn shoes.  Shocking!  I generally go barefoot.  As a woodworker I have no problem with that.  When people question why I'm barefoot I refer them to this image:

Well, since I'll be going to Pennsic and camping for a week I thought it a good idea to create a pair of shoes which are more durable than my bare feet.  I came across these shoes for sale at $150 and I thought two things.  1) Wow, that's not cheap.  2) I bet I can make those.

Dorestad: Old Norse Reproduction Handmade Leather
Before I started the process and not entirely sure I wanted ankle boots I kept looking.  I came across an awesome site which had this image.

Where Are The Elves?Adventures in Historic Shoemaking
I really loved both shoes and could not make up my mind.  I had read that the secret to keeping your shoes in good shape is to have 2 pair and rotate them.  good idea.  I'll make both.

I started by making the very common duct tape template over a pair of old socks.  I did the same process for each pair of shoe but I'll only show the one.


I then marked the tape and cut out my rough pattern.


The site containing the second pair of shoes (Where are the Elves) had great step by step photos.... which I didn't follow.  I took some short cuts for a couple reasons.  The leather I was using was a bit thin and I found that stitching style to be too difficult.  I stitched my shoes in a manner which has exposed sewing which I'm not too concerned about.  They will be better than most army boots you see folks wearing at events.

I cut the pattern out and then proceeded to test fit them.  Using a very "non period" approach I pinned the sole to the upper.  I wasn't sure it would fit and had a fear of simply starting to sew.  I didn't have a last to work on and thus I used pins.  The process worked well enough.


Here is a close-up of the stitching from the outside of the shoe joining the 2 parts of the upper together.


Pinned up and ready for sewing.


So far the I was concerned about the fit of the base.  I slipped the shoe on and thought it fit.  Turns out it didn't and I hate these shoes.  I'll explain later.

Here is what the sole looks like.  I used a curved awl to pierce the leather upper through the side of the sole and then used opposing embroidery needles to stitch the shoe together.


The leather I used for the upper was rather soft.  It was what I had left over from my satchel I made a while back.  I soaked the shoe in warm water for about 5 minutes and easily turned it.  Once turned I put the shoe on a shoe makers anvil and lightly hammered the seams smooth.


At this point I was rather happy with the sole and the entire sewing process.  I was NOT happy with the fit.  As it turns out the pattern for the heal portion was much too large.  Next time I'll modify the template and make a felt shoe first to ensure the fit before going through the trouble.  The heal is much too loose and the sole is about a quarter inch long.


I tried to run a row of saddle stitching along the top of the heal and then cover it with a light colored decorative trim gathering as I went.  This helped snug up the fit a little bit.  I will have to wear these shoes with thick hosen for sure.  I may go out and buy some modern insoles as well.  With modern insoles they will likely fit better and be more comfortable.  In any event these will likely be my court shoes or my back-up only shoes.  Live and learn...

 
At this point all I had left was the buckle.  I had intended to cast some period buckles but as I desperately hate these shoes I decided to scrounge around instead.  I generally keep all buckles, zippers, clips etc from just about anything I buy from Salvation Army or that my wife and kids throw away.  These are buckles from an old pair of my wife's shoes.  Not strictly period but they are belong on an ill fitting pair of ugly shoes.


My second set of shoes... I LOVE.  These went together much easier and fit like a glove.  They are absolutely comfortable and came out exactly as I would have hoped.  Basically the same process of construction except for the leather toggles I used, instead of buck

This was a one piece upper which had only one seem to assemble.  I cut, stitched and pinned to the sole.


Fully stitched but not yet turned.


Soaked for 5 minutes and turned.


I worn them around the house wet until they dried on my feet.  since there were not toggles yet I simply tied them on with some string until they dried.


Dried up nicely.  I hammered the outside edges of the sole on the shoe maker's anvil.


I made some small cuts in the side where I inserted my toggles.  I cut small holes to insert the toggle in the flap as a button hole.  I then put the shoe on and tightened the toggle.  Once I had the proper length I tied a not in the remaining porting of the toggle's tail.


All done, dried and fitted.  Worn with a pair of my wool hosen they fit great.


Final step is the finish.  I made some cream by mixing 50/50 tallow and olive oil.  I use that as a lubricant for my wood working lathe.  I simply rubbed that into the entire shoe and let set.  The next day I did the same thing.  No brushing or polishing done.  That sheen is the natural finish now.