Pages

Showing posts with label IRCC. Show all posts

Friday, June 17, 2011

IRCC - Hand Stitched Leather Belt Pouch

I have started the next addition to my IRCC costume. I started making a leather belt pouch out of light weight black leather. Unlike most of my other leather projects, this project was not done using recycled leather. I actually purchased leather from Tandy Leather. To start the project I based the design on a couple portraits from the 16th century. Based on the appearance In the portraits I sketched what I thought would be a good pattern on the back of an old poster.


Drafted pattern pieces


I decided to make this pouch slightly more complex than it perhaps had to be. Based on some extant pouches and some reconstructed pouches I’ve seen that others have made I decided to make a small pouch, within a pouch. I also added a divider on the inside of the pouch. I stiched all the pieces together inside out and then turned the pouch.
Inside of pouch front before turned.
Inside back before turned


I fashioned a sort of bodkin from some 16 guage steel wire I had and used that to do the lacing of the inner and outer pouch lacing.


I’ve already attached the flap which will be used as the closure, similar to the one in the following portrait, although I haven’t take a photo of that yet. I still have to fashion some sort of button to lock the flap closed.


Turned pouch without final flap closure
Inside of pouch

One final note.  I do a lot of hand sewing and the one thing that hurts more than sticking yourself with the point of the needle, is pushing so hard on the needle that the back end of the needle sticks into your finger.  Here's an example of pushing way too hard on a needle.  Either that or using a needle which is too small for the job! 


Friday, June 10, 2011

IRCC Black worked shirt nearing completion

My least favorite part of assembling a shirt is the collar. Not sure why. I’ve got close to 60 hours in on this shirt so fart and I have probably only a couple left and yet I just didn’t want to do the collar. Well I gave in and finally added the collar. I ran two gathering stitches along the ruffle to fit it into the collar. I decided on the closures I would use as well. I made three different types of braided cords before I decided which I would use. I opted for the ones you see in the photo. I braided two black lines with two white lines to give a rather nice effect which matches well with the rest of the black work.


Here part of a portrait which shoes the effect I was going for. Some period shirts had a single line as the closure while others from that period had two. This is the first shirt I’ve done with this sort of pair of braided closures and I’m quite happy with the look.


Here is the gathered ruffle and the section of blackwork prior to assembly.


Here is the gathered ruffle assembled to the front and back of the collar.  The braided closures are 12 inches long each with a 1/2 allowance for attaching to the collar.


Here is the assembled collar prior to attaching to the shirt.


VoilĂ ! Here is the completed collar attached to the shirt.  Now I have only one cuff left to do and this project will be wrapped up.

Thursday, June 9, 2011

IRCC - Source of fur and leather for Overgown

This is some raw materials which I purchased for uses as part of an article of clothing to be constructed as part of the IRCC challenge. This will be used as part of an overall outfit I hope to enter into a Pentathlon in the future year(s). The overall garment is intended to be worn by an Italian gentleman who living between 1520 and 1540. This is one of four coats which I’ve purchased from a local thrift store. I’ve already disassembled the rest of the coats. I only recently found this coat for $10 so I thought I’d photo it as part of documenting the overall progress of the construction. The summer seems to be a great time to find fur coats and leather coats at Salvation Army. Many people must purge their winter closets. Nobody wants to buy coats during the summer so they get marked down quickly. Most of the coats I’ve purchased were about $10 or less. One had some significant damage and is not wearable. As I intended to cut the whole thing up anyway, I thought that $4 was a good investment for what turned out to be about 18 square feet of fur!


This coat is in really good shape and it may seem to be a shame to chop it, but it is far cheaper than buying new fur for projects. This coat (and a few of the others) were very soft, clean and unmarred black leather. It is lined in what appears to be black rabit fur.


IRCC - Handkerchief

This article of clothing was constructed as part of the IRCC challenge. The overall garment is intended to be worn by an Italian gentleman who living between 1520 and 1540. This item is a linen handkerchief. The edges were rolled and bound with hand stitched blanket stitches using linen thread. I then hand stitched some store bought lace to the edge. I’d love to learn to make the lace, but until I start making lace I’m stuck with the store bought variety.

Sunday, June 5, 2011

IRCC - Hand sewn underwear

IRCC - Hand sewn underwear (Persona, Breadth and Depth)
Article of clothing which was constructed as part of the IRCC challenge. This is a portion of an overall outfit I hope to enter into a Pentathlon in the future year(s). The overall garment is intended to be worn by an Italian gentleman who living between 1520 and 1540. This pair of underwear has about 8 hours of hand sewing so far and is almost done. I have created these without a pattern. I based the design on a pair of extant men’s underwear from the mid-16th century. As far as I could tell from the photo, it was a lined pair of underwear. There are reinforced holes used to add lacing for the hose. I will hand stitch the hose later and finish the rest of the holes. This item was made from a light weight linen lining and a slightly heavier, linen outer layer. The linen I used for the outer layer is a very soft loose weave. It is very comfortable. I drafted the patter out of a piece of curtain I bought from Salvation Army. I pinned the mockup together and when I liked the pattern I hand stitched the lining and the outer layers together. I’ve included a few photos of close-ups of the reinforced lacing holes. Even though these are a simple pair of underwear which nobody will ever see worn, I am rather happy with the way they turned out. All of the hand stitching is about 1/16th of an inch or less.

Here is a photo of the extant garment which I copied.
 

Here is a copy of my garment in progress.


Here are the laces which I created by slicing up a leather belt which I purchased from a local thrift store.  I cut the belt up with scissors, but found them a bit uneven and therefore had to do a lot of hand trimming with a small knife.

Monday, May 23, 2011

IRCC Paternoster

Article of clothing which was constructed as part of the IRCC challenge.  This is a portion of an overall outfit I hope to enter into a Pentathlon in the future year(s).    The overall garment is intended to be worn by an Italian gentleman who living between 1520 and 1540.  A single strand paternoster not made in loop.  This style was used by men while the looped version was used by both men and women.  This paternoster has 100 black glass beads and 10 larger black & yellow beads which were purchased from Walmart.  There are two slightly larger yellow beads on each end which I found on a neclace at Salvation Army.  The beads are strung with a heavy weight black linen thread which was waxed with bees wax.  The tassle at the end was made from black cotton line with a loop which I fashioned from a piece of brass rod.

IRCC Shirt progresses

The work on the IRCC shirt progresses slow and steady as I expected. All of the edges have been rolled and bound and the construction of the shirt has started. I still haven't started the blackwork detail of the cuffs and collars. I keep putting that off as long as possible. Here are some photos which show the detail of the joinery.

Top of shoulder seam and neck gore.

In the following two images you can see both sides of the same section of the seam.  This type of seam not only looks interesting, it looks good from both the inside and the outside.  Can you tell which is the inside of the shirt and which is the outside?

Outside view of seam.

Inside view of seam

One other thing I like about this type of seam is the way the sleeve looks when it is joined to the body.  The following picture is a close-up of the underam section of the sleeve.


IRCC - Blackworking for shirt is complete

The IRCC shirt is almost complete.  I have finished the blackworking for both the cuffs and for the collar.  I did all of the blackwork using backstitching as it would have been done in Italy during the mid 16th century.  Here are some photos of the black work. 


IRCC Shirt Blackwork for collar

IRCC Shirt Blackwork for cuffs
I did all of the blackworking on a hoop and then cut the pieces to the proper size when complete.  I have since assembled one cuff completely, but have not yet photographed it.  I hope to have the entire shirt completed in the next couple days.  One remaining detail I haven't decided on though, is the closures for the neck.  I plan on using a braded line, but haven't decided if I will use solid white (as I did for the cuffs) or a combination of black and white as I have seen on some portraits.  We'll have to see what sort of mood I'm in in the next couple days when I braid it.

Monday, May 9, 2011

IRCC shirt continues

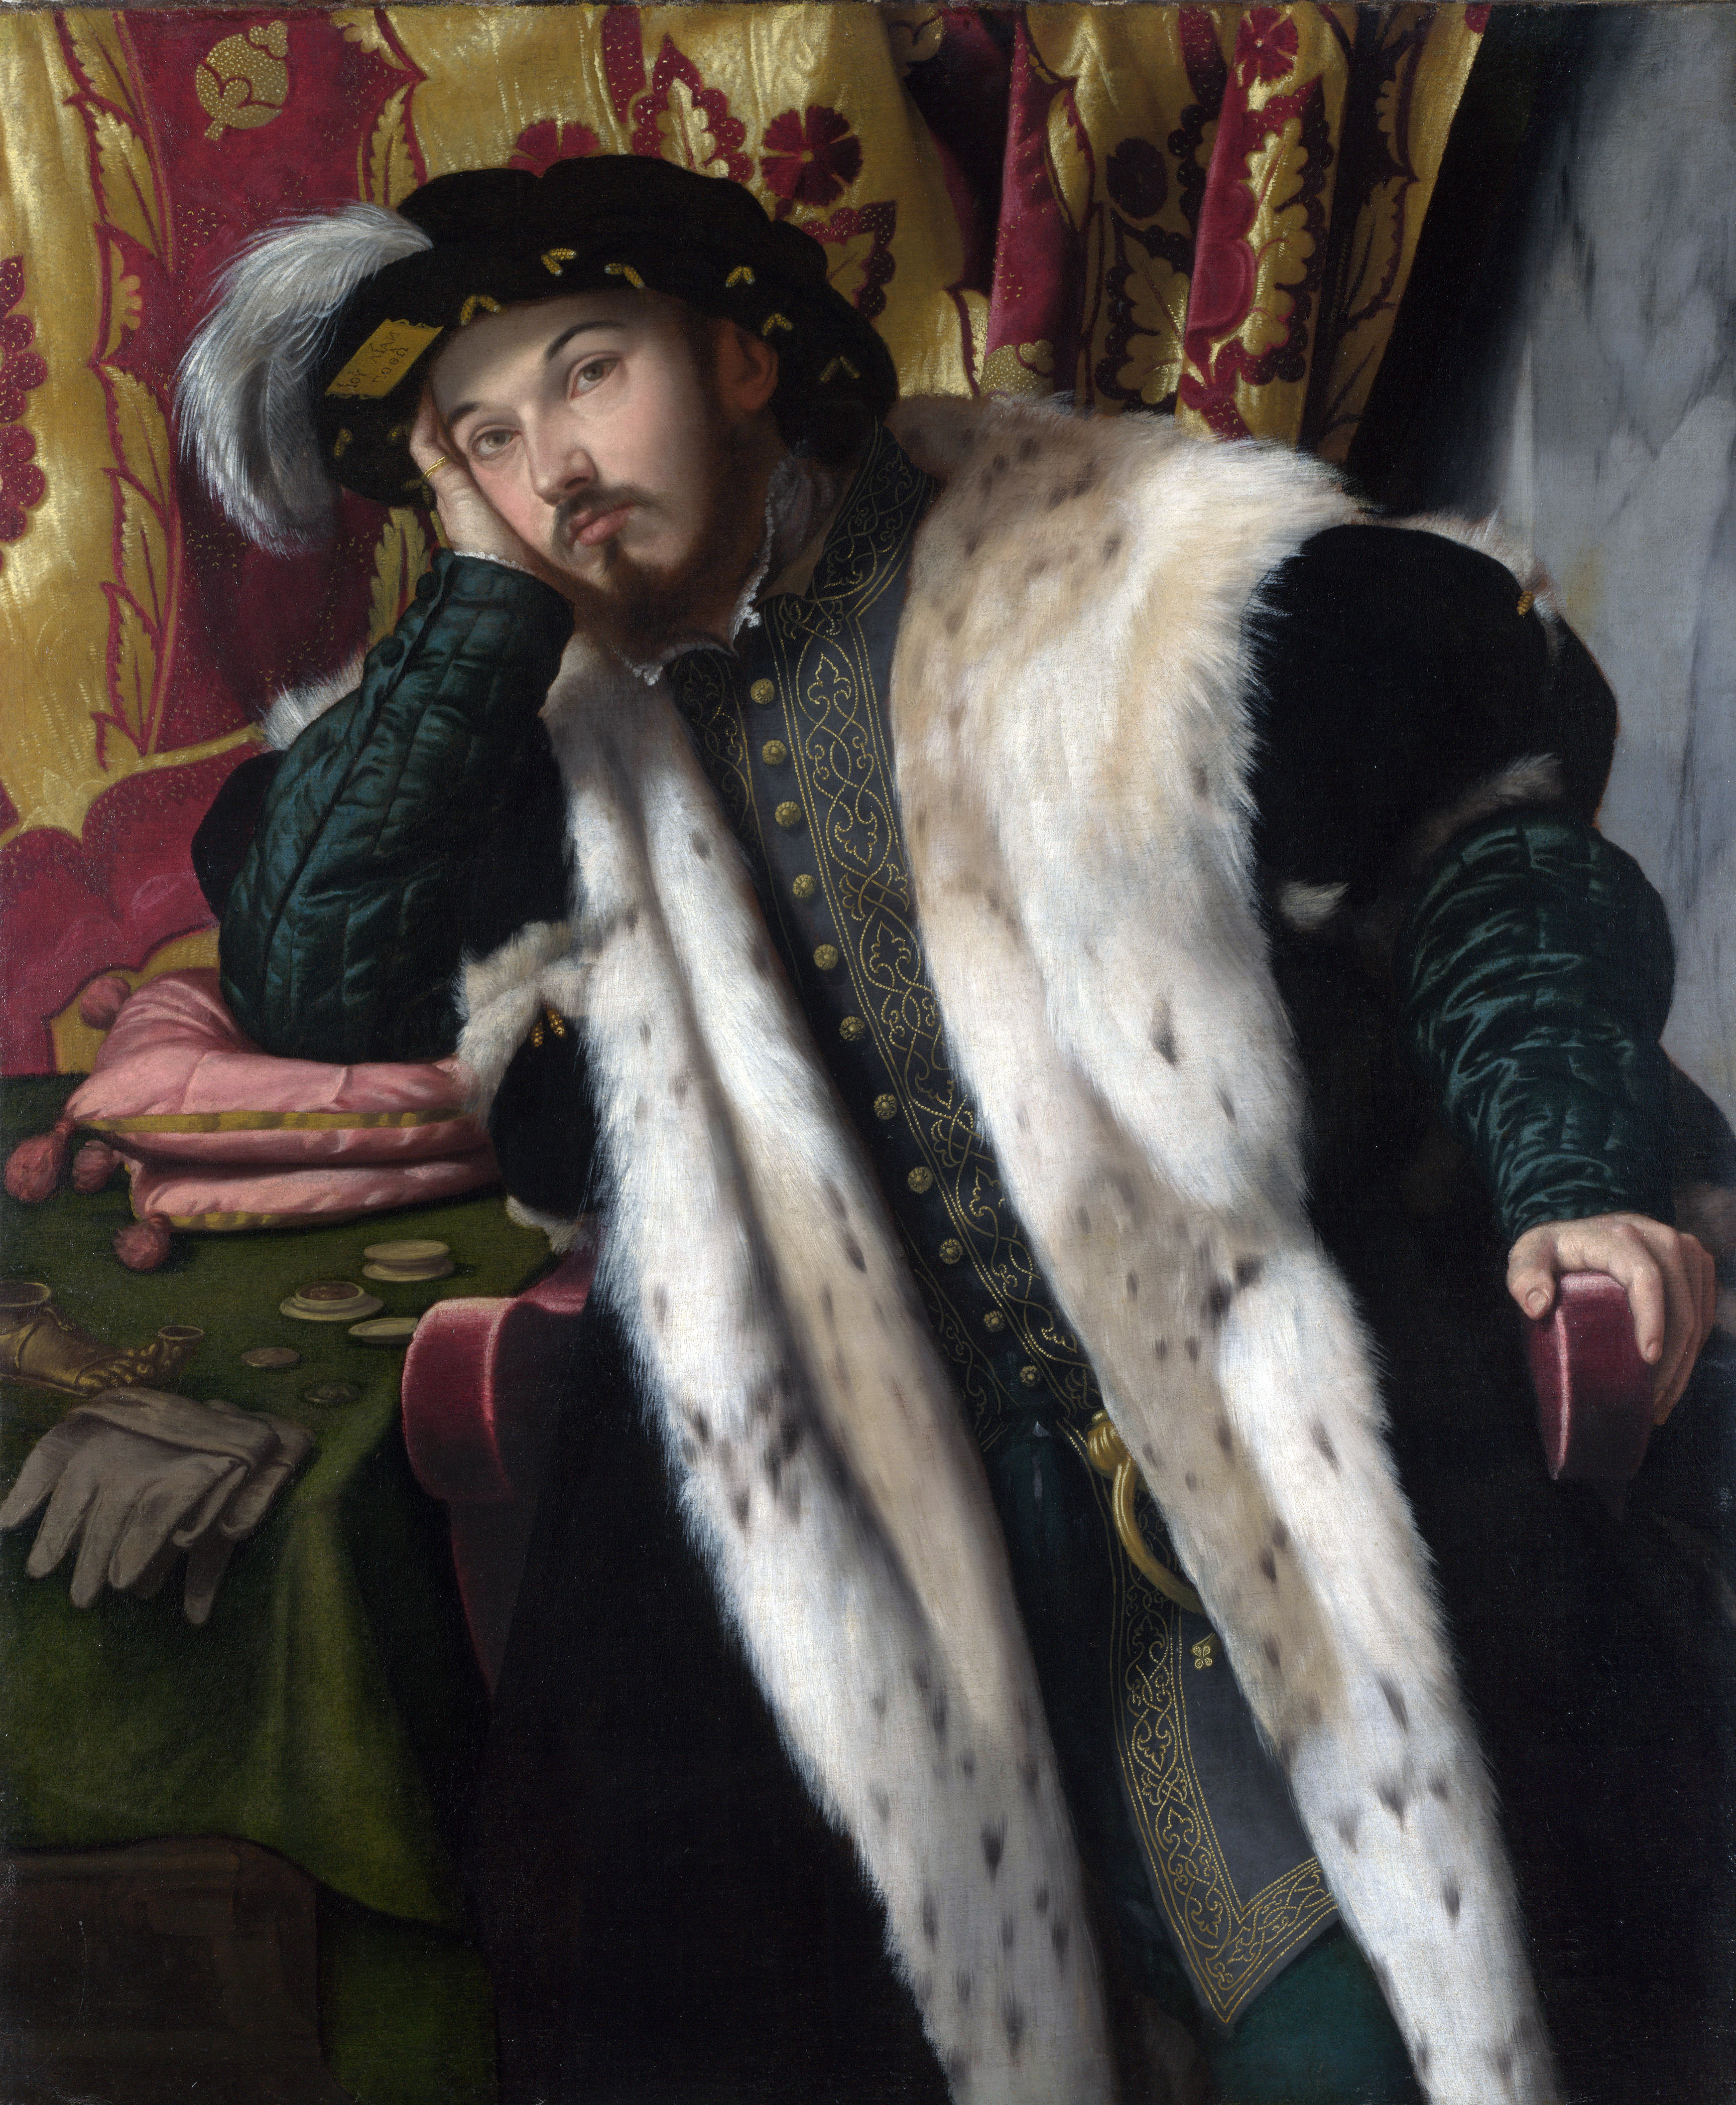
After spending countless hours searching through books and websites I am certain I have viewed over 4,000 paintings and sketches. Most were either not appropriate to the period I was looking for or were not from the right geographic region. After absorbing all of the images I care to (for now) I've come up with a final design for my IRCC outfit. There are a lot of components and I still hope to hand sew as many of the items as possible. The overall theme of the outfit is not one of my favorite colors, but it is something new for me. I will be making the doublet of brown silk with hand embroidered gold trim. I chose to use a dark brown for a couple reasons. I haven't done anything in brown before and I found some lovely silk and wool very cheap at a local fabric store. The over gown will be made of similarly colored brown wool and trimmed with fur. The shirt which I started last week is making good progress and is more than half way complete. All of the edge work is done and the sleeves have been assembled (without cuffs). I have to do the black working on the cuffs and collar before continuing assembly. I am hoping to begin assembly within a week or so. The pattern I have selected for the black work is not quite as elaborate as I might have liked, but I am really trying to schedule the remaining work so that I can get as much done as possible. After the competition ends I may disassemble and add more blackwork later. The pattern for the blackwork and the embroidery on the doublet are basically the same and come from a portrait by Moretto da Brescia. The portrait is of Count Sciarra Martinengo Cesaresco. (http://en.wikipedia.org/wiki/File:Moretto_da_brescia_cesaresco.jpg)


I copied the pattern of the embroidery from the Count's doublet and scaled it down a bit to fit on about a 3/4 inch cuff.  Here is a sample renderings of the designs I'll be using.

Monday, May 2, 2011

IRCC blackworked shirt continues

New shirt is making progress.  This 16th century linen shirt is constructed of light weight linen and will be entirely hand stitched using either white linen thread or black silk thread.  Each of the panels which make up the shirt have button hole stitching holding the rolled edge and shall be woven together to construct the shirt.  The following photo shows the panels of the shirt I’ve completed the edge work on so far.  I plan on blackworking the collars and cuffs as well.  So far I've completed the edgework on the gussets and the sleeves.


Here is a silly little project.  I was getting sick of sewing yards of button hole stitches and so I made this pin cushion just for the heck of it.  It is made of some scrap wool I had on the floor next to my work chair.  It was left over from the wool Friar's robe I made last fall.

Friday, April 29, 2011

New Shirt started

As part of the IRCC (see prior posts for details) I have started a new linen shirt.  It will be made of light weight linen and have some blackworking.  All of the edges will be rolled edges with button hole stitching around them.  The seams will all be joined similar to a previous white shirt I did (http://ercc-glaison.blogspot.com/2011/02/another-shirt-completed.html).

Here is a photo of the first section of the shirt.


Note the brass needle.  I created my own needle and itend to sew the entire shirt using that needle.  Based on the rate at which I sewed the first 30 inches or so, I think that just the edging will take about 25 hours to complete.  After all the edgework is done I'll blackwork and assemble the shirt.  That will likly take another 25~30 hours or so.

Tuesday, April 26, 2011

Gloves are complete

Well, as in most things my first attempt at something didn't come out quite like I imagined, but it will have to do for now. In hind sight I wish I would have ordered some linen thread which was closer in color to that of the leather I used. The black thread really shows through. They fit rather nicely. I am pleased that if nothing else, I have confirmed the pattern. I intend to keep it and use it again for other gloves in the future (after the IRCC is done).

Here is my first pair of hand stitched leather gloves.


One last touch.  I sniped the cuffs of the gloves similar to the style I've seen on a few differant portraits from 1520~1550.


The following are samples of various portraits which served as inspiration for this project.

Title: Portrait of Charles de Solier, Lord of Morette 1534-35

Painted by: Hans, the Younger Holbein
Location: Gemäldegalerie, Dresden, Germany


Description: Man with a Glove 2

English: "Man with a Glove 2" oil on Canvas.
Date: 1520-22
Artist: Tiziano Vecellio (Titian)
Source: http://www.wikigallery.org/wiki/painting_300736/Tiziano-Vecellio-(Titian)/Man-with-a-Glove-2


Artist Name: Flemish Unknown Masters

Painting Title: Portrait of a Young Man 1530-40
Museum: Koninklijk Museum voor Schone Kunsten, Antwerp, Belgium 
Source: http://www.artchive.com/web_gallery/F/Flemish-Unknown-Masters/Portrait-of-a-Young-Man-1530-40.html

Sunday, April 24, 2011

Poncho Leather gloves are a failure


Well, I had to throw in the towel on the leather gloves being made from the poncho leather.  Turns out there were some sections of the leather that were rather dried out and weak.  I got the thumb and a couple fingers done and then realized the stitching was pulling through on the knuckles. After making a fist only a couple times I realized that the gloves were not going to hold up. 

Broke down and went to Tandy leather and found a really nice light weight leather.  I finished one of the gloves, but I'm not sure I really like it.  I sewed the glove insid out and then turned it.  I pulled every stitch as tight as I could and yet the stichting still shows quite a bit.  I may trie a saddle stitch or some other option.  I think I'll finish the right glove so that at least the two will match, but I know that I'll come back to glove making again in the future.

Here is the new and only slightly improved version of the glove.
(By the way I think this glove took about 4hours to cut and sew.  I hope to be quicker on the future ones as I have worked out the kinks in my pattern now.)