
Most of the time when I start a new project I like to start with an extant item. I had a goal of creating a seal matrix which would be appropriate for use in the 13th century. I scanned the internet for images. I found hundreds of extant examples. I further limited my search for those cast in pewter or lead as I didn't feel like messing with bronze for this winter project.
I found enough examples similar to the following which lead me to believe that this style and shape would be appropriate.

I then did a line drawing to scale which I planned to use as a template for the mold.


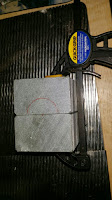
I proceeded to cut a few slabs of green soap stone which I purchased from Blicks Art store. At this point I didn't have a full vision how the process would work. I had intended to try and carve the face of the matrix. So, at this point, I believed that I needed a three part mold.


I placed my template on the stone and determined a good spot for my register pins.

I drilled the holes for the register pins with a small hobby drill.

Oops moment. Cracked the stone while drilling and pouring. Holes didn't line up and the mold stuck closed. I cracked in when opening the mold. Nothing a little super glue couldn't fix.
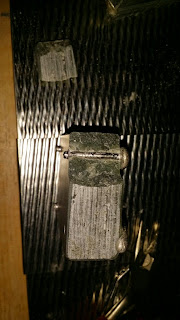
Register pins poured I drew the template in with a marker.

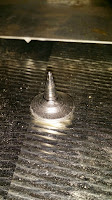
I took a modern one inch spade bit and filed it down to a template shape closely approximating that of the seal matrix. I then clamped the mold together marked and drilled the initial hole.


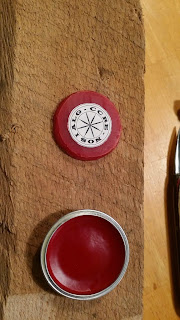
This is what the initial piece looked like. Not exactly a finished piece but I was happy that the process worked. The proof on concept ensured me that I could create the mold in this fashion.

I could now see how much further I would need to carve out to complete the project. I did a small amount of tweaking to the drill bit and drilled further with no material benefit. From this point I would have to hand carve the mold out.


I often closed the mold together and then used small pin files to smooth the opening a little at a time.

I poured a new piece every once and a while to see the progress. I kept all the pieces so that I could show the progression of the mold along the development process.

Once the cone was finished and polished nicely I moved on to the handle portion.

This portion was done with small dental tools and carving knives.

Again I poured samples on a regular basis to ensure that the flow was working as expected.


Once I got enough flow from one side of the mold I then placed the piece back into the mold on the uncarved half using the piece as a template to trace around. This would ensure that both halves of the mold would line up correctly.


My plan changed. I decided to try a lost wax face while also continuing work on this mold. I would pour this seal matrix "template" with a blank face which I could then engrave.
If you look at the following seal matrix you can see where it seems as if the finished face were engraved rather than created a mold which had the details included in it. I decided to create my version in this manner.


I tried pouring with only 2 parts of the mold. I also tried cutting the top 3rd into 2 pieces and make it a four part mold to get a smother face.


I wasn't terribly happy with the result of the four part mold and decided to simply pour in a 2 part mold and then file the face smooth.
Here is the progression of pieces along the way.

After a bit of clean up here is my finished "template" piece ready for engraving.


To better hold the piece still while engraving it I drilled a hole in a piece of oak. I then rounded the edge of it and covered the wood with a strip of leather. This securely held the piece without risk of damaging the surface of the piece.


I started by doing some small stamps and scratches with a knife. I definitely felt in over my head on this one. I am not an engraver and don't expect to develop that skill anytime soon. I fully expected my piece to be rough but hoped it would be functional.


I did a small sample to see how much definition I would get with as little engraving as possible. As I added more detail I kept doing test stamps along the way although this is the only sample I kept.


The finished piece was readable and functional, although not very pretty. It would serve as a prop piece for my kit though.

I decided to try lost wax approach. BIG FAIL HERE. I decided to use some recycled wax. Where did I get the wax you might ask? Well, my kids love those little baby bell cheese wrapped in red wax. We ate some and I kept the wax. I heated it and filtered it thinking it would work..... Nope.

I cast a small block of it as a proof of concept. I then did some quick carvings to see what would happen. I had heard that you could use plaster of paris as a simple throw away one use mold so I decided to try.

I placed my wax piece in the center of a shallow dish and covered it with plaster of paris.

Once dry I cut the opening further planning to pour my mold as an open mold similar to the stone one. This was not intended to be a usable piece only a proof of concept.


So far so good. I was very happy at this point.
Here's the real problem. I understood that in lost wax casting you should heat the mold. I have friends who use plaster of paris for pewter casting all the time. They had indicated that a slow bake will cure the mold so I proceeded to heat it. I fully expected the wax to melt and drain out.


Nope. It wasn't pure wax. You can see an oil residue on the face and surface of the mold. the wax even tho fully melted stuck like a mess in the mold. I tried pouring it anyway but the corrupt wax surface totally screwed up the mold.

I plan on trying this process again with pure beeswax next time. I also purchased some modern wax used for lost wax casting of jewelry. I plan on making a better mold and casting a bronze one in the future. Not any time soon though. The rough looking pewter one will do for now.