The blue and green one with the yellow stripe was supposed to be inspired by my heraldic colors. The other two were the colors of our kingdom and mostly I just wanted to make some dots.

Well, not long after returning home from the class I wanted to try my hand at it. My wife was convinced into getting me a starter set from Hobby Lobby for my birthday. The set came with a torch, some glass, a small set of tools and some basic instructions. I spent quite a bit of time watching YouTube videos and just started playing away.
Here is my setup. It really doesn't take much room at all.

I just started cranking out beads of all shapes and sizes. I wanted to try a lot of different techniques with no real goal as to what I would do with the beads.


I found myself making similarly colored beads in groups. Once the glass rod was hot I would make 5~10 at a time with the same color grouping. I even made a small bird just to see if I could.


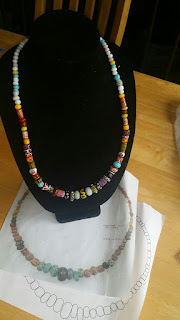
As the collection grew I just kept adding them to a string, still with no real goal in sight.

Eventually it came to me. I had planned on doing an A&S pentathlon so why not try and make a replica of an extant necklace? Like many of my projects I focus on the making and not so much on the using of an item. I spent 300 hours making a shirt I haven't worn so obviously it is more about the process for me than the finished piece. So I started looking for extant necklaces which I could use as inspiration.
I looked through a bunch of books and literally hundreds of downloaded images. I found collections with beads that inspired me but nothing in tact in it's entirety. There were a lot of Viking finds which had a dozen or so beads. I was really looking for an extant item with enough beads of various styles to show more than a few techniques. I wanted complexity as well as beauty. Eventually I found it.
I came across a collection of necklaces held at the Metropolitan Museum of Art (http://www.metmuseum.org/). I found about 10 different necklaces which fit exactly what I was looking for.
Here is an image of one of those necklaces:

Beaded Necklace
Date: 500–600
Geography: Made in Niederbreisig, Germany
Culture: Frankish
Medium: Glass
Dimensions: Overall: length of string 27 3/4 x 15/16 in. (70.5 x 2.4 cm)
Classification: Glass-Beads
Credit Line: Gift of J. Pierpont Morgan, 1917
Accession Number: 17.193.101
This would be my project. I found some beads from about 6~7 of the different necklaces that I liked. My goal was to make a necklace that would "fit" this collection while including as many different types of beads as I could in the single necklace.
To get the proper scale of the beads I took the information provided to calculate the diameter of the photo.
2 * Pi * r = 27.34 inches
That resulted in a diameter of 8.7 inches.
I then imported the image into a graphic editor and scaled the photo to be "life sized". Once that was done I could properly measure every bead on the string to design a scaled version of this style of necklace. In the graphic editor I traced the size of each bead so that I could get an accurate measure of each bead along the strand.

After completing the "tracing" of each bead I had a layout and sample to guide my design of each bead for my creation.

I then numbered each bead. After reviewing a number of extant necklaces of this style I chose the design pattern and color for each bead on my project.

I created a numbered chart so that I could organize my design and work through the list of beads one at a time replicating the size for each position along the strand. I then went through all the images of the extant necklaces and found various styles, colors, shapes that I liked and fit them into the chart. This process was almost as much fun as the bead fabrication. Once the chart was done I had my goal. I started walking through the chart of beads. I would make a practice bead and then the real bead for the necklace trying to keep to the color and size as compared to the scale printout I had.
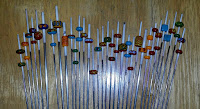
I quickly learned that the mandrels which came with my starter set would not always work. Some of the beads were very small and only slightly larger than the mandrels I had. I didn't feel like spending a ton of money to buy new mandrels sold by the online glass shops so I proceeded to search Home Depot. I found these small flags. They are intended to mark property before/during construction projects. They are made of very thin steel rods and sold in packs of 100 for about $7. I bought a pack and cut them all in half. That produced 200 mandrels for about 4 cents a piece. They worked great for the smaller beads.


Of course I encountered some issues. :-) I was warned that this might happen and in fact it happened a LOT. I ran out of glass from my starter set and order new glass from an online supplier. I like the varied color selections available but the glass from the online source is a LOT more temperamental. It exploded a LOT when not heated slowly enough.


As my collection of beads grew I began slipping them on to a brass wire to see if my scale and size was looking OK. I just kept adding to the strand until the length was about right.

The best part of this project was taking an extant bead and then trying to figure out how to copy it. It gave me a direction for the new crazy interest. I found a bead and tried to replicate it. Some beads took 30 minutes or more to figure out. A few took even longer after 2 or 3 throw aways.

Since I'm the one working the glass I didn't really have a chance to get any "in progress" photos other than these.


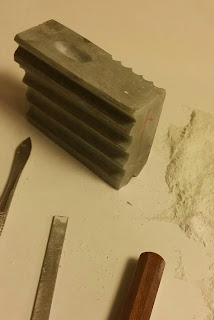
A couple of the beads required the use of a marver to help shape the bead.
Here is an excerpt of a book showing an extant marver made of stone.


I added some sharp edges and hollows of varying size to help with rounding of the larger beads.

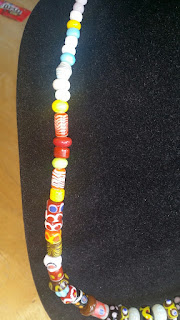
Some close ups of the finished piece.


I have no doubt I will be making more glass in the future.