
And here the medieval book binding experiment continues. So far I must say that I am thoroughly enjoying this experience and I predict that I will be making more books in the future. The push to get these done is driven by the deadline of next month for Pennsic. I'd like to take more time and research better on the next version, but I am very happy with the results so far.
The books at this point have been stitched together and now need a cover. I chose a quarter inch plank made of oak which I purchased from Home Depot. The board was about three foot long so the single board was long enough to accommodate the cover for both books.
I used a standard hand saw to slice the boards into rough planks to fit each of the two books. I left about a one eighth inch allowance for an overlap on the top, side and bottom of the cover.

After the boards were cut, I sanded the edges to a mild taper to make a smooth transition when the leather was glued on. As I was aware that the wood would be completely covered I was not too concerned about the roughness of my finish when done sanding. I did take a clean damp rag to wipe off all residue to ensure that the glue would adhere well.

Planks cut to length and sanded now needed to be drilled. I placed each cover on the appropriate book and eyeballed the location for the holes.

I wanted to try two versions of book binding so I planned on drilling the hole differently as you will see further along.

The smaller and thicker book was stitched together onto double strands and therefore required two holes grouped together. On this book I wanted to try the technique I had seen where the cordage was drawn through the cover and then frayed and glued flat. The cordage used for this book was chosen for this purpose as it tended to fray a lot easier. The thicker cord didn't fray as well and would use a different technique where the cord would be fed in and out of two separate holes and then glued and pegged in place.
I matched the two sides of the planks together but drilled them one at a time using a hand held electric drill.

The size of the hole was slightly smaller than the cordage used and so it took a bit of poking and prodding to get the cord through. I was concerned about leaving a hole too large and I'm glad I did make it as snug as I did. While it took more time to feed the cord through and get situated, once it place it was very sturdy even before the glue was applied.

At this point I planned on preparing for glue so I covered up the pages of the book with waxed paper held in place with painters tape.

Here the book is tested for binding with no glue and no fraying done yet. Looked good so far. Ready to fray and glue.

Here is what the inside of the cover looked like before I frayed the strands. You can see that some of the cordage was coming apart a little already. That was due to some issues I had pulling it through the very tight fitting holes I drilled. Again, worth the effort. I think that the tight holes will help in the final binding.

I simply unwound the cordage by hand and used my finger nails to pull and spread the strands apart. Once I got to this point I used a small bone comb I recently made to comb out the strands until they were even and would lay flat.

I applied the PVA glue and smeared it around using only my finger tips. I kept working the glue into and around all portions of the strands.

I'm not sure how much more sturdy this version will be from the next one but I can quickly see why this was done. Fraying the strands affords a much stronger bonding surface for the glue and will be easily covered up by the inside cover since the strands lie almost flat when glued down.

I propped that book open to dry overnight and moved onto my larger volume. This volume required pairs of wholes about an inch apart from each other. The method requires that you feed the cord in one hole and out the other. The cord is then pegged into place and glued.

As the cord was rather thick and I wanted the inside cover to lie flat I had to carve a small channel between the holes which the cordage would fit into. I used a shallow U gouge and a carving knife to make these channels.

I know the handy work isn't pretty, but I was fully aware that these were simply functional. They would be covered up by the cord, glue and subsequently leather. No reason to be overly cautious about neatness.

Again the holes were drilled with the intent of being very snug. I found that the natural cord was not entirely uniform in thickness. There were a few holes which had to be manually carved slightly larger to allow the cord to get through.

Here you can see the inside of the cover before feeding through the second set of holes.

The cord was fed in and out and pressed firmly into place. I wasn't sure how tight to pull it as I didn't want to distort the binding. As it turns out even before glue was applied this method of binding provided a very sturdy backing. Both methods seem very practical and relatively easy to do. In the future though I think I prefer the second method for ease of use and construction. It was easier to dry fit the cordage and glue it using this method. Fraying the cord and gluing wasn't difficult but this method allowed me to move on without having to prop the book open overnight to dry.

Here you can see the method I used to slowly ease the cord into place. I had to leave a large gap so that there would be enough cord to allow the cover to close flat. At this point I realized the HUGE mistake I made. I really should have provided three or four blank pages at the beginning and ending of the book. I will have to glue a inside cover to the binding and there is not "extra" pages to glue them to so I'll have to mess up the first page of the book. Oh well, live and learn. At this point it was really too late to pull it apart and add a few more pages. I'll just have to remember that the next time I bind a book.

Pulled snuggly through the holes the cord is ready to plug and cut.


When pulled tightly you can see a very small space available in the hole. I pulled the cord as tight as I could to create a gap.

After eyeballing the gap I carved a small piece of wood in a 1/2 circle plug to press into that opening. I placed a few drops of glue in the crack and then pressed the plug in place ensuring that it was very tight. Once in place I used a carving knife to cut off the excess wood and the cordage sticking out.

Really starting to look like a book now.

I clamped the book while the cordage dried and also to ensure that it would be stable while I used a small chisel to smooth out the surface where the cord and plug were sticking out.

This is the glue that I purchased at Hobby Lobby. I found it as a recommended glue on a book binding website. While at the store I was unable to find an associate who understood what I was looking for. While I waited for the manager to come back I searched on my smart phone for "book binding glue". I found references to PVA (polyvinyl acetate) glue. One site recommended Sobo Glue. This 8 ounce bottle was about $3.50 and I figured would server the purpose for this first time adventure.

Ready for binding. I had seen some examples of books bound with and without an extra piece of material. I haven't researched it much and plan to do so in the future. For this project I wanted the books to be sturdy, practical and functional. I can't state for sure when/how the material gluing process got added to book binding.

I took some very thin handkerchief linen and a thin layer of glue to applied to the spine of each book. I pressed the glue into the cracks using only my fingers and made sure that there was sufficient coverage. I then placed the thin strip of linen on the spine and worked it into place ensuring full coverage without any gaps. It is this process that I envision will help hold the folios together well when the book is opened and closed repeatedly.

Same process, second book.

I really love the look in this image. It is a crummy photo but at this point I really fell in love with the process. I was now holding an item that I created which really looked like a BOOK!

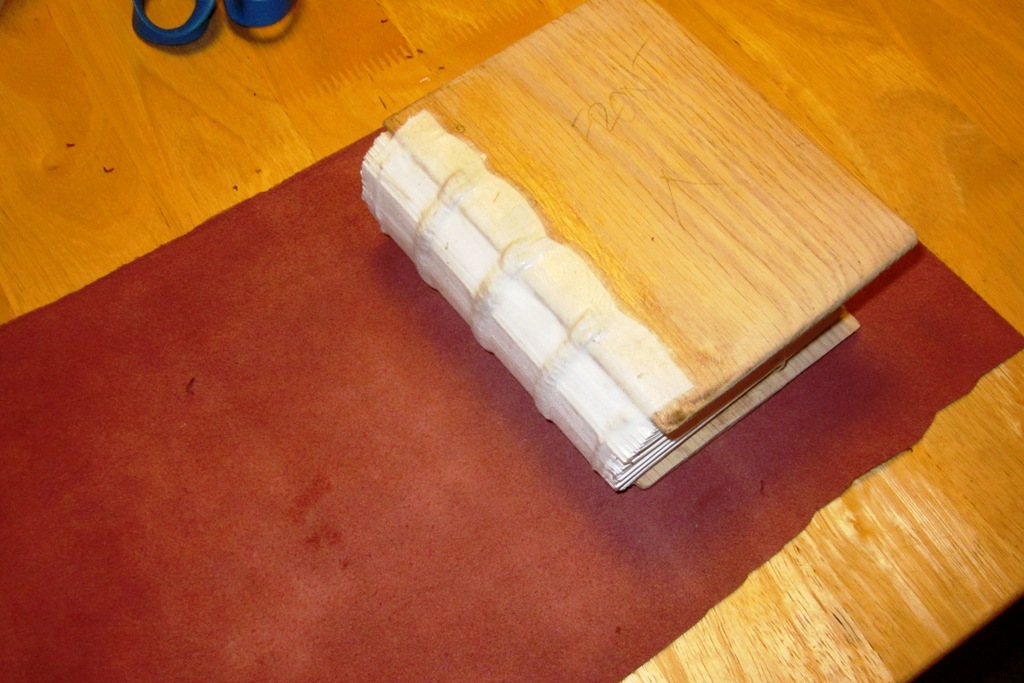
I let the books dry a couple days before digging out some scrap leather to cover them with. As in many of my projects the leather for these books would be from reclaimed leather coats. Both of the coats were men's coats purchased at Salvation Army. here is the back left shoulder of the coat which allowed just the right amount of leather to used for the smaller book.

Nothing scientific here. I simply placed the book out, and roughly eyeballed the size I would need. I don't think that it really matters if there is one inch overlap or two.
I sketched the size of the book on the leather and then filled that area in with an even coat of the PVA glue. I also put a small amount of glue on the spine of the book to make sure that the cordage was fully covered along the spine.

I placed the leather on and stretched it by hand as well as I could and then folded the edges to the inside and placed a clean smooth board on both covers of the book.

I clamped the boards snuggly down. I simply wanted the boards to hold the leather in place so I made sure not to tighten the clamps so far as to leave any sort of impression on the cover when dried. At this point I used a small bone awl which was smooth, round and available. I used the tool to work the leather into place to make sure that the glue would connect all surfaces of the leather and the spine.

Now the same process all over again.
Here is the pile of leather collected after dismantling the second coat. The lining was in horrible shape but the quality of most of the leather was really in good shape. One of the back panels was a decent rectangle which was more than large enough for the larger book.

Glued up and clamped. I stretched this leather as tight as I could and clamped it.

After the outside glue dries I'll fold it over, cut it and glue the inside of the cover. Not sure if this should have been done all part of the same process in period, but I just couldn't get it done without messing up the cover with my glue covered fingers.

Now we wait another night to finish...