Pages

Thursday, June 4, 2015

Trestle Table

This is the tale of a cheap but attractive trestle table.  I wanted to make a servicable, yet portable table for weekend events which would look something like the following image.


My project has some of the usual limitations.  
1)  Cost had to be minimal
2) Had to be very sturdy when in use
3) Easy to set up
4) Easy to take down
5) Easily fit into the back of my car

This is what I ended up with.
I purchase 4 "standard" 2X4s from the local Home Depot.  They were not "clear".  I dug through the pile of construction grade lumber and found some rather clean looking boards.  The table top was previously created as part of a failed work bench attempt.  It was made from an 8 foot 2X12 cut in half and jointed.  I purchased 1 quarter inch dowel for pegging the construction together.  I also used a scrap 1X10 which I had in the garage about 30 inches long.

I rough cut the legs out.  
Note: One of my favorite parts of this project is the massive sense of satisfaction I got doing all this construction with no drawn out plan and no real math.  I'll try and explain as best as I can.


My basic layout would consist of a saw horse looking set of legs.  Modern saw horses usually have four legs.  My trestle would have three.  The side with 2 legs would be permanently joined with an "A" shaped 1X10.  I layed out the 2 legs with the center board to get a rough size of how wide the top of the "A" would be.


I then spread the legs out so that they would maximise the use of the base of the "A".  I then scribed the line for the shape of my "A".  So far no math.  No angles.


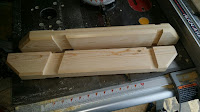
I ripped the "A" and used it as a rough guide as to how large a slot I would have to cut in each leg.


I used the table saw to cut the main line and then finished with a hand saw.  The base of the slot was cut out with a hand chisel.


Now having 2 legs with a slot I fitted the "A" in them and cleaned up the joints.


I took a piece of printer paper and roughed out the shape of my decorative cut.  I folded the paper in half and then free hand cut the shape with scissors so that it would be symmetrical.  I cut the shape out on my scroll saw and then ran the edge on the router to round over the sharp edge.


I wanted the legs to have a tapering profile so I marked out a line on each side of the slot and connected that spot with the bottom corner of the leg.  I then "free handed" with my table saw.  I can't say that I recommend this but it was the fastest and easiest way for me to do it.  I took the rip fence off and the guide and simply treated the table saw as a circular saw.  I used both hands to feed the wood through and follow the line.  That way I could simply follow the line without having to figure out what the angles are on my guide fence.


Once done I set up my router with a 45 degree corner bit and took the sharp edge off all of the legs.
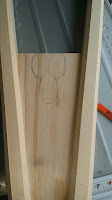


Pretty fancy and so far still no math or measuring.


As I said my "saw horse" style legs would have 2 on one side and one on the other. The single leg would be constructed much easier than the A frame setup.

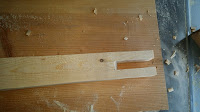
 

This would be the top cross beam for the "saw horse" style set of legs.  I knocked a 45 degree cut off the bottom of each end and then used the router on all the edges as well.


I spread the pieces out on the saw table to get a rough idea of the look I wanted.  I then scribed the lines for the dado cuts needed. 


I don't use a dado blade.  I'm really just too lazy to swap it out.  I run a cut on each side and then nibble away at the cut until the channel is clear enough.  On occasion I may use a hand chisel to clean out the groove, but not too often.


I glued up the legs and then let them dry.  I then assembled them.  As you recall I haven't done any measurements or math yet.  At this point the legs are not even and therefore the table will not sit very well.  That's OK.  That was the plan.  

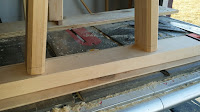
The legs were only rough cut.  I made sure the surface of my table saw was level to begin with.  I then set up the table on the top of my saw with a level on it.  I kept adjusting and shimming up each leg until my table top would sit level.  Once level I marked the bottom of the legs where they should be cut by making sure that my markings were all of equal distance from the surface of my table.
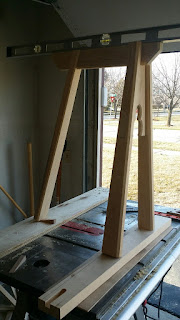


You can see here that once I had the legs shimmed level I marked them by making my line parallel to the surface of the table saw face.  This would ensure that all three lines on all three legs were on the same plane.  It would also give me the proper angle to cut.  This would be a compound angle and math would be involved without this shortcut.


I used a flush cut saw on the top of the legs to smooth out the surface where the table top would sit.


All done, cut, glued and dried.  I then drilled the holes for the pegs and pegged the legs together.


Here is what the rough setup looked like.


Construction complete.  Works great.  My table top needs a little work yet.  It is VERY heavy and doesn't seem to want to move around so I don't think I'll need to cut any sort of channels or pegs to hold it in place.  Next step is a coat of milk paint for the legs.  The table surface will stay natural so that it can double as my work bench surface as well.
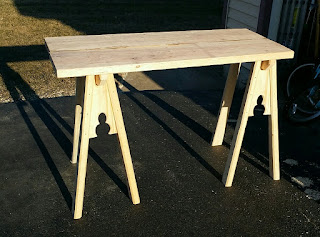

Packed for shipment.  Breaks down very fast and easy and fits inside the back of my car.  Success.


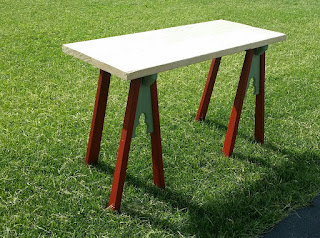
Finished painting the legs.  Here are a couple images of the setup.  The table surface is about 2 foot wide by 4 foot long.  The frame on the table top in the second image is the soon-to-be tabula (backgammon) board.


Lead Pencils

I have a friend who makes and sells lead pencils... made from real lead!  I know that a lot of people these days are all taboo about anything containing lead.  I have no such fears.  I did a little digging and came across these extant pencils.

PENCIL

Unique ID: IOW-946291


PENCIL

Unique ID: IOW-ED968C


PENCIL

Unique ID: IOW-6FEA87


I decided to make my own version.  I started by slicing a couple pieces of green soap stone.  I drilled and set register pins.  I then clamped the two halves together and used a drill to rough out the shape of the pencil.


I used some small carving tools to clean up the mold but not much work was needed other than to shape the point.

I then took a collection of old fishing weights and melted them down.  Note that I DID do this outside.  I put a wind sheild up and simply heated the lead with a propane torch.


 This ladle was enough to make 3.5 pencils.  I spilled a bit on my first pour but that was probably only about 1/3 a pencil or so.


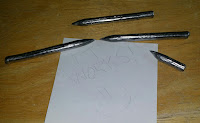
I didn't do any filing on these.  I took a small hammer and cleaned up the tip and the cast lines by tapping the pencil with a hammer.  Sharpening with a knife removes material.  These pencils can be "sharpened" with a small hammer instead.  The finished pencils are about 3 inches in length.


Portable Period Games

Teetotum

This is a Teetotum which is a top which has various markings on each of the possible sides.  
A girl holding up a four-sided teetotum on Pieter Brueghel'sChildren's Games (1560)
I created my teetotum by harvesting a bit of wood from an old wheel barrow handle.  The wood is very hard and very heavy.  I used a table saw to cut the shape square and then rounded the edges a bit on a belt sander.  I used a drill press to drill a quarter inch hole in the center and then inserted a sharpened dowel. The top spins well enough but I may make more with various other possible sides.  I simply used a "V" gouge to cut grooves I, II, III, IIII on the sides and then painted the grooves with goache paint.


Checkers / Draughts

Draughts or Checkers have been around for along time.  This particular Draught board is rather huge.
I came across this picture and fell in love with really big board games.  (I know these are chess boards but inspiration is inspiration).


I made it from a bunch of scrap wool which a friend gifted to me.  I have made a LOT of quilts in the past so the idea of making a quilt seemed easier than making a board of wood.  This board can serve as a lap blanket, table cloth or game board.  The squares are three inches square.  I machine quilted the board and then backed it with a heavy cotton canvas.

You may also notice that I made the board 12X12.  American checkers is typically 8X8.  I have a wooden board 8X8 so as long as I was making a new one, I figured I'd make an older European version.  As it turns out the 12X12 is more fun to play.  I have always found checkers to be a bit boring.  The 12X12 option seems to change the game play as there is a lot more room for maneuvering before confrontation.


Game Pieces

The draught/checker/backgammon pieces were cut from a 2 inch dowel and rounded on a belt sander.
As I am making a couple games that uses this sized game pieces I wanted to paint them in three different colors and leave one plain.  Here is how they were painted.  

I squeezed a bit of goache paint into a plastic bag and then added water.  I added my wooden disks and then simply did a little shake-and-bake type prep.  I sloshed them around for a while and then took them out and spread them out to dry.  The red took three coats to get a coverage.  The blue and green seemed to take a lot better with only two coats.


A couple days to dry and I have my stacks of game pieces.


Quoits (Ring Toss)

Well, the game of Quoits was new to me.  Honestly I was looking to add to my bag of games and keep the kids busy at events.  I did a lot of internet searches and came across the game of quoits.  I understand that it is simply a ring toss game and is played much the way modern horse shoes were made.  I figured this game would work well as most people have played horse shoes, bean bags or jarts.  Scoring can be done much in the same way so people can walk up and play rather quickly.

I created my rings by taking 6 equal lengths of 1/2 inch rope and then weaving them into a simple circle.  I let the ends overlap by about 1 inch after which I locked the ring closed by tightly wraping then ends in a colored string.  This served both to hold the rings together in a standard size as well as indicate the rings belonging to each player.  The finished rings are about 8~9 inches across.  The rope is stiff enough to hold shape reasonably well, but yet soft enough to cause some variability when thrown.  I have yet to play a game with them but have tossed them in the yard just for fun.  Seems like an quick game to build and easy to play. 


Backgammon / Tabula

A really big Tabula board.  That's What I wanted.  When I saw this image I knew my board had to take up a table top.

 Medieval illustration of tabula players from the 13th century Carmina Burana.  

I don't have many pictures of the construction process for this as I was busy building and forgot until the end.  The construction is basically frame and panel construction.  The panel is quarter inch plywood board and the frame is made from clear pine 1X2.  I created the frame using lap joints on the corners and then cut a groove for the panel using the table saw.

Here is the frame cut and dry fitted.  Note that the pieces on the board are 2 inches wide.  Yes, this is a BIG game board.


Once happy with the fit of the panels I drilled the holes for the pegs.  I used quarter inch dowel rods to peg the frame together.  I glued frames up and then drove in the dowel.  I used a flush cut saw to cut the dowel to length and then wiped off the glue leakage.  Unfortunately I was at a friends shop and didn't have my clamps with me.  I ended up placing them on the ground with some weights on the corners while drying.  Here is the frame, glued, pegged and somewhat dry.


I've purchased some milk paint to finish the board but that will have to be another post later when I get around to painting the board.

Glückhaus

I have a number of friends that like to play gambling games and often come to events with their own bags of tokens and pewter coins.  There is even one event run locally which is almost all gambling.  This game boards was created for people who like to gamble.

The game of Glückhaus is a basic put and take gambling game.  I have seen a number of period reproductions of the board which look something similar to the following.
  

 If you are familiar with the game you may see a couple basic flaws with this layout.  As the rules go, if you role a number which does not have a coin on it, you place a coin there.  If you role a number which has a coin there, you get to take the coin.  The exceptions are the numbers 2, 4, 7 and 12.  A 7, which is the most likely number to get when rolling 2 dice, always costs the roller a coin.  A 4 pays the house or does nothing.  A 2 claims all the coins except those on the 7.  A 12 claims everything on the board.  So, you see, the 7 is very likely to develop a goodly stack of coins on it.  These layouts also include a space for the 2 and for the 12.  Neither the 2 nor the 12 need a space as they never collect coins.

So, I redesigned the board a bit.  I made the space for the 7 a lot larger and placed the numbers in sequence around the seven.  Some period layouts have numbers scattered around.  I find that my layout makes it easier for new players to catch on quickly.  While there is a crown (for the 12) and a space for the 2 the area allotted to them are much smaller and not in the way of the game play.

I stared by sketching an idea on some paper.


Once satisifed with the overall look I drew the design out on some garment leather.  I harvested this leather from the back panel of a coat purchased at Salvation Army.  (If you've read my other posts you know I love leather coats from thrift stores for all my leather projects).  I found that I could not trace onto the leather so I simply free handed the drawing again with some chalk.


I then used a modern wood burner with a pointed tip to lightly draw onto the leather.  I practiced a bit on some scraps but found that burning leather is a lot easier than burning wood.  The image shows up and draws almost as easily as using a pencil.

Here is the completed board which is about 14 inches square.  It folds up nicely and yet has a look which I hope will appeal to the gamblers in my circle.


Fox and Geese

Here is another game inspired by the wood burner.  I had so much fun playing with the wood burner I looked for other period game boards which would work well using a similar construction.  I came across the game of "Fox and Geese".  

The layout of the game is simple.

I took that same basic layout and sketched it out with some chalk onto another piece of leather.  This leather is from the same coat as the board above.  No measurements were taken as I didn't really want a perfectly square drawing that looked machine made.  I free handed the outline with a chalk pencil.


Until I started with the wood burner I had planned on making straight lines.  It then came to me that a more organic look might suit this game.  The fox is trying to run around the yard eating geese so why not make the lines out of vines.  I started free handing some vine work.


As the basic vine lines were completed I then went back in and added some additional details to improve the look of the vines.  You can easily tell that they lines weren't draw using a ruler and I really enjoy that look.  The loose organic flow suits me I think.


Now for the game tokens.  Initially I thought about wooden tokens or small glass squashed marbles like those sold at hobby stores.  I then remembered my collection of rocks.  I went to the Dunes last summer with the family.  While the kids played in the water (which was freezing) I combed the beach for this collection.  I was looking for rocks which were flat-ish and could be used for gaming.   

I planned on getting a rock tumbler and polishing them.  I never got around to it.  Now that I see them on the board I really like the natural look.  I'll keep a couple options in the bag for the "fox".  Another period looking game which packs small and is easy to play.