
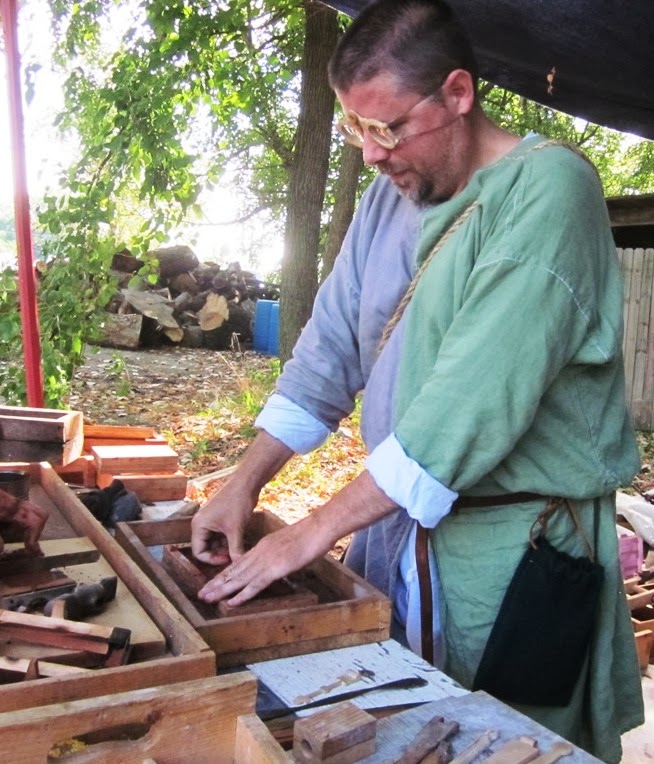
The gentleman on the far right is HL Guillaume del la Sudeterre who was instructing the class.

This first piece was for another student but the instructor did most of the work to show us how it would be done. We had a selection of wooden shapes to choose from which he had created previously. This particular object is a small flint knapping hammer. The piece is placed face down on the work surface and then surrounded with the frame. I light coat of talc was then tapped onto the piece.

The mixture of sand and some other agents (I wasn't taking good notes) was pressed into the mold. When the frame was sufficiently packed a hammer head was used to pack the sand firmly into place. After sufficiently packed the frame was flipped over.


At this point I started the process with my own piece. I chose a two part model which would become a small compass. As you can see I angled the pieces so that the smaller ends were closer together as I planned on cutting the sprue on that end.

I placed the two pieces in place, applied the talc and held them in place with one hand as I packed in some sand. Once sufficiently covered I began packing the sand in with my thumbs and then the hammer head.
Back to the instructor. He began to show us that we would remove the piece and then cut a sprue slot where the molten metal would be poured in. He indicated that the opening should be sufficiently large enough to allow a pool of molten metal to sit. As the metal in the mold would cool it would shrink. As it began to shrink the still molten metal in the sprue would trickle down and fill in the gaps.


Here I have finished packing my first frame and was ready to flip it and apply the second side.

So far so good.


At this point I was doing close up work and had to remove my glasses. The purpose of the next step is not always needed. If the model being used is square this process may not be needed. When the model is a rounded shape some of the sand must be removed to allow for the piece to be removed cleanly. The following images will demonstrate what I am talking about.
Assume you have a round piece. If you covered the piece with sand, flipped it and then covered the other side with sand when the mold was opened it would look like this. The piece would be buried and unable to be removed.

Instead, after the first mold is flipped the piece must be dug out slightly up to the half way point of the rounded piece. In the image below you can see that I would dig out along the dotted line to allow easy extraction of the piece.

After digging out the piece and then flipping the top frame would be filled with sand to provide the following cross section.

At this point I was doing close up work and had to remove my glasses. I began carving out the piece with a few small metal tools that the instructor had.


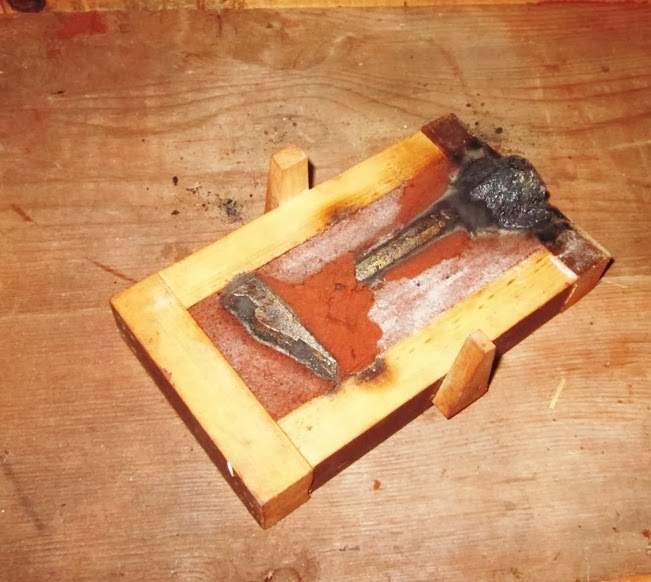
Pieces carved out and ready for the next step.


I covered the newly carved sand with another layer of talc so that the next layer of sand would not stick to it. I placed the second half of the frame on top and then packed away.

When the halves were opened up you can see that the top half has a protruded layer of sand similar to that of the cross section image above.


It is now time to cut out the section for the sprue. The opening was cut on both sides of the mold and formatted so that the flow of molten metal would go into both halves of the mold evenly.


After the sprue was completed it was time to cover the mold with two pieces of plane lumber and clamp it shut for later filling.

As evening progressed the bronze was melted in a propane forge. Here you can see the instructor checking on the warming metal. It was heating for about an hour or so before it was ready to pour.

The process was rather amazing to witness. The instructor held a long armed instrument which would carry the crucible. A second gentleman (Master Gerald Goodwine) lifted the crucible from the heat source and placed it into the carrying device. He then helped guide the pouring into each of the molds. My job was pretty easy. I simply held a pair of tongs to make sure that the clamped molds didn't move as he was pouring.


You can see that some of the molten metal did spill onto the wooden frames. As it did the wood ignited and began to burn. This is a normal occurrence I was told and nothing to worry about. Eventually I tried blowing some of the flames out and the molten metal would ignite them immediately anyway. After about 8~10 minutes the flames would go out on their own. The instructor took a small hand full of dirt and dropped it onto each mold to suffocate the fire sooner.


After letting the molds sit for about 30 minutes or so they were broken open. here you see the first hammer that was made.


After seeing how the process was done I opened up my mold to find the piece nicely formed.

At this point the piece was still rather hot. Using small tongs the piece was placed into some water to cool it down quicker. You can see that there is a bit of extra material around the seam of the piece but I think that will all clean up easily with a metal file. The sprue was cut off and the pieces fit together perfectly.
