
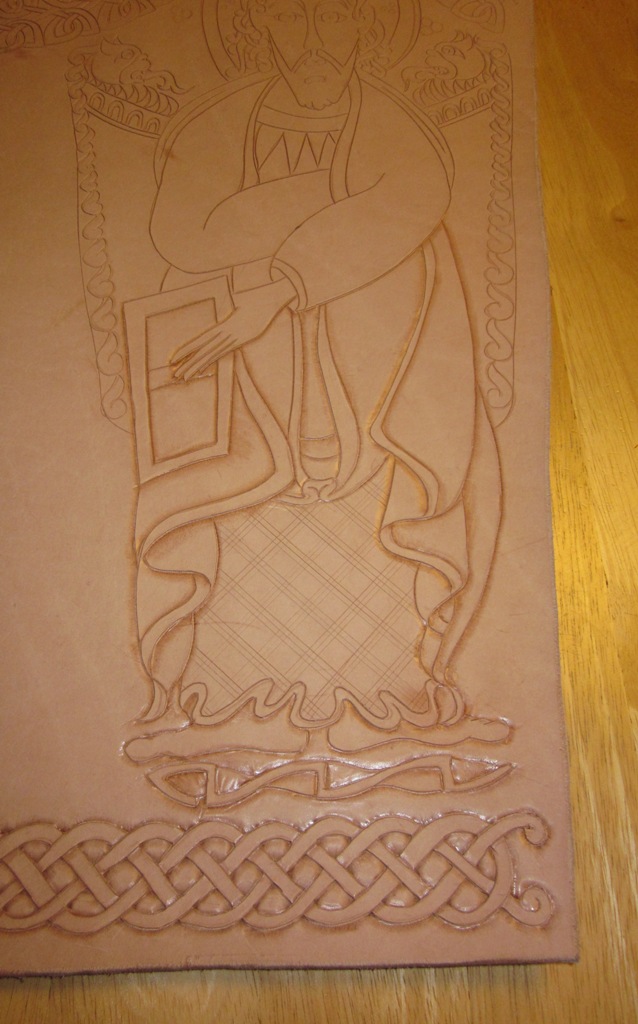
The pattern I'm making for the quiver is based on the carpet page from the Book of the Kells featuring Saint Mathew. While the quiver is not an early period replica, it is simply embellished using a Celtic style design as an inspiration.

I traced my pattern for the space I'd have for the quiver onto a group of 8X10 sheets taped together. In hind sight I wish I used a single large piece of paper. Drawing over the tape was a pain in the ....
I stretched the figure out a little bit but wanted to capture enough of the Book of Kells stylistic approach so that the figure would be recognizable. At this point I was rather concerned that I was perhaps overstepping my ability. Never having done any serious leather tooling of this size I pondered whether or not it would look like it did in my head.


To help get the look and feel correct for the knot work here's a little trick I used. I drew the line of the knotwork and then I thickened it up a bit with a highlighter. I could add substance to the design with the highlighter and still see the underlying drawing.

After I was satisfied with the shape and size of the knotwork at the top I simply traced around the highlighter with a black marker. At this point tracking the over/under approach of knotwork was a bit easier to manage. I could then simply trace those black lines onto the leather.

Since this was a rather huge project I started with the smallest piece to get my beak wet. I started with the smaller of the two straps which will be connected to the quiver. The first image is the strap dampened with a sponge. The second is the same strap about 5~10 minutes later. When the color of the wet leather goes away tooling can commence.


I did a basic Celtic pattern on the strap using all straight lines. I will likely come back later and give more texture and depth to some areas, but I first wanted to see if I liked the look and feel of the design.

After tooling was done I took a mallet and gave it a good whack at the ends to crease it where it will be stitched to the quiver. I found that I had to shave the back of the strap about 1/2 thickness to more easily shape it. I'll set this aside for now. So far so good.

Same approach on the larger of the two straps. Wet with a sponge, wait until surface is try and then whack away.

Here are a couple photos in progress. I first placed my design on the leather and traced it with a ball point pen. The pressure from the pen on the wet leather left a mark where I would need to tool. I then simply followed the lines that the pen made. Note that the patter on this strap is different. Yup, that's on purpose. The thickness of the straps is slightly different and quite plainly I wanted to try out two different patterns.


I think that the two patterns are quite complementary while not being exactly the same.

Next step... the big stuff. I used the same ball point pen method to transfer the pattern onto the surface of the wet leather. I then used a knife to cut slightly into the surface to create a sharp clean edge to tool against.


Before any real tooling could begin I wanted the entire pattern cut. The next and probably most worrisome portion of the pattern was the knotwork at the top. Transferring and cutting this portion took A LOT of time. Not sure exactly how much, but my hand was cramping badly and I had to stop a few times during the process for fear of slipping and ruining the whole thing. Definitely the most difficult portion of the project thus far.


Now... Mathew needs to make his presence known. Same process. Wet, trace, cut the leather.

At this point I began to get very happy. I really liked the way the image was taking shape. Even if I simply cut the image in and painted it I would be happy. I won't do that of course, but I would be happy. I am not exactly sure how I will give depth and detail to the image but so far the progress is exceeding my expectations.


CUTTING IS DONE. Now the tooling can begin. Another scary step. Every project I do where any point of potential for failure causing the project to start over causes me stress. I don't like that stress, but I find that if I just keep plugging through I am always more pleased with the outcome. That may be why I like to keep doing new things. There is more stress and therefore pleasure from trying a potentially new disaster as opposed to doing the same thing over and over. Not sure if that makes sense. At this point the stress got to me though and I had to let it sit in this state for a few days before I could muster the gusto to begin the whacking with the mallet.

To begin the image tooling I picked what I thought would be the easiest area. The style of the knotwork at the bottom was quit a bit like the tooling I did on a recent archery bracer. I was pretty sure I could handle this portion. I started by wetting the leather and pressing some basic shading in by hand with a smoothing tool. Once the basic over/under shading was established I came back with the mallet and tools to set the shading in deeper and clean up the corners. After I finish the whole piece I'll come back in and clean up some detail stuff before dying it.


Similar approach as I worked my way up the image. I found it to be basically like relief carving but instead of cutting material away you simply press it down. The one major difference is the depth of the relief. I've done carvings before but nothing so shallow as leather tooling. Can't get a good picture with my crummy camera. Tried a few angles to get the shading, but I don't think the pics do it justice.

Basic shallow image coming in. Trying to take baby steps. once you mash the leather down and find that the image is not correct, much like carving, there is no way to get that material back to it's original state. Baby steps.... baby steps...

Lots of stress and arm cramping so I decided to set this down for another day or two and start playing with metal again. I wanted to make a ring that was not quite a basic hoop and not too fancy as to detract from the rest of the quiver. Copper twist, that was the answer. This started as a proof of concept which turned into a "I love it and I think I'll keep it" sort of project.
I heated some copper an twisted it. Heated again and hammered flattish and then shaped into a rough circle about the size of the cardboard mock-up I had made previously.

Where the ends butted up I figured I hide the joint with a copper belt hanger. Took some scrap metal from the plate I used for my last "Weights and Measures" project and shaped it as seen below.

Basic rough shaping done. Nothing but a hammer used so far. Not sure I even plan on polishing or filing it. I like the rough look of the copper. I probably won't decide for sure until I settle on a color dye to use on the leather. That's all for now. Back to the tooling since there are no more bits of metal to play with.
