Pages

Tuesday, March 19, 2013

Archery Champions Scroll Illumination

I have been tasked with doing the illumination for this year's Archery Champions Scroll.  I don't much care for nor like the quality of my Calligraphy so when the illumination is completed I will hand off the scroll to another friend who will finish it up.  I searched a long time across many time periods for illuminated manuscripts which depicted archers in action.  I debated long with myself as to the image I should select.  Ultimately I went with the following page as my inspiration:

Illuminated Manuscript, Book of Hours, St. Sebastian, Walters Manuscript W.168, fol. 215v

This fine illuminated Book of Hours was produced in two stages in the second and third quarters of the fifteenth century. The manuscript contains eleven full-page miniatures and twenty historiated initials. The first stage of production includes a section attributed to the Masters of Zweder van Culemborg and the calendar (fols. 3r-14v, 52v-211v), while additional prayers illustrated in the style of the workshop of Willem Vrelant were added later in the fifteenth century (fols. 16r-50v, 213r-223r), presumably when the book was bound in its present binding. The Hours of the Virgin is for the Use of Rome. The Use of the Office of the Dead is unidentified, but the calendar is for the Use of Utrecht. The two separate parts of the manuscript were bound together in Flanders. The sections of W.168 attributed to the Masters of Zweder van Culemborg have been compared to Utrecht, Utrecht University Ms. 1037; Cambridge, Fitzwilliam Museum James Ms. 141; the second hand in New York, Pierpont Morgan Library Ms. M.87; Stockholm, Royal Library A 226, and Philadelphia, Free Library Lewis Ms. 88.

At first I thought about replacing the image of the martyred Saint Sebastian with a target, but I thought on it and decided to simply make the image appear as close to the original as possible.  While we in the SCA reenact and pretend to play warrior I rather think it important to know that the skill we practice was once actually used to commit killings like those depicted.  I hope that the archer who receives the scroll is not only happy with the quality of the workmanship and but can appreciate the historical image and understand the that the skill they now practice was once used for horrendous tasks.

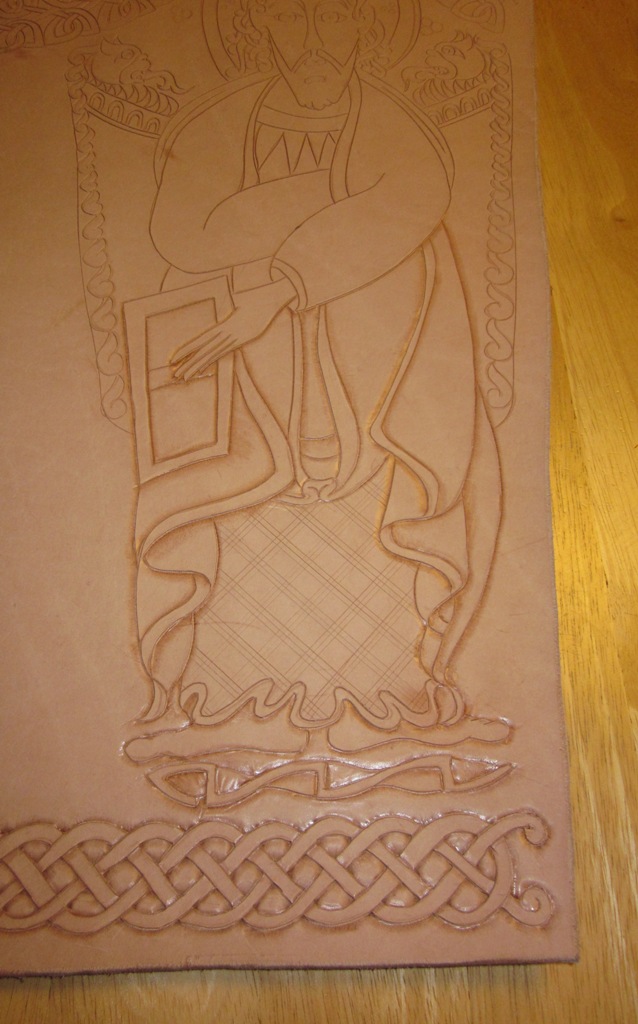
To get things started I sketched out the image on 11x14 Pergamenata. The image was sketched with a mechanical pencil.


Normally I would use a metal tipped dip pen do do all the ink-work  but this time I tried out a new fountain pend that I purchased.  The resulting quality looks much like the original depicted and saved some time since I didn't have to dip the pen 200 times while inking in the outlines.


Here are some progress photos.  I printed out a copy of the original on my color printer and used that as a side by side reference.  The gold work is Holbein Gold Gouache. The rest of the color applied is Reeve's Gouache paint purchased from Michaels.


Close up of the detail work.  I've never done this sort of imagery on a scroll.  The closest thing like this that I have done before was a "period" inspired painting for my game board based on the period painting of the seven deadly sins.  That painting (still not completed) was done in acrylics though.  This is the first time I tried painting an image like this with gouache.  Sort of a trial by fire.  I started by laying down layers of paint which would serve as the background color.  This also helped me space out the image.  I wanted to cover my light pencil sketch lines as well.


As the detail work gets added I imagine that the image in the middle of the illuminated letter will take about 75~80% of the total time spent creating the scroll.  I plan on doing the white work at the very end.  That sort of work I've done a little of before and I have less concern about that.  I want to finish the image in the middle as I have only 5 more days before I have to hand this off to the calligrapher.


 Decided to take a break from the Saint Sebastian painting and finish up some of the detail work around the border.  Added some highlights on the flowers.  I really like this style border and may use it again, without the Saint Sebastian in the middle.


Friday, March 15, 2013

Straight Razor Tonsure

I have generally three personas that I use when doing period reenactments.  Recently I've been doing a Franciscan Friar more and more often.  Each time I do it I do a little more research and try to take the role a little more seriously.  The SCA, which is the reenactment group I play with most often has a huge annual event called Pennsic.  Thousands of folks come from all over the place and dress in  all kinds of manners depicting all types of personas.  Due to family obligations I have only been able to attend this huge event once.  This coming July will be my second trip to the Pennsic War.

I have decided to cast off EVERYTHING modern and adopt fully and completely the role of a late 12th century friar.  To prepare for that 6~7 full immersion I started experimenting in period hygiene tasks.  First and foremost (in my mind) was how would I have cut my hair.  As I understand it when the grey friars went out on a pilgrimage that would typically travel in very small groups, but not usually alone.  I would, therefore, expect to have a traveling companion.  One of us might carry a church owned razor and we would each take turns tonsuring each other at least once every two weeks.  As I am the only friar I know I will have to come up with a good back story as to why my two partners have left but in the end I needed to figure out how to shave my head with a period style razor... by myself.

These pictures were taken by my daughter, who is NOT a fan of this hair style.  While she hates when daddy cuts his hair like this, she does like to take pictures of me doing stuff.  This was my first attempt at a straight razor tonsure and it turned out rather well and no blood was shed.  next time I'll do it with only period soap, and no modern shaving cream!


Tuesday, March 12, 2013

Quiver Continued

The pattern I'm making for the quiver is based on the carpet page from the Book of the Kells featuring Saint Mathew.  While the quiver is not an early period replica, it is simply embellished using a Celtic style design as an inspiration.


I traced my pattern for the space I'd have for the quiver onto a group of 8X10 sheets taped together.  In hind sight I wish I used a single large piece of paper.  Drawing over the tape was a pain in the ....

I stretched the figure out a little bit but wanted to capture enough of the Book of Kells stylistic approach so that the figure would be recognizable.  At this point I was rather concerned that I was perhaps overstepping my ability.  Never having done any serious leather tooling of this size I pondered whether or not it would look like it did in my head.   


To help get the look and feel correct for the knot work here's a little trick I used.  I drew the line of the knotwork and then I thickened it up a bit with a highlighter.  I could add substance to the design with the highlighter and still see the underlying drawing.


After I was satisfied with the shape and size of the knotwork at the top I simply traced around the highlighter with a black marker.  At this point tracking the over/under approach of knotwork was a bit easier to manage.  I could then simply trace those black lines onto the leather.


Since this was a rather huge project I started with the smallest piece to get my beak wet.  I started with the smaller of the two straps which will be connected to the quiver.  The first image is the strap dampened with a sponge.  The second is the same strap about 5~10 minutes later.  When the color of the wet leather goes away tooling can commence.


I did a basic Celtic pattern on the strap using all straight lines.  I will likely come back later and give more texture and depth to some areas, but I first wanted to see if I liked the look and feel of the design.


After tooling was done I took a mallet and gave it a good whack at the ends to crease it where it will be stitched to the quiver.  I found that I had to shave the back of the strap about 1/2 thickness to more easily shape it.  I'll set this aside for now.  So far so good.


Same approach on the larger of the two straps.  Wet with a sponge, wait until surface is try and then whack away.


Here are a couple photos in progress.  I first placed my design on the leather and traced it with a ball point pen.  The pressure from the pen on the wet leather left a mark where I would need to tool.  I then simply followed the lines that the pen made.  Note that the patter on this strap is different.  Yup, that's on purpose.  The thickness of the straps is slightly different and quite plainly I wanted to try out two different patterns.   


I think that the two patterns are quite complementary while not being exactly the same.


Next step... the big stuff.  I used the same ball point pen method to transfer the pattern onto the surface of the wet leather.  I then used a knife to cut slightly into the surface to create a sharp clean edge to tool against.


Before any real tooling could begin I wanted the entire pattern cut.  The next and probably most worrisome portion of the pattern was the knotwork at the top.  Transferring and cutting this portion took A LOT of time.  Not sure exactly how much, but my hand was cramping badly and I had to stop a few times during the process for fear of slipping and ruining the whole thing.  Definitely the most difficult portion of the project thus far.


Now... Mathew needs to make his presence known.  Same process.  Wet, trace, cut the leather.


At this point I began to get very happy.  I really liked the way the image was taking shape.  Even if I simply cut the image in and painted it I would be happy.  I won't do that of course, but I would be happy.  I am not exactly sure how I will give depth and detail to the image but so far the progress is exceeding my expectations.


CUTTING IS DONE.  Now the tooling can begin.  Another scary step.  Every project I do where any point of potential for failure causing the project to start over causes me stress.  I don't like that stress, but I find that if I just keep plugging through I am always more pleased with the outcome.  That may be why I like to keep doing new things.  There is more stress and therefore pleasure from trying a potentially new disaster as opposed to doing the same thing over and over.  Not sure if that makes sense.  At this point the stress got to me though and I had to let it sit in this state for a few days before I could muster the gusto to begin the whacking with the mallet.


To begin the image tooling I picked what I thought would be the easiest area.  The style of the knotwork at the bottom was quit a bit like the tooling I did on a recent archery bracer.  I was pretty sure I could handle this portion.  I started by wetting the leather and pressing some basic shading in by hand with a smoothing tool.  Once the basic over/under shading was established I came back with the mallet and tools to set the shading in deeper and clean up the corners.  After I finish the whole piece I'll come back in and clean up some detail stuff before dying it.


Similar approach as I worked my way up the image.  I found it to be basically like relief carving but instead of cutting material away you simply press it down.  The one major difference is the depth of the relief.  I've done carvings before but nothing so shallow as leather tooling.  Can't get a good picture with my crummy camera.  Tried a few angles to get the shading, but I don't think the pics do it justice. 


Basic shallow image coming in.  Trying to take baby steps.  once you mash the leather down and find that the image is not correct, much like carving, there is no way to get that material back to it's original state.  Baby steps.... baby steps...


Lots of stress and arm cramping so I decided to set this down for another day or two and start playing with metal again.  I wanted to make a ring that was not quite a basic hoop and not too fancy as to detract from the rest of the quiver.  Copper twist, that was the answer.  This started as a proof of concept which turned into a "I love it and I think I'll keep it" sort of project.

I heated some copper an twisted it.  Heated again and hammered flattish and then shaped into a rough circle about the size of the cardboard mock-up I had made previously.


Where the ends butted up I figured I hide the joint with a copper belt hanger.  Took some scrap metal from the plate I used for my last "Weights and Measures" project and shaped it as seen below.


Basic rough shaping done.  Nothing but a hammer used so far.  Not sure I even plan on polishing or filing it.  I like the rough look of the copper.  I probably won't decide for sure until I settle on a color dye to use on the leather.  That's all for now.  Back to the tooling since there are no more bits of metal to play with.


Friday, March 1, 2013

Pinner's Bone

Here are some extant examples of Pinner's bones.  These were one of the tools used by a pinner, or pin maker to aid in sharpening the end of the pin in a consistent manner.


http://www.nuernberger-hausbuecher.de

The way the pinner's bone was used is demonstrated below.  The pinner would obtain already drawn wire from a wire drawer.  The image at the right is one of many depicted wire-drawers working at their craft.  The pinner would take the hardened wire and lie it along the groove in the end of the bone with the future end of the pin pointing towards the bone.


In this position the pinner would use a metal file across the flattened portion of the bone.  Using the file while slowly rotating the future pin would take off metal from the wire in a consistent manner so as to form a consistently shaped pinpoint on every pin.


In the image below the darker section of the wire would have been removed from the wire and the remaining wire would result in a consistently sharpened pin.


I'll be doing a demonstration at a future event on pin making.  I've made a ton of pins, but have never actually used a period style pinner's bone.  I usually use my small metal anvil.  For the demo I created the pinner's bone depicted below.


 I used a small metal file to easily cut into the bone.  I made a variety grooves in the bone, similar to the period bones I have seen.  Due to the varied shape of the bone I expect this will allow for a variety of positions to hold the bone.  I haven't tried using it yet so I'm not sure exactly how well it will work.